



Handbrake Cable Adjuster (1992-95)
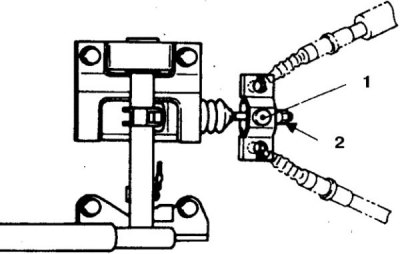
1. Pin
2. Nut
Cars 1983-91.
1. Check and, if necessary, adjust the clearance between the pads and drums.
2. Check the lever travel – with a force of 18.2 kgf, the lever should move 4–5 clicks and completely brake the car.
3. If the number of clicks is not within the norm, adjust the cable as follows.
4. Release the lever and, working under the vehicle, tighten the cable by turning the cable tension adjuster nut.
5. Start the engine and at idle speed, apply and release the brake lever, press the brake pedal several times.
6. Repeat this procedure until the automatic regulator operates (determined by clicking).
7. Check the lever travel until it is fully braked; adjust the tension if necessary.
8. Continue the procedure until the lever stroke is normal.
9. Raise the rear of the vehicle, release the brake lever and check that the wheels rotate freely.
Cars 1992-98.
1. Check the lever travel – the lever should move 4–6 clicks until the car is completely braked.
The article is based on data from the website: mitsubishiman
2. If the number of clicks is not within the norm, adjust the cable as follows.
3. Loosen the nut and loosen the brake cable.
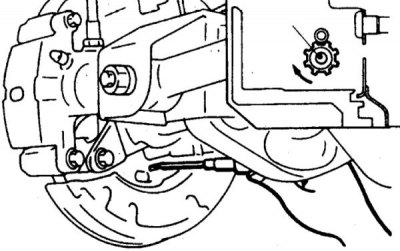
4. Remove the plug in the brake shield and spread the pads by rotating the adjuster sprocket through the hole (the disk should not rotate).
5. Loosen the sprocket by 3-4 teeth.
6. Turn the adjusting nut to adjust the brake lever stroke. If the lever stroke is less than normal, the cause is excessive cable tension.
7. Make sure there is no play between the nut and the cable adjuster pin.
8. Raise the rear of the vehicle, release the brake lever and check that the wheels rotate freely.