



Contents: Mirage models with rear drum brakes ⤓ Mirage models with rear disc brakes ⤓ Galant models up to 1993 with rear…⤓ Galant models up to 1993 with rear…⤓ Galant models from 1994 with drum…⤓ Galant models from 1994 with rear…⤓ Diamante Models ⤓
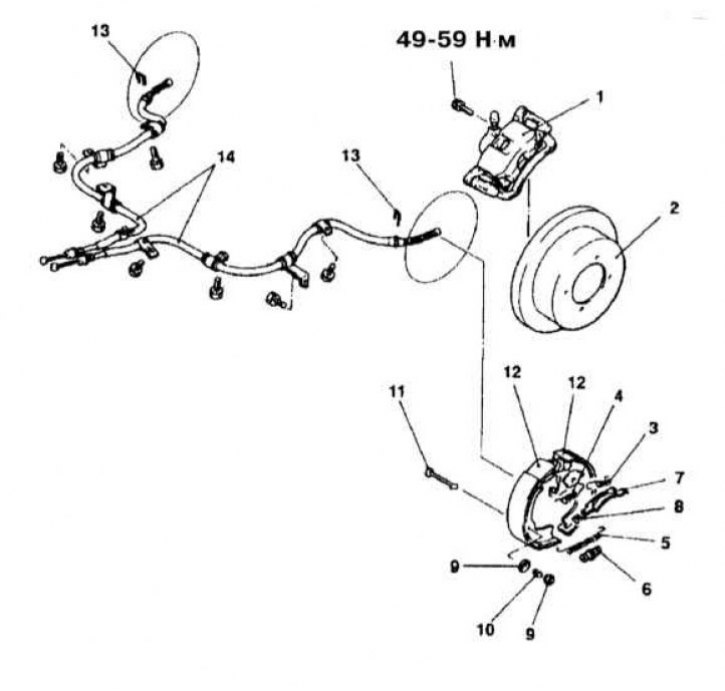
Parking brake drive design on Galant models 1994-1995, equipped with rear disc brakes
1 - Assembling the brake mechanism; 2 - Brake disc; 3 - Rear brake shoe anchor spring; 4 - Front brake shoe anchor spring; 5 - Adjustment wheel spring; 6 - Regulator; 7 - Spacer bar; 8 - Return spring of the spacer bar; 9 - Shoe guide spring plate; 10 - Shoe guide spring; 11 - Anchor pin; 12 - Brake shoe assemblies; 13 - Retainer; 14 - Parking brake cable
Attention! If the vehicle is equipped accordingly, before proceeding to remove the parking brake cables, turn off the SRS (airbags)!
Mirage models with rear drum brakes
Removal
1. Disconnect the negative cable from the battery.
Warning! If the car stereo system is equipped with a security code, make sure you have the correct combination to activate the audio system before disconnecting the battery!
2. Remove the mounting screws and remove the rear section of the center console.
Attention! On models equipped with the additional safety system, try not to subject the SRS diagnostic unit to impact loads!
3. Remove the rear seat cushion.
4. Remove the clamp securing the center section of the drive cable and release the bushing.
5. Jack up the car and place it on supports.
6. Remove the rear wheels, brake drums and shoe assemblies (see Sections Removal, installation and inspection of the brake drum и Checking the condition of the brake shoes).
7. Disconnect the drive cable end from the parking brake lever.
8. Squeeze the clamps and disconnect the drive cable from the brake shield.
9. Release the cable from all the provided intermediate fasteners and remove it from the vehicle.
Installation
1. Sometimes drive cables are marked with different colors for identification purposes. Check the cables for identification markings.
2. Connect the cable to the rear actuator and secure it with a special clamp and spring clamp.
3. Install the brake shoes and drum.
4. Loosely secure the cable in the intermediate clamps.
5. Connect the cables to the actuator in the vehicle interior.
6. Adjust the rear wheel brake shoes.
7. Check that the cable assembly is securely latched into all the provided fasteners.
8. After completing all adjustments, apply and release the parking brake several times.
9. Jack up the rear of the vehicle and check that the rear wheels rotate freely with the parking brake released.
10. Install the center console and rear seat assembly.
11. Connect the negative cable to the battery.
12. Check that the parking brake holds the vehicle securely on the slope.
Mirage models with rear disc brakes
Removal
1. Disconnect the negative cable from the battery.
Warning! If the car stereo system is equipped with a security code, make sure you have the correct combination to activate the audio system before disconnecting the battery!
2. Remove the mounting screws and remove the rear section of the center console.
Attention! On models equipped with the additional safety system, try not to subject the SRS diagnostic unit to impact loads!
3. Remove the rear seat cushion.
4. Loosen the adjusting nut and disconnect the drive cables from the actuator.
5. Remove the clamp securing the center section of the drive cable and release the bushing.
6. Jack up the car and place it on supports.
7. Disconnect the drive cable end from the parking brake assembly.
8. Squeeze the clamps and disconnect the drive cable from the brake shield.
9. Release the cable from all the provided intermediate fasteners and remove it from the vehicle.
Installation
1. Sometimes drive cables are marked with different colors for identification purposes. Check the cables for identification markings.
2. Connect the cable to the rear actuator and secure it with a special clamp and spring clamp.
3. Loosely secure the cable in the intermediate clamps.
4. Connect the cables to the actuator in the vehicle interior.
5. Check that the cable assembly is securely locked into all the provided fasteners.
6. By tightening the adjusting nut, remove the slack from the cable.
7. Adjust the parking brake (see Section Adjusting the parking brake).
8. After completing the adjustment, apply and release the parking brake several times.
9. Jack up the rear of the vehicle and check that the rear wheels rotate freely with the parking brake released.
10. Install the center console and rear seat assembly.
11. Connect the negative cable to the battery.
Galant models up to 1993 with rear drum brakes
Removal
1. Disconnect the negative cable from the battery.
Warning! If the car stereo system is equipped with a security code, make sure you have the correct combination to activate the audio system before disconnecting the battery!
2. Remove the center console side trim panels.
3. On models with manual transmission, remove the handle from the gearshift lever. On models with automatic transmission, remove the selector lever trim.
4. Remove the switch panel/console storage box and remove the two mounting screws located underneath it.
5. Remove the radio trim panel.
6. Remove the radio.
7. Remove the inner console trim panel and unscrew the two screws located underneath it.
8. Remove the remaining mounting screws located on the sides of the console assembly.
9. Remove the center console.
10. Press down the front edge of the rear seat cushion, release the locking levers and remove the cushion.
11. Loosen the cable tension adjuster on the equalizer assembly.
12. Remove the clamp securing the central section of the drive cable and release the bushing.
13. Jack up the car and place it on supports.
14. Remove the rear wheels, brake drums and shoe assemblies (see Sections Removal, installation and inspection of the brake drum и Checking the condition of the brake shoes).
15. Disconnect the drive cable end from the parking brake lever.
16. Squeeze the clamps and disconnect the drive cable from the brake shield.
17. Release the cable from all the provided intermediate fasteners and remove it from the vehicle.
Installation
1. Sometimes drive cables are marked with different colors for identification purposes. Check the cables for identification markings.
2. Connect the cable to the rear actuator and secure it with a special clamp and spring clamp.
3. Install the brake shoes and drum.
4. Loosely secure the cable in the intermediate clamps.
5. Connect the cables to the actuator in the vehicle interior. Turn the adjusting nut to remove any slack in the cable assembly.
6. Adjust the parking brake (see Section Adjusting the parking brake).
7. Check that the cable assembly is securely latched into all the provided fasteners.
8. After completing all adjustments, apply and release the parking brake several times.
9. Adjust the rear wheel brake shoes.
10. Jack up the rear of the vehicle and check that the rear wheels rotate freely with the parking brake released.
11. Install the center console and rear seat assembly.
12. Connect the negative cable to the battery.
13. Check the proper functioning of the electrical equipment built into the console assembly.
14. Check that the parking brake holds the vehicle securely on the slope.
Galant models up to 1993 with rear disc brakes
Removal
1. Disconnect the negative cable from the battery.
Warning! If the car stereo system is equipped with a security code, make sure you have the correct combination to activate the audio system before disconnecting the battery!
2. Remove the center console side trim panels.
3. On models with manual transmission, remove the handle from the gearshift lever. On models with automatic transmission, remove the selector lever trim.
4. Remove the switch panel/console storage box and remove the two mounting screws located underneath it.
5. Remove the radio trim panel.
6. Remove the radio.
7. Remove the inner console trim panel and unscrew the two screws located underneath it.
8. Remove the remaining mounting screws located on the sides of the console assembly.
9. Remove the center console.
10. Press down the front edge of the rear seat cushion, release the locking levers and remove the cushion.
11. Loosen the adjusting nut and disconnect the rear sections of the cable assembly from the actuator.
12. Remove the clamp securing the central section of the drive cable and release the bushing.
13. Jack up the car and place it on supports.
14. Release the lock and the retaining ring securing the cable to the rear wheel brake caliper.
15. Disconnect the cable end from the caliper.
16. Release the cable from all the provided intermediate fasteners and remove it from the vehicle.
Installation
1. Sometimes drive cables are marked with different colors for identification purposes. Check the cables for identification markings.
2. Connect the cable to the actuator on the caliper assembly and secure it with the retainer and snap ring.
3. Loosely secure the cable in the intermediate clamps.
4. Connect the cables to the actuator in the vehicle interior. Tighten the adjusting nut to remove any slack from the cable assembly.
5. Adjust the stroke of the drive cable (see Section Adjusting the parking brake).
6. Check that the cable assembly is securely latched into all provided fasteners.
7. After completing all adjustments, apply and release the parking brake several times.
8. Jack up the rear of the vehicle and check that the rear wheels rotate freely with the parking brake released.
9. Install the center console and rear seat assembly.
10. Connect the negative cable to the battery.
11. Check the proper functioning of the electrical equipment built into the console assembly.
12. Conduct road tests of the vehicle.
13. Check that the parking brake holds the vehicle securely on the slope.
Galant models from 1994 with drum brakes on the rear wheels
Removal
1. Disconnect the negative cable from the battery.
Warning! If the car stereo system is equipped with a security code, make sure you have the correct combination to activate the audio system before disconnecting the battery!
2. On models with manual transmission, remove the handle from the gearshift lever. On models with automatic transmission, remove the selector lever trim.
3. Remove the instrument section of the center console.
4. Remove the console storage box.
5. Remove the two screws securing the center section of the console.
6. Remove the four screws securing the side panels and remove the console from the vehicle.
7. Loosen the adjusting nut and release the drive cable from the vehicle interior.
8. Jack up the car and place it on supports.
9. Remove the rear wheels, brake drums and shoe assemblies (see Sections Removal, installation and inspection of the brake drum и Checking the condition of the brake shoes).
10. Disconnect the drive cable end from the parking brake lever.
11. Squeeze the clamps and disconnect the drive cable from the brake shield.
12. Release the cable from all the provided intermediate fasteners and remove it from the vehicle.
Installation
1. Connect the cable to the rear actuator and secure it with a special clamp and spring clamp.
2. Install the brake shoes and drum.
3. Loosely secure the cable in the intermediate clamps.
4. Connect the cables to the actuator in the vehicle interior.
5. Turn the adjusting nut to select the slack in the cable assembly.
6. Adjust the parking brake (see Section Adjusting the parking brake).
7. Check that the cable assembly is securely latched into all the provided fasteners.
8. After completing all adjustments, apply and release the parking brake several times.
9. Adjust the rear wheel brake shoes.
10. Jack up the rear of the vehicle and check that the rear wheels rotate freely with the parking brake released.
11. Install the center console.
12. Connect the negative cable to the battery.
13. Check the proper functioning of the electrical equipment built into the console assembly.
14. Check that the parking brake holds the vehicle securely on the slope.
Galant models from 1994 with rear disc brakes
Removal
1. Unlike the previously discussed options, these models do not have a parking brake built into the brake caliper. In this case, separate friction shoes are used, installed behind the brake disc.
2. Disconnect the negative cable from the battery.
Warning! If the car stereo system is equipped with a security code, make sure you have the correct combination to activate the audio system before disconnecting the battery!
3. On models with manual transmission, remove the handle from the gearshift lever. On models with automatic transmission, remove the selector lever trim.
4. Remove the instrument section of the center console.
5. Remove the console storage box.
6. Remove the two screws securing the center section of the console.
7. Remove the four side screws and remove the console assembly.
8. Loosen the adjusting nut and release the cable assembly from the vehicle interior.
9. Jack up the car and place it on supports.
10. Remove the rear wheel, brake caliper and disc (see Sections Removal and installation of disc brake calipers и Removal, condition check and installation of the brake disc).
11. Remove the parking brake friction shoes (see Section Removal and installation the parking brake friction shoes (models with rear disc brakes)).
12. Disconnect the cable assembly from the parking brake actuator lever.
13. Release the clamps and release the cable from the brake shield.
14. Release the lock and the retaining ring securing the cable to the rear wheel brake caliper.
15. Release the cable from all the provided intermediate fasteners and remove it from the vehicle.
Installation
1. Connect the cable to the rear actuator and secure it with the clamp and snap ring.
2. Install the parking brake friction shoes.
3. Install the brake disc and caliper (see Sections Removal and installation of disc brake calipers и Removal, condition check and installation of the brake disc).
4. Loosely secure the cable in the intermediate clamps.
5. Connect the cables to the actuator in the vehicle interior.
6. Tighten the adjusting nut to remove any slack from the cable assembly.
7. Adjust the stroke of the drive cable (see Section Adjusting the parking brake).
8. Check that the cable assembly is securely latched into all the provided fasteners.
9. After completing all adjustments, apply and release the parking brake several times.
10. Jack up the rear of the vehicle and check that the rear wheels rotate freely with the parking brake released.
11. Install the center console.
12. Connect the negative cable to the battery.
13. Check the proper functioning of the electrical equipment built into the console assembly.
14. Conduct road tests of the vehicle.
15. Check that the parking brake holds the vehicle securely on the slope.
Diamante Models
Removal
Attention! Work should be started at least 90 seconds after the ignition key is turned to the LOCK position and the negative cable is disconnected from the battery! If the vehicle is equipped accordingly, do not forget to also turn off the airbags.
1. On Diamante models, the rear wheels are equipped with disc brakes with separate friction shoes for the parking brake. The shoes are located behind the brake disc.
2. Disconnect the negative cable from the battery.
Warning! If the car stereo system is equipped with a security code, make sure you have the correct combination to activate the audio system before disconnecting the battery!
3. On models with manual transmission, remove the handle from the gearshift lever. On models with automatic transmission, remove the selector lever trim.
4. Remove the ashtray/switch panel from the center console assembly.
5. Remove the two screws located in the center of the console.
6. Remove the side screws and remove the console assembly from the vehicle.
Attention! On models equipped with the additional safety system, try not to subject the SRS diagnostic unit to impact loads!
7. Loosen the adjusting nut and pull down to release the cable assembly from the vehicle interior.
8. Jack up the car and place it on supports.
9. Remove the rear wheel, brake caliper and disc (see Sections Removal and installation of disc brake calipers и Removal, condition check and installation of the brake disc).
10. Remove the parking brake friction shoes (see Section Removal and installation the parking brake friction shoes (models with rear disc brakes)).
11. Disconnect the cable assembly from the parking brake actuator lever.
12. Release the clamps and release the cable from the brake shield.
13. Release the cable from all the provided intermediate fasteners and remove it from the vehicle.
Installation
1. Connect the cable to the rear actuator and secure it with the clamp and snap ring.
2. Install the parking brake friction shoes.
3. Install the brake disc and caliper (see Sections Removal and installation of disc brake calipers и Removal, condition check and installation of the brake disc).
4. Loosely secure the cable in the intermediate clamps.
5. Connect the cables to the actuator in the vehicle interior.
6. Tighten the adjusting nut to remove any slack from the cable assembly.
7. Adjust the stroke of the drive cable (see Section Adjusting the parking brake).
8. Check that the cable assembly is securely locked into all the provided fasteners.
9. After completing all adjustments, apply and release the parking brake several times.
10. Jack up the rear of the vehicle and check that the rear wheels rotate freely with the parking brake released.
11. Install the center console.
12. Connect the negative cable to the battery.
13. Check the proper functioning of the electrical equipment built into the console assembly.
14. Check that the parking brake holds the vehicle securely on the slope.