
English Русский
Български
Беларускі
Український
Српски
Hrvatski
Română
Polski
Slovenský
Magyar
Articles Bookmark Contacts Sitemap   
Company Audi Company Ford Company Hyundai Company Kia Company Mazda Company Mercedes-Benz Company Nissan
MitsubishiMan.ru


Home Colt Lancer Galant L200 Outlander Pajero Others
Galant 6 and 7 (1987-1998) Galant 5 (1983-1989, petrol)

Removal, installation and inspection of the brake drum (Mitsubishi Galant 6)

  • Home
  • Galant
  • 6 (1987-1998)
  • Chassis and running gear
  • Brake system
  • Removal, installation and inspection of the brake drum
0
Contents: Mirage models produced up to 1992. ⤓ Galant and Mirage models since 1993. ⤓


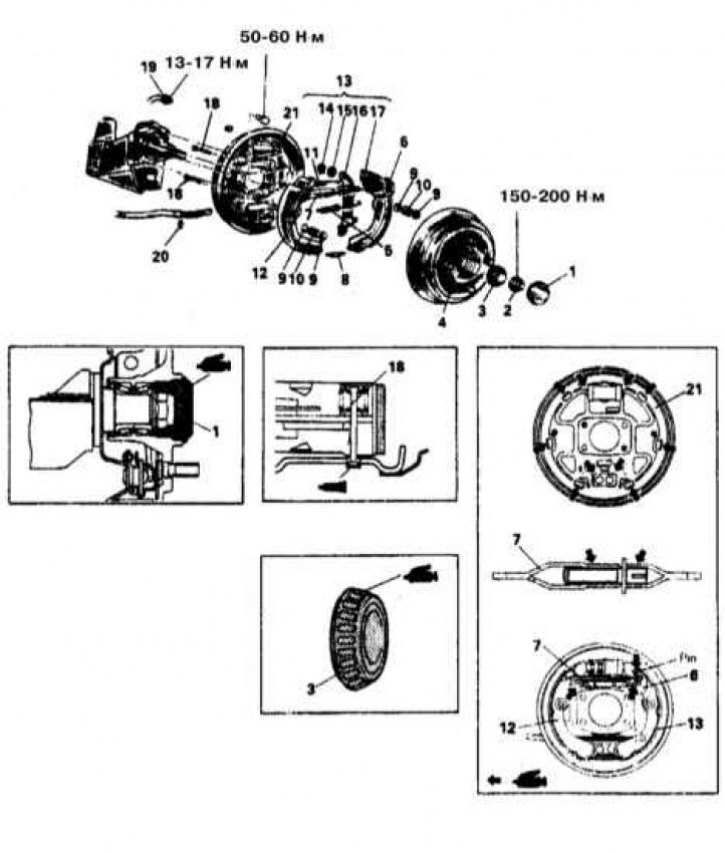
The design of the drum brake mechanism used on Mirage models up to 1992.
1 - Hub nut cover; 2 - Hub nut; 3 - Inner race of outer bearing; 4 - Brake drum; 5 - Spring for attaching the shoe to the regulator lever; 6 - Regulator lever; 7 - Assembling the automatic regulator; 8 - Lower tension spring; 9 - Spring guide plates; 10 - Shoe guide springs; 11 - Upper tension spring; 12 - Brake shoe; 13 - Assembling the shoe with the anchor unit; 14 - Holder; 15 - Wave washer; 16 - Parking brake actuator lever; 17 - Brake shoe; 18 - Anchor pin; 19 - Brake pipe; 20 - Retaining ring; 21 - Brake shield
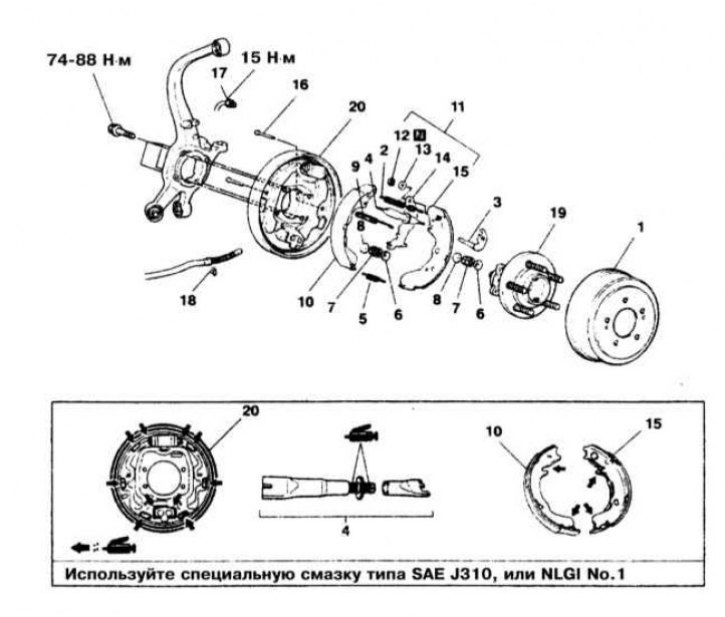


The design of the drum brake mechanism used on Galant and Mirage models since 1993.
1 - Brake drum; 2 - Spring for fastening the shoe to the regulator lever; 3 - Regulator lever; 4 - Assembling the automatic regulator; 5 - Lower tension spring; 6 - Spring guide plates; 7 - Shoe guide springs; 8 - Spring guide plates; 9 - Upper tension spring; 10 - Brake shoe with friction lining; 11 - Assembling the brake shoe with the adjusting lever; 12 - Holder; 13 - Wave washer; 14 - Parking brake actuator lever; 15 - Brake shoe with friction lining; 16 - Anchor pin; 17 - Brake pipe; 18 - Retaining ring; 19 - Hub assembly; 20 - Brake shield


Warning! Remember that the dust generated during operation of the brake mechanisms may contain asbestos, which is extremely harmful to human health. Never blow off dust with compressed air or inhale it - wear a protective mask or respirator when servicing the mechanisms. Never use gasoline or petroleum-based solvents to wipe brake system components - use only branded cleaning agents or methyl alcohol!


Mirage models produced up to 1992.


Removal


1. The design of the drum brake mechanism used on Mirage models up to 1992 is shown in the illustration.

2. Jack up the car and place it on supports.

3. Remove the corresponding rear wheel.

4. Remove the hub nut dust cover.

5. Remove the self-locking hub nut.

6. Remove the outer wheel bearing.

7. Remove the brake drum assembly with the inner wheel bearing from the spindle.

8. Remove the oil seal.

Installation


1. To check the suitability of the self-locking nut for further use, screw it onto the spindle so that the end of the latter protrudes outward by approximately 3 mm. Measure the torque of resistance to counterclockwise rotation of the nut. The measurement result is less than 5.5 N·m, the nut must be replaced.

2. Lubricate and install the inner bearing.

3. Install the new oil seal.

4. Place the brake drum on the spindle.

5. Lubricate and install the outer wheel bearing.

6. Tighten the self-locking hub nut to the required torque (150÷200 Nm).

7. Install the protective cover.

Checking the status
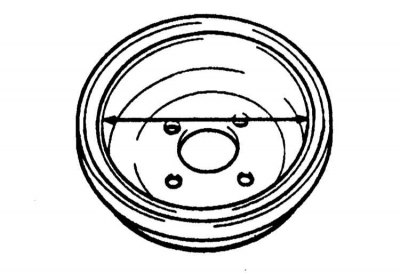


1. Measure the inner diameter of the brake drum removed from the vehicle - in order to identify signs of ovality, the measurement should be taken at several points.


2. If the measurement result exceeds the maximum permissible value (231 mm), replace the drum complete with shoes (see Section Removal and installation brake shoes).

Galant and Mirage models since 1993.


Removal


1. The design of the drum brake mechanism used on Galant and Mirage models since 1993 is shown in the illustration.

2. Jack up the car and place it on supports.

3. Remove the corresponding rear wheel.

4. Loosen the parking brake actuator adjusting nut.
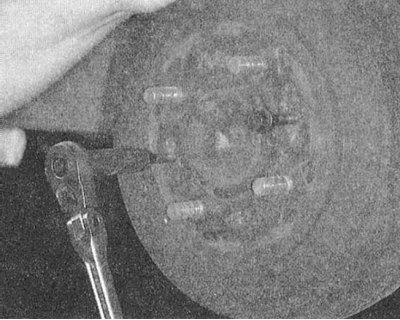


5. Pull the brake drum off the hub assembly - if necessary, tap the assembly with a soft-faced hammer to loosen it. If the disc is stuck and cannot be removed, screw a pair of bolts of the appropriate size into the two specially provided threaded holes in its front surface and, gradually tightening them, loosen the drum.

Installation


1. Install the drum onto the hub.

2. Install the wheel and adjust the parking brake drive.

3. Lower the vehicle to the ground.
This article is available at: russian, bulgarian, belarusian, ukrainian, serbian, croatian, romanian, polish, slovak, hungarian
This article was reviewed by: Dmitry Vasiliev
Share with friends:
◀ Previous
Galant 6 and 7: Brake system
Next ▶

Drum brakes — general information
Removal, condition check and installation of the brake disc
Restorative repair of the disc brake caliper
Removal and installation of disc brake calipers
Replacing disc brake pads
Checking the condition of the brake shoes
Removal and installation brake shoes
Adjustment of drum brake mechanisms
Removal, restoration and installation of wheel cylinders
Removal and installation the parking brake cable(s)
Similar materials for other Mitsubishi models

➤ Rear wheel drum brake shoes — removal and installation Mitsubishi Colt 4 and 5 (1991-2003)
➤ Removal and installation the rear wheel hub/brake drum Mitsubishi Lancer 3 and 5 (1984-1992)
➤ Checking the thickness of the rear drum brake shoes and… Mitsubishi L200 4 (2005-2014, diesel)
➤ Disassembling and assembling the rear drum brake Mitsubishi Outlander 1 (2003-2008)
➤ Rear drum brake shield Mitsubishi Pajero 1 and 2 (1982-1999)
➤ Checking the thickness of the brake shoe linings of drum… Mitsubishi Carisma (1995-2004)
Link in different formats to this article
Comments and feedback from visitors
No comments yet


Add up two numbers 39 + 20


Galant 6 and 7 (1987-1998) 
  • General information
  • Introduction to guide
  • User manual
  • Driving and operation
  • Maintenance
  • Power unit
  • Dismantling the engine
  • Engine overhaul
  • Cooling and heating
  • Power and exhaust systems
  • Engine electrical equipment
  • Engine management systems
  • Transmission
  • Mechanical gearbox
  • Automatic gearbox
  • Clutch
  • Drive shafts and transfer case
  • Chassis and running gear
  • Brake system
  • Car suspension
  • Steering
  • Body and interior
  • Exterior (external elements)
  • Interior (internal elements)
  • Doors, locks and windows
  • Electrical equipment
  • Equipment and devices
  • Wiring diagrams Galant
  • Wiring diagrams Mirage
  • Wiring diagrams Diamante
Galant 5 (1983-1989, petrol) 
  • General information
  • Troubleshooting
  • Maintenance
  • Power unit
  • Engine repair
  • Engine overhaul
  • Cooling and heating
  • Fuel and exhaust system
  • Engine electrical equipment
  • Reducing exhaust toxicity
  • Transmission
  • Manual gearbox
  • Automatic gearbox
  • Clutch and drive shafts
  • Chassis and running gear
  • Brake system
  • Car suspension
  • Steering
  • Body and interior
  • Exterior (external elements)
  • Interior (internal elements)
  • Doors, locks and windows
  • Electrical equipment
  • Equipment and devices
  • Electrical diagrams
MitsubishiMan.ru © 2018–2026 • Mobile version • Articles about Mitsubishi • Contacts • Sitemap: EN BG BY UA RS HR RO PL SK HU • Site search • Bookmark
Colt 2 and 3 (1983-1993) · Colt 4 and 5 (1991-2003) · Colt 5 (1995-2003) · Lancer 3 and 5 (1984-1992) · Lancer 9 (2000-2007) · Galant 5 (1983-1989) · Galant 6 and 7 (1987-1998) · L200 4 (2005-2014) · Outlander 1 (2003-2008) · Pajero 1 and 2 (1982-1999) · Pajero 4 (2006-2021) · Carisma (1995-2004) · Space Star (1998-2005) ·
This resource sets cookies 🍪 to avoid bothering you with repeated data entry.