
English Русский
Български
Беларускі
Український
Српски
Hrvatski
Română
Polski
Slovenský
Magyar
Articles Bookmark Contacts Sitemap   
Company Audi Company Ford Company Hyundai Company Kia Company Mazda Company Mercedes-Benz Company Nissan
MitsubishiMan.ru


Home Colt Lancer Galant L200 Outlander Pajero Others
Lancer 9 (2000-2007, petrol) Lancer 3 and 5 (1984-1992)

Removal and installation the rear wheel hub/brake drum (Mitsubishi Lancer 3)

  • Home
  • Lancer
  • 3 (1984-1992)
  • Chassis and running gear
  • Rear suspension
  • Removal and installation the rear wheel hub/brake drum
0
Contents: Removal ⤓ Installation ⤓
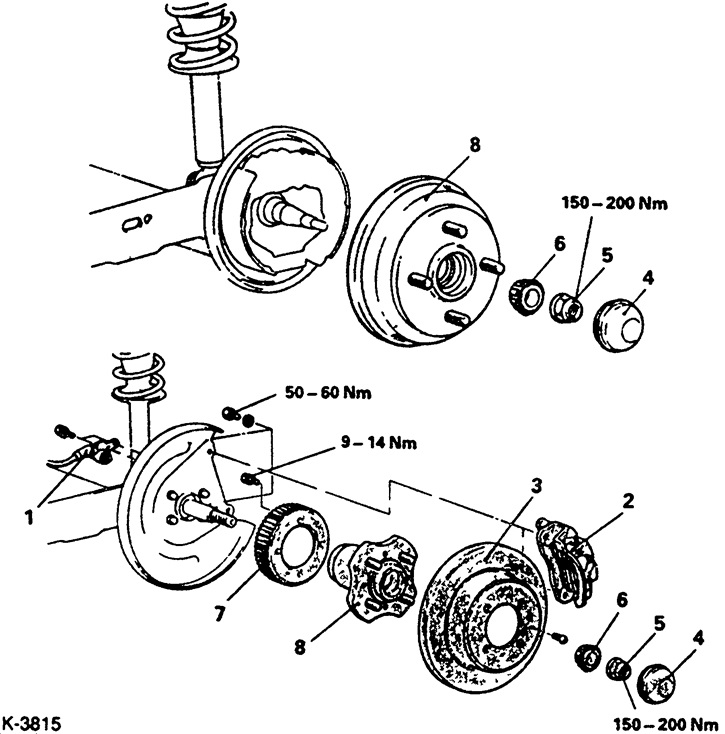

Cars produced from 9.88 to 3.92
1 - Wheel speed sensor (only on vehicles with ABS)
2 - Brake caliper
3 - Brake disc
4 - Hub cap
5 - Self-locking nut
6 - Inner race of outer wheel bearing
7 - Rotor (only on vehicles with ABS)
8 - Rear wheel hub


Removal


Carefully knock off the hub cap "4" with a plastic or rubber hammer.

Set the handbrake and loosen the self-locking nut "5" without unscrewing it.

Remove the brake caliper, see p. 18.5.

Remove the brake disc "3" by unscrewing the retaining bolt.

If present, remove the wheel speed sensor.

9 Loosen nut "5" and remove outer roller bearing "6". Do not drop the bearing.

9 Remove the brake drum/wheel hub.

On vehicles with ABS: Remove the wheel hub and rotor.

Caution: Handle the rotor with care. The rotor teeth must not be scratched or damaged, as this may adversely affect the functioning of the ABS.


Installation


Check the condition of the sealing ring on the rear of the hub/drum. If traces of grease are visible, replace the ring.

Make sure that there are no chipped areas or changes in the color of the surface of the bearings and their races.


Check the hub/brake drum for wear or damage.

Insert the hub/brake drum and, if applicable, the rotor. Possibly tap the hub/brake drum in with a plastic hammer.

Fill with bearing grease and insert the outer bearing.

Tighten the new self-locking nut to 150 Nm (100 Nm on cars manufactured from 1.84 to 8.88). Clamp a tire iron between the studs to prevent the hub from turning (do not damage the threads). High tightening force! Place the wrench horizontally to prevent the car from sliding off the supports when tightening. Tighten the nut in several steps, turning the hub/brake drum in different directions in between to prevent the bearing from seizing.

Note: The old nut can be tested for re-installation. To do this, screw the nut onto the wheel stub by 2 and 3 mm. Loosen the nut with a torque wrench. If the loosening force exceeds 5.5 Nm, the nut can be re-installed.
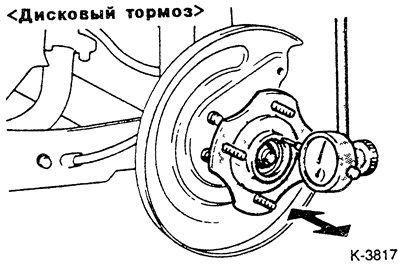


Check the play of the hub bearings. The required value is 0.2 mm. If the play is large, tighten the hub nut to a maximum of 200 Nm (on cars manufactured from 1.84 to 8.88 - 150 Nm) until the required play value is achieved.

If available, secure the wheel speed sensor.
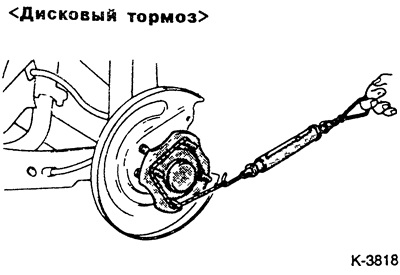


Check the bearing breakaway torque. To do this, attach a cord to the hub/brake drum studs as shown in the figure. Attach a spring balance to the other end of the cord and pull at a 90° angle to the studs until the hub/brake drum starts to rotate. The spring scale (spring balance) readings should not exceed 2.2 kg (on vehicles manufactured from 1.84 to 8.88, 1.7 kg, with the spring balance attached directly to the lower stud). If the breakaway torque is too high, loosen the hub nut slightly. If the required tightening force (150 Nm - 200 Nm), bearing play and breakaway torque values cannot be achieved simultaneously, replace the hub bearings.

The material is based on data from the website: MitsubishiMan
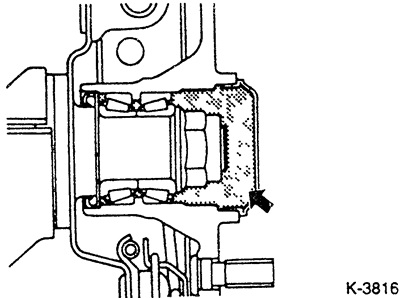


Fill the hub cap with bearing grease and press it in until it stops.


Install the brake disc.

Install the brake caliper, see paragraph 18.5.
This article is available at: russian, bulgarian, belarusian, ukrainian, serbian, croatian, romanian, polish, slovak, hungarian
This article was reviewed by: Dmitry Vasiliev
Share with friends:
◀ Previous
Lancer 3 and 5: Rear suspension
Next ▶

Removal and installation rear wheel bearings
Rear wheel bearings
Disassembling the rear spring strut / Removing and installing the shock absorber / coil spring
Removal and installation shock absorber/coil spring
Removal and installation the rear spring strut
Checking the hub bearings
Similar materials for other Mitsubishi models

➤ Rear wheel drum brake shoes — removal and installation Mitsubishi Colt 4 and 5 (1991-2003)
➤ Checking, lubricating and adjusting rear wheel bearings… Mitsubishi Galant 5 (1983-1989, petrol)
➤ Checking the thickness of the rear drum brake shoes and… Mitsubishi L200 4 (2005-2014, diesel)
➤ Disassembling and assembling the rear drum brake Mitsubishi Outlander 1 (2003-2008)
➤ Rear drum brake wheel cylinder Mitsubishi Pajero 1 and 2 (1982-1999)
➤ Checking the functionality of the rear brake pressure… Mitsubishi Carisma (1995-2004)
Link in different formats to this article
Comments and feedback from visitors
No comments yet


Add up two numbers 43 + 15


Lancer 9 (2000-2007, petrol) 
  • General information
  • User manual
  • Maintenance
  • Power unit
  • Repair of MPI engines
  • Repair of GDI engines
  • Engine overhaul
  • Cooling and lubrication system
  • MPI fuel injection system
  • GDI fuel injection system
  • Intake and exhaust system
  • Starting and charging system
  • Transmission
  • Automatic gearbox
  • Variator (CVT)
  • Drive shafts and gearbox
  • Chassis and running gear
  • Front suspension
  • Rear suspension
  • Steering
  • Brake system
  • Body and interior
  • Doors, locks and windows
  • Exterior (external elements)
  • Interior (internal elements)
  • Electrical equipment
  • Heater and air conditioner
  • Security system SRS
  • Equipment and devices
  • Wiring diagrams (saloon)
  • Wiring diagrams (wagon)
Lancer 3 and 5 (1984-1992) 
  • General information
  • Maintenance
  • Power unit
  • Engine repair
  • Lubrication system
  • Cooling system
  • Ignition system
  • Fuel system
  • Carburetor
  • Fuel injection
  • Diesel power system
  • Exhaust system
  • Transmission
  • Clutch
  • Car gearbox
  • Chassis and running gear
  • Front suspension
  • Rear suspension
  • Steering
  • Brake system
  • Wheels and tires
  • Body and interior
  • Exterior (external elements)
  • Interior (internal elements)
  • Heating system
  • Electrical equipment
  • Equipment and devices
  • Power devices
  • Electrical circuits
MitsubishiMan.ru © 2018–2026 • Mobile version • Articles about Mitsubishi • Contacts • Sitemap: EN BG BY UA RS HR RO PL SK HU • Site search • Bookmark
Colt 2 and 3 (1983-1993) · Colt 4 and 5 (1991-2003) · Colt 5 (1995-2003) · Lancer 3 and 5 (1984-1992) · Lancer 9 (2000-2007) · Galant 5 (1983-1989) · Galant 6 and 7 (1987-1998) · L200 4 (2005-2014) · Outlander 1 (2003-2008) · Pajero 1 and 2 (1982-1999) · Pajero 4 (2006-2021) · Carisma (1995-2004) · Space Star (1998-2005) ·
This resource sets cookies 🍪 to avoid bothering you with repeated data entry.