
English Русский
Български
Беларускі
Український
Српски
Hrvatski
Română
Polski
Slovenský
Magyar
Articles Bookmark Contacts Sitemap   
Company Audi Company Ford Company Hyundai Company Kia Company Mazda Company Mercedes-Benz Company Nissan
MitsubishiMan.ru


Home Colt Lancer Galant L200 Outlander Pajero Others
Lancer 9 (2000-2007, petrol) Lancer 3 and 5 (1984-1992)

Disassembling the rear spring strut / Removing and installing the shock absorber / coil spring (Mitsubishi Lancer 3)

  • Home
  • Lancer
  • 3 (1984-1992)
  • Chassis and running gear
  • Rear suspension
  • Disassembling the rear spring strut / Removing and installing the shock absorber / coil spring
0

Cars produced from 9.88 to 3.92


Removal


Remove the rear spring strut.

To remove the shock absorber, you must first compress the spring. The service station uses a special device for this.

Caution: Never remove the shock absorber unless the spring is compressed.
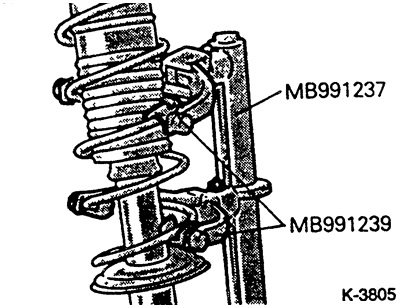


Compress the spring with a compression device. Insert the rear spring strut into the device and slowly and evenly compress the spring until the upper spring cup is relieved.

Caution: If the clamps of the device are inserted into the coils of the spring, make sure that they are securely clamped and that the clamps cannot slip off the spring. Be sure to compress the spring from two opposite sides. The force of the spring is high, so use only a strong tool. Never tighten the spring with wire. Risk of accident!
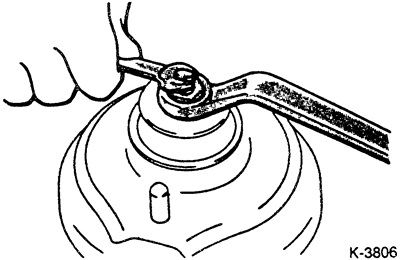


Caution: The fastening nut can only be removed after the spring has been securely compressed.


Loosen the fastening nut. At the same time, hold the piston rod with a spanner.

Remove individual parts "2" through "10", see Fig. K-3804.

Note: When replacing the spring, release the spring slowly. When replacing the shock absorber, the spring remains compressed.


Installation


Check the shock absorber before installation. Release the gas when disposing of it, see item 14.4.

If replacing a spring, compress the new spring.


Put on the coil spring. Make sure that the spring fits correctly against the lugs of the lower spring lining.
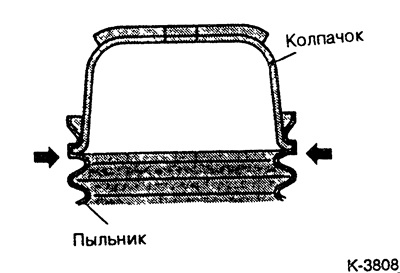


Assemble the individual parts of the spring strut. At the same time, snap the cap into the dust cover, as shown in the figure.
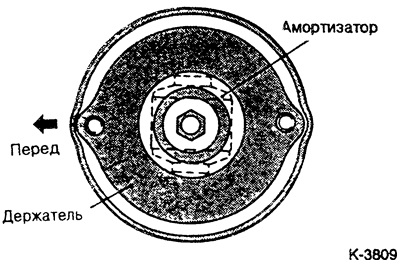


Place the upper support of the spring strut and align it with the lower shock absorber holder, see figure.


Tighten the new self-locking nut to 50 Nm while holding the piston rod with a spanner.

Slowly release the spring. Make sure that the ends of the spring are correctly seated in the spring pads.

Install the rear spring strut, see paragraph 15.2.
This article is available at: russian, bulgarian, belarusian, ukrainian, serbian, croatian, romanian, polish, slovak, hungarian
This article was reviewed by: Dmitry Vasiliev
Share with friends:
◀ Previous
Lancer 3 and 5: Rear suspension
Next ▶

Removal and installation shock absorber/coil spring
Removal and installation the rear spring strut
Spring stand
Rear suspension — device
Rear wheel bearings
Removal and installation rear wheel bearings
Removal and installation the rear wheel hub/brake drum
Checking the hub bearings
Similar materials for other Mitsubishi models

➤ Shock absorber strut — removal and installation Mitsubishi Colt 4 and 5 (1991-2003)
➤ Front Strut/Shock Absorber and Coil Spring — Removal,… Mitsubishi Galant 5 (1983-1989, petrol)
➤ Front suspension shock absorber strut Mitsubishi L200 4 (2005-2014, diesel)
➤ Disassembly and assembly of the shock absorber strut Mitsubishi Outlander 1 (2003-2008)
➤ Coil spring suspension Mitsubishi Pajero 4 (2006-2021)
➤ Rear suspension shock absorber strut Mitsubishi Space Star (1998-2005)
Link in different formats to this article
Comments and feedback from visitors
No comments yet


Add up two numbers 28 + 26


Lancer 9 (2000-2007, petrol) 
  • General information
  • User manual
  • Maintenance
  • Power unit
  • Repair of MPI engines
  • Repair of GDI engines
  • Engine overhaul
  • Cooling and lubrication system
  • MPI fuel injection system
  • GDI fuel injection system
  • Intake and exhaust system
  • Starting and charging system
  • Transmission
  • Automatic gearbox
  • Variator (CVT)
  • Drive shafts and gearbox
  • Chassis and running gear
  • Front suspension
  • Rear suspension
  • Steering
  • Brake system
  • Body and interior
  • Doors, locks and windows
  • Exterior (external elements)
  • Interior (internal elements)
  • Electrical equipment
  • Heater and air conditioner
  • Security system SRS
  • Equipment and devices
  • Wiring diagrams (saloon)
  • Wiring diagrams (wagon)
Lancer 3 and 5 (1984-1992) 
  • General information
  • Maintenance
  • Power unit
  • Engine repair
  • Lubrication system
  • Cooling system
  • Ignition system
  • Fuel system
  • Carburetor
  • Fuel injection
  • Diesel power system
  • Exhaust system
  • Transmission
  • Clutch
  • Car gearbox
  • Chassis and running gear
  • Front suspension
  • Rear suspension
  • Steering
  • Brake system
  • Wheels and tires
  • Body and interior
  • Exterior (external elements)
  • Interior (internal elements)
  • Heating system
  • Electrical equipment
  • Equipment and devices
  • Power devices
  • Electrical circuits
MitsubishiMan.ru © 2018–2026 • Mobile version • Articles about Mitsubishi • Contacts • Sitemap: EN BG BY UA RS HR RO PL SK HU • Site search • Bookmark
Colt 2 and 3 (1983-1993) · Colt 4 and 5 (1991-2003) · Colt 5 (1995-2003) · Lancer 3 and 5 (1984-1992) · Lancer 9 (2000-2007) · Galant 5 (1983-1989) · Galant 6 and 7 (1987-1998) · L200 4 (2005-2014) · Outlander 1 (2003-2008) · Pajero 1 and 2 (1982-1999) · Pajero 4 (2006-2021) · Carisma (1995-2004) · Space Star (1998-2005) ·
This resource sets cookies 🍪 to avoid bothering you with repeated data entry.