
English Русский
Български
Беларускі
Український
Српски
Hrvatski
Română
Polski
Slovenský
Magyar
Articles Bookmark Contacts Sitemap   
Company Audi Company Ford Company Hyundai Company Kia Company Mazda Company Mercedes-Benz Company Nissan
MitsubishiMan.ru


Home Colt Lancer Galant L200 Outlander Pajero Others
Lancer 9 (2000-2007, petrol) Lancer 3 and 5 (1984-1992)

Checking/disposal of shock absorber (Mitsubishi Lancer 3)

  • Home
  • Lancer
  • 3 (1984-1992)
  • Chassis and running gear
  • Front suspension
  • Checking/disposal of shock absorber
0
During movement, the following phenomena indicate a defective shock absorber:
  • Prolonged vibrations of the body on uneven road surfaces.
  • The body sways when the road surface becomes uneven one after another.
  • Lifting of the front part of the car during acceleration.
  • Wheels bounce even on smooth road surfaces.
  • The car pulls to the side when braking (may have other causes).
  • Uncertain cornering due to insufficient road grip. Car skidding.
  • Knocking noises while driving.

The shock absorber can be checked manually. However, a reliable check of shock absorbers is performed using a shock tester (with the shock absorber not removed) or on a special machine for checking shock absorbers.

Manual check


Remove the shock absorber.

Hold the shock absorber in the working position, stretch the shock absorber and compress it.

(The source of the article is available at: MITSUBISHIMAN.ru)
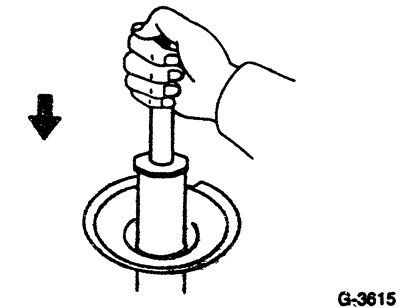


The shock absorber rod should move throughout its entire working stroke with the same resistance force and without jerking.

Press the piston rod all the way in and then release it. The piston rod should then extend again at a uniform speed.


If the shock absorber is functioning properly, traces of fluid are not a reason to replace it.

If there is a large fluid leak, replace the shock absorber.

Caution: The shock absorber must be degassed before disposal.


Install the shock absorber.

Disposal of shock absorber.

Extend the shock absorber piston rod fully and hold the shock absorber horizontally.
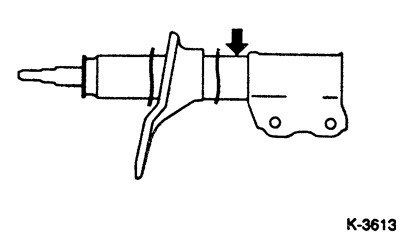


Before disposing of the shock absorber, drill a hole of approximately 3 mm in diameter in the place shown in the figure to release the gas.

Note: The gas released is colorless, odorless and non-toxic. When drilling, sawdust may fly off, so wear protective glasses.
This article is available at: russian, bulgarian, belarusian, ukrainian, serbian, croatian, romanian, polish, slovak, hungarian
This article was reviewed by: Dmitry Vasiliev
Share with friends:
◀ Previous
Lancer 3 and 5: Front suspension
Next ▶

Disassembling the front strut / removing and installing the shock absorber / coil spring
Front pillar — device
Removal and installation the front pillar
Front suspension — device
Wishbone — device
Removal and installation the wishbone / Replacing the ball joint seal
Removal and installation the anti-roll bar
Drive shafts — device
Removal and installation the drive shaft
Similar materials for other Mitsubishi models

➤ Front shock absorber strut — design description Mitsubishi Colt 5 (1995-2003, petrol)
➤ Rear shock absorber — removal and installation Mitsubishi Galant 5 (1983-1989, petrol)
➤ Front suspension shock absorber — removal and installation Mitsubishi L200 4 (2005-2014, diesel)
➤ Removal and installation the shock absorber assembly Mitsubishi Outlander 1 (2003-2008)
➤ Shock absorber operating mode regulator Mitsubishi Pajero 1 and 2 (1982-1999)
➤ Front suspension shock absorber strut Mitsubishi Space Star (1998-2005)
Link in different formats to this article
Comments and feedback from visitors
No comments yet


Add up two numbers 50 + 12


Lancer 9 (2000-2007, petrol) 
  • General information
  • User manual
  • Maintenance
  • Power unit
  • Repair of MPI engines
  • Repair of GDI engines
  • Engine overhaul
  • Cooling and lubrication system
  • MPI fuel injection system
  • GDI fuel injection system
  • Intake and exhaust system
  • Starting and charging system
  • Transmission
  • Automatic gearbox
  • Variator (CVT)
  • Drive shafts and gearbox
  • Chassis and running gear
  • Front suspension
  • Rear suspension
  • Steering
  • Brake system
  • Body and interior
  • Doors, locks and windows
  • Exterior (external elements)
  • Interior (internal elements)
  • Electrical equipment
  • Heater and air conditioner
  • Security system SRS
  • Equipment and devices
  • Wiring diagrams (saloon)
  • Wiring diagrams (wagon)
Lancer 3 and 5 (1984-1992) 
  • General information
  • Maintenance
  • Power unit
  • Engine repair
  • Lubrication system
  • Cooling system
  • Ignition system
  • Fuel system
  • Carburetor
  • Fuel injection
  • Diesel power system
  • Exhaust system
  • Transmission
  • Clutch
  • Car gearbox
  • Chassis and running gear
  • Front suspension
  • Rear suspension
  • Steering
  • Brake system
  • Wheels and tires
  • Body and interior
  • Exterior (external elements)
  • Interior (internal elements)
  • Heating system
  • Electrical equipment
  • Equipment and devices
  • Power devices
  • Electrical circuits
MitsubishiMan.ru © 2018–2026 • Mobile version • Articles about Mitsubishi • Contacts • Sitemap: EN BG BY UA RS HR RO PL SK HU • Site search • Bookmark
Colt 2 and 3 (1983-1993) · Colt 4 and 5 (1991-2003) · Colt 5 (1995-2003) · Lancer 3 and 5 (1984-1992) · Lancer 9 (2000-2007) · Galant 5 (1983-1989) · Galant 6 and 7 (1987-1998) · L200 4 (2005-2014) · Outlander 1 (2003-2008) · Pajero 1 and 2 (1982-1999) · Pajero 4 (2006-2021) · Carisma (1995-2004) · Space Star (1998-2005) ·
This resource sets cookies 🍪 to avoid bothering you with repeated data entry.