
General information
As a rule, the audio system is not part of the standard equipment of the car and is installed as an option.
The proprietary audio system delivers clear sound across all frequency ranges, makes it easy to turn off your favorite radio stations using the preset keys, allows you to listen to audio cassettes, and provides control over listening to records from CDs loaded in the CD changer cartridge.
The cassette deck is equipped with Dolby noise reduction, automatic detection of the installation of a chromium dioxide magnetic tape and an auto-reverse function that allows continuous playback of recordings from both tracks of a tape without reloading the audio cassette.
Note. The Dolby system used, manufactured under license from Dolby Laboratories Licensing Corporation. "Dolby", and the double stylized D icon are registered trademarks of Dolby Laboratories Licensing Corporation.
The appearance of the control panel included in the standard equipment of Mitsubishi stereo radio is shown in the illustration.
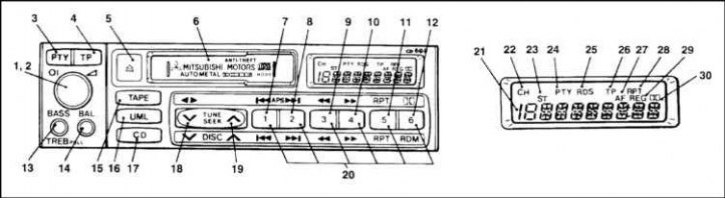
Stereo radio control panel
1, 2 - PWR / VOL - Power button / volume control; 3 - PTY - Button to enable the program type detection mode; 4 - TP - Button for turning on the broadcast of traffic news services; 5 - Audio cassette eject button; 6 - Cassette receiver; 7, 8 - APS - Buttons for automatic search for a record with rewind 33/forward 44; 9, 10 - Fast film rewind buttons 33/forward 44; 11 - RPT - Repeat button; 12 - Dolby noise reduction button; 13 - BASS / TREB - Button for adjusting the tone of the sound in the low / high frequency range; 14 - BAL / FADE - Button for adjusting the stereo balance between the left and right / front and rear speakers; 15 - TAPE - Button for turning on the audio cassette listening mode; 16 - UML - Radio frequency range selection button (USW/MW-LW); 17 - CD - Button for turning on the CD listening mode; 18, 19 - TUNE SEEK/DISC / - Directional step-by-step search tuning / disc selection keys; 20 - Buttons for selecting radio programs stored in the tuner's memory; 21 - Playback frequency/film counter indicator; 22 - Memory number indicator; 23 - ST - Stereo playback indicator; 24 - PTY - Program type indicator; 25 - RDS - Broadcast data system indicator; 26 - TP - Traffic news service indicator; 27 - AF - Automatic return function indicator; 28 - RPT - Repeat mode indicator; 29 - REG - Program indicator of regional broadcasting services; 30 - Dolby noise reduction indicator
Turning on/adjusting the sound volume
When properly connected, the audio system functions when the ignition key is in the ACC position (I) or ON (II). In the first position of the key, the power supply to auxiliary electricity consumers is turned on, in the second position, the ignition and power supply to all electricity consumers are turned on. The audio system is turned on by pressing the PWR / VOL button handle. Rotating the same knob allows you to adjust the playback volume.
Sound tone control (BASS/TREB)
To adjust the tone of the sound in the bass range mode (BASS) click on the button (13) so that it slides out of the panel - turning the button clockwise leads to an increase in the intensity of low-frequency reproduction, against - to a decrease.
To access tone control in treble mode (TREB) the button should be further pulled out of the panel. Adjustment is made in the same manner as described above.
After completing the adjustment, do not forget to drown the button into the panel again.
Balancing (BAL/FADE)
Balancing the sound level between right and left (BAL) / front and rear (FADE) columns is done using the button (14). Press the button so that it moves out of the panel - turning the button clockwise leads to a shift in the level balance to the right, counter-clockwise - to the left.
To switch the balancing between the front and rear speakers, the button should be pulled out of the panel even more. Adjustment is made in the same manner as described above.
After completing the adjustment, do not forget to drown the button into the panel again.
Radio tuning
Any of the three ranges (USW1/USW2/MW-LW) The radio receiver allows tuning in three possible ways: manually (TUNE), semi-automatically (SEEK), and tuning to pre-selected radio stations whose frequencies are stored in the radio's memory. Selecting the AM search frequency range (MW-LW) and FM (USW1 and USW2).
Manual setting (TUNE function) performed using the TUNE/SEEK key (18/19), - to change the frequency of receiving the tuner in the direction of decreasing or increasing, press the left (>) or right (<) part of the key respectively.
In semi-automatic mode (SEEK function) The radio receiver searches for a radio station with a strong signal in the current band and tunes to it on its own. To turn on the radio in search mode, press the left (>) or right (<) part of the TUNE/SEEK key and hold it down for about 0.5 second. The search for a radio station with a sufficiently strong signal will occur in the lower or upper subband relative to the current tuning frequency of the radio, depending on which part of the key is pressed. The search stops as soon as the receiver finds the first radio station with a sufficiently strong signal.
Tuning the radio to pre-selected stations. With six buttons (20), marked with numbers from 1 to 6, you can memorize the frequencies of your favorite radio stations into the radio's memory. Each button allows you to program one frequency in the AM radio band (MW-LW) and two frequencies in the FM band (one in each of the USW1 and USW2 bands). To program the radio's memory, do the following:
- a) Using the UML button (16) select the desired radio frequency band (USW1/USW2 or MW-LW);
- b) Use the TUNE/SEEK key to tune the radio to the desired radio station;
- c) Select one of the six memory programming buttons for this radio, press and hold it until you hear a short beep;
- d) Repeat operations from the first to the third in order to memorize the frequencies of six radio stations;
- e) Now it is enough to press any of the six buttons for programming the radio receiver's memory so that it automatically tunes in to a pre-selected station, the signal frequency of which is entered in the corresponding memory cell.
Radio preset frequencies are erased from memory when the radio fails (strong discharge) or disconnecting the battery, as well as when removing the fuse of the audio system.
Radio Data System (RDS)
The design of the car radio tuner makes it possible to use the service functions of the RDS radio data system, which are especially well developed abroad. The RDS system uses a program identification signal (PI) and a list of alternative frequencies (AF), transmitted by some of the radio stations broadcasting in the ultrashort frequency range (FM). When the RDS function is activated, the tuner of the radio receiver using the amplification method of another set (EON), identifies stations broadcasting the same program (by PI code) and automatically retune to frequencies from the AF list with the strongest signal. This function allows you to listen to the same program on long trips without switching frequencies when you leave the range of the next repeater. Additionally, RDS provides services such as selecting the desired type of information received (PTY), interrupting the current broadcast for emergency announcements and traffic information (TP), as well as limiting the list of received regional radio stations.
Automatic retuning to the selected program
This function allows you to receive the selected program of an RDS-enabled radio station with automatic selection of the strongest signal from the alternative frequency band (AF) without switching the receiver when passing significant distances. To turn on the mode, press and hold the UML button in the recessed state for at least 2 seconds (16), - on the radio control panel display (21) mark will be displayed "AF" (27). The tuner returns to normal reception mode by pressing the UML button again.
Program identification (PI)
When playing frequencies programmed with buttons (20) it is possible to listen to broadcasts with the same identification code (PI). If the signal level at the programmed frequency drops to an unacceptable limit, the tuner automatically selects another station on the same network transmitting a similar program - the mark will appear on the display screen "REG" (23).
Selecting the type of programs received (PTY)
In the RDS system, all radio programs are sorted according to the type of programs being transmitted (by topic). Select mode is activated by pressing the PTY button (3). The choice of the type of received programs is made using the TUNE / SEEK button (18/19) from the following list:
- 1 SPEECH
- 2 NEWS
- 3 AFFAIRS Business
- 4 INFO Information programs
- 5 SPORT Sports programs
- 6 EDUCATE Educational programs
- 7 DRAMA Theater productions
- 8 CULTURE Culture
- 9 SCIENCE Science
- 10 VARIED Miscellaneous
- 11 MUSIC Music programs
- 12 POP M Pop music
- 13 ROCK M Rock music
- 14 MOR.M. road music
- 15 LIGHT M Light music
- 16 CLASSIC Classical music
- 17 OTHER M Other music
Note. When choosing positions 1 and 11 () the search is carried out in a wide range of concepts "Speech" And "Music"
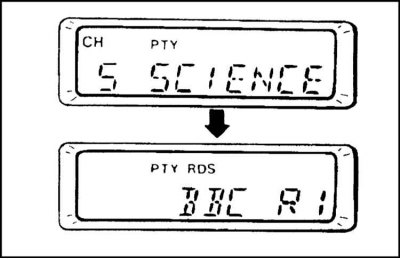
To activate the theme selection mode of received programs, press the PTY button (3), then short presses on the corresponding side of the TUNE/SEEK key (18) select a topic from the list, the corresponding name will be displayed on the display screen. Two seconds after the selection is made, the search for programs that meet the specified parameters will begin - during the search, the mark will flash on the screen "PTY". After the required radio station has been found, its name will appear on the display.
Attention! If you hold down the TUNE/SEEK button for more than 0.5 seconds, the system will try to continue searching for the next station that meets the requirements of the selected topic range. If no station broadcasting a program of the required type is found, the message will appear on the display screen for approximately 5 seconds "EMPTY", then the receiver will return to playing the previously transmitted program.
It is possible to store up to 6 types of programs in the tuner's memory. The choice of program type is made using the TUNE/SEEK key (18/19). After the selection is made, click on one of the six buttons (20) and keep it pressed for at least 2 seconds. For the time of entering the data into the system memory, the playback of the program will be interrupted, the button number and the selected program type will be displayed on the display. Calling up a previously memorized program type is done by holding down the corresponding button for at least 2 seconds.
Attention! Disconnecting the battery/removing the radio fuse will erase the data stored in the system memory!
Information for road users
While listening to FM/cassette or CD programmes, the radio tuner may automatically tune in to receive traffic announcements.
To enable the function, press the TP button (4), - the label will appear on the display screen "TP" (26). If traffic information is being transmitted, the message will appear on the display screen for about 5 seconds "NO RDS".
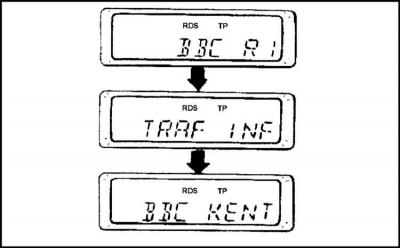
If traffic information is being transmitted by the station already selected or by some other station, a message will appear on the screen for approximately 5 seconds "TRAF INF", then for 2 seconds - the frequency of the radio signal, then - the name of the radio station broadcasting traffic news. If the transmission volume level is not high enough, the system automatically optimizes it. At the end of the transmission, the receiver will return to playback of the previously selected program.
Return to the previous mode is carried out by pressing the TP button again.
Receiving emergency messages
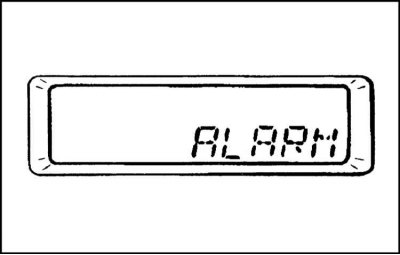
While listening to FM programs/cassette or CD recording, the radio tuner can automatically tune in to receive emergency messages, and a warning message will appear on the display screen "ALARM", and the playback volume is automatically optimized. At the end of the transmission of the emergency message, the receiver automatically returns to playback of the program that was previously played.
Listening to audio cassettes
Make sure the tape is tightly wound on the spools of the cassette. Insert a cassette into the cassette deck, the recording will start playing automatically, even if the radio or CD player was previously turned on. In addition, the playback mode of a recording from a magnetic tape of a cassette already inserted into the cassette deck can be turned on using the TAPE button (15).
When listening to tapes recorded with Dolby noise reduction (marked NR) noise suppression system can be activated with a button (12), - the corresponding mark will appear on the display screen (30). The noise reduction system is turned off by pressing the same button again.
Note. The Dolby system used, manufactured under license from Dolby Laboratories Licensing Corporation. "Dolby", and the double stylized D icon are registered trademarks of Dolby Laboratories Licensing Corporation.
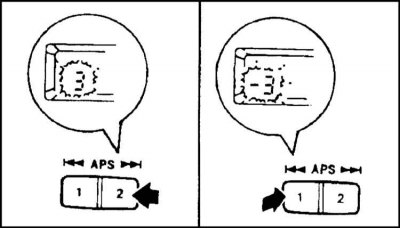
Selecting the direction of listening to a magnetic tape
Selecting the listening direction (tracks) magnetic tape is carried out using the button (18). The current film advance direction is shown on the display screen.
- 1 forward
- 2 back
At the end of the film, the direction of scrolling will switch automatically (mode "auto reverse").
Tape fast rewind
Rewinding the film in the appropriate direction is done using the buttons (9 - forward) And (10 - back) car radio control panel.
When you press a button (18)
Repeat playback of the selected section
You can repeat the playback of a favorite fragment of a magnetic recording using the RPT button (11), - the corresponding message will appear on the display screen (28). To cancel the repeat mode, press the RPT button again.
Using the automatic music search function (APS)
APS button (7 and 8) allows you to search for the beginning of the next thing on a magnetic tape from a musical recording, skipping up to 7 musical recordings in a row.
For fast forward search, press the button (8) as many times as you are going to skip songs - the display screen will show the serial number of the selected item from the rewind start point, the tape will quickly rewind to the required position and playback will automatically start. Scroll back search is performed in a similar manner, but with the button (17).
Note. For the APS function to function smoothly, the pauses between recordings on the tape must be at least 4 seconds and be free from noise.
Stopping playback and ejecting the cassette
Click the button (5) on the control panel of the car radio, - the playback of the magnetic recording will stop and the cassette will be ejected from the cassette slot.
Caring for your radio
During the operation of the car radio, the magnetic head of the cassette deck is gradually contaminated with deposits of dust and particles of the magnetic layer that have fallen off the film. If the magnetic head is heavily soiled, the sound quality during playback of recordings deteriorates. In view of the foregoing, it is necessary to regularly, every 30 hours of operation of the deck, clean the magnetic head.
Careless care of the radio and violation of the agreed schedule for cleaning the magnetic head can lead to a situation where the removal of accumulated deposits with a conventional cleaning cassette will be impossible.
The design of the deck provides for the possibility of automatic unloading of an audio cassette, which for some reason cannot be played normally. If the cassette is ejected before playback has begun, it may be damaged and should not be attempted to reload such a cassette. Occasionally, audio playback may stop, the deck reverse mechanism may operate once or twice, or the cassette may be ejected. Typically, such phenomena occur due to jamming of the mechanism, or as a result of uneven resistance to rewinding the magnetic tape on the cassette reels. In this case, you need to remove the audio cassette and manually wind the tape a few turns of the reel.
The cassette deck of the car radio is designed for the use of audio cassettes with a recording duration of up to 100 minutes. Use of higher capacity thin magnetic film cassettes may result in deck failure or film distortion.
Carefully inspect the audio cassette before inserting it into the deck's slot. If the magnetic film has significant slack, tighten it by rotating the spool hub in the appropriate direction with a pencil or fingers.
If the label peels off, glue it or remove it completely. Otherwise, a loose sticker may cause the cassette to jam when you try to remove it from the deck. Do not insert a bent or broken audio cassette into the deck's slot.
Do not leave audio cassettes in places where they are exposed to high temperature or high humidity, such as on the top shelf of the dashboard or in the cassette deck itself, do not insert an overheated or supercooled cassette into the radio until its temperature has returned to normal.
Do not insert foreign objects into the cassette deck's output window.
Listening to CDs
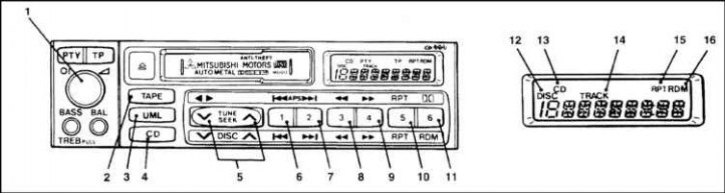
Car radio controls used when listening to CDs
1 - Power button / volume control knob; 2 - TAPE button; 3 - UML button; 4 - Button for turning on the CD listening mode; 5 - Drive select button (DISK); 6 - Button to skip the track back; 7 - Button to skip the track forward; 8 - Fast rewind button; 9 - Fast forward button; 10 - Repeat button (RPT); 11 - Button for activating the random playback sequence mode (RDM); 12 - DISK - disk number indication; 13 - CD - indication of the inclusion of the CD listening mode; 14 - TRACK - track number indication; 15 - RPT - indication of the inclusion of the repeat mode; 16 - RDM - indication of the inclusion of the random playback sequence mode (RDM)
The design of the stereo system allows you to listen to CDs from a CD changer connected to the car radio.
The layout of the changer controls on the radio panel is shown in the illustration.
Listening to CD recordings
Insert a disc into the CD player/changer slot - make sure that the disc is loaded with the label facing up. After the disc is pulled in, playback from it will start automatically, even if the radio or tape recorder was previously turned on. When a disc is loaded into the player/changer, playback from it is started using the button (4) on the radio panel. The system allows you to manage listening to up to 10 CDs loaded into the CD changer cartridge. The disk number is selected using the button (5) (see ibid). Switching to the radio or magnetic recording listening mode is made using the UML and TAPE buttons.
Fast moving across a disk
Fast moving around the disk is done using the buttons (8 - back) And (9 - forward). When you release the button, playback will resume.
Finding the beginning of the desired fragment
The search for the beginning of the desired fragment of the recording is carried out using the buttons (6 - back) And (7 - forward). The button is pressed as many times as there are fragments to be skipped - the corresponding number will appear on the display.
Repeat playback of the selected section
Repeat playback of the fragment you like can be done using the RPT button (10). The repeat mode is turned off by pressing the same button again.
Turn on/off the shuffle mode of tracks
The random sequence playback mode from the CD is activated using the RDM button (11), - the corresponding message will appear on the display screen (16) (see ibid). To disable the function, press the button again.
Car radio security system
On models equipped with such a system, disconnecting the audio system from the power source for any reason leads to its blocking. To unlock the system, a four-digit code must be entered using the radio's preset buttons. Since there are hundreds of thousands of such combinations, it is almost impossible to unlock the system without knowing the correct code.
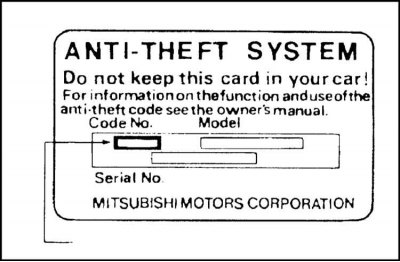
When installing an audio system on a car, the owner receives a special card with the code and serial number of the stereo system. The compilers of this Guide strongly advise you to keep the card in a safe and secure place. Enter the serial number of the audio system in a notebook and keep it with other documents outside the vehicle. A new card to replace the lost one can be obtained at Mitsubishi branded service stations upon presentation of the serial number.
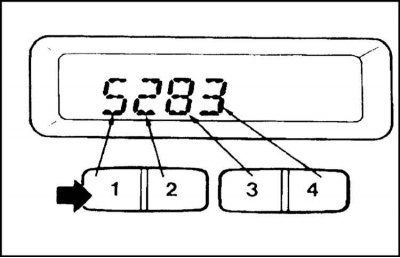
In the event of a discharge or disconnection of the battery, the audio system will inevitably block. In this case, when the system is turned on, the front panel display of the radio shows the inscription "CODE" (Code). Using the setting buttons, enter the required four-digit code - each time you press the button, the corresponding digit of the code will change its value by one from zero to nine in a closed loop.
Having finished entering the code, press the UML button - if the code is entered correctly and identified by the audio system, it starts to function normally.
If you enter an incorrect combination, the display will briefly show the message "X ERROR" (where X is the serial number of the error), which then changes to the prompt "CODE", allowing you to start re-entering the code combination. The system allows up to three erroneous combinations to be entered, after which the display shows the message "OFF" and activation of the audio system can only be done in a Mitsubishi workshop.