
English Русский
Български
Беларускі
Український
Српски
Hrvatski
Română
Polski
Slovenský
Magyar
Articles Bookmark Contacts Sitemap   
Company Audi Company Ford Company Hyundai Company Kia Company Mazda Company Mercedes-Benz Company Nissan
MitsubishiMan.ru


Home Colt Lancer Galant L200 Outlander Pajero Others
L200 4 (2005-2014, diesel)

Checking and replacing the front brake pads (Mitsubishi L200 4)

  • Home
  • L200
  • 4 (2005-2014, diesel)
  • Chassis and running gear
  • Brake system
  • Checking and replacing the front brake pads
0
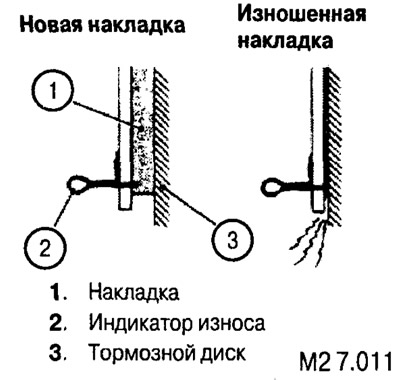
The front brakes are equipped with a wear indicator that touches the brake disc and makes a squealing sound when the lining thickness reaches 1.5 mm.


Attention:
  • if you are replacing the pads, replace the pads on both sides of the vehicle;
  • if the thickness of the pads on the left and right differs significantly, check the piston and the clamping mechanism crackers.


1. Check the brake lining thickness through the hole in the brake caliper. Wear limit: 1.5 mm.
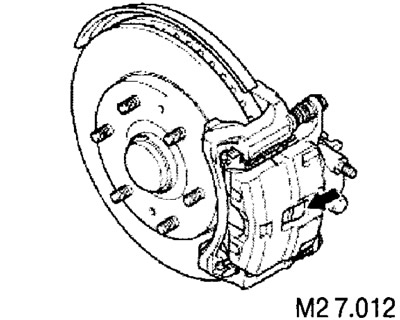


Caution: Do not wipe grease off the screw or contaminate it.


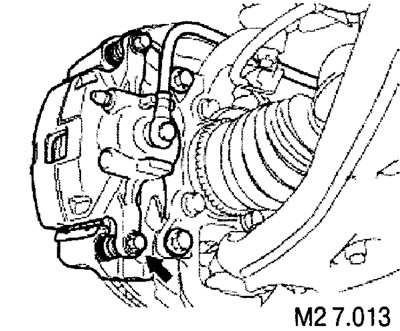
2. Remove the screw (arrow), rotate the bracket assembly and secure it with the cable.


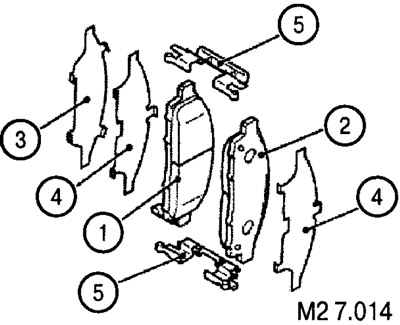
3. Remove the following parts from the caliper support: lining assembly (on the right wheel)/lining assembly with wear indicator (on the left wheel) (1), lining assembly (2), outer lining (3), linings (4) and clamps (5).


4. To measure the braking force after installing the pads, measure the resistance of the hub without pads.

5. Install the pads and caliper assembly and check the braking force.
This article is available at: russian, bulgarian, belarusian, ukrainian, serbian, croatian, romanian, polish, slovak, hungarian
This article was reviewed by: Nikita Romanov
Share with friends:
◀ Previous
L200 4: Brake system
Next ▶

Checking the rear weight dependent brake force control valve (LSPV)
Checking and adjusting the rear brake force regulator spring (without ABS)
Bleeding air from the brake line
Bleeding air from the master cylinder
Checking the brake booster
Checking the disc brake rotor
Checking the thickness of the brake disc
Checking the flatness of the front brake discs and adjusting them
Checking the thickness of the rear brake shoe linings and drums
Removal and installation the brake pedal
Similar materials for other Mitsubishi models

➤ Checking and replacing the front brake pads Mitsubishi Colt 5 (1995-2003, petrol)
➤ Checking the thickness of brake pads Mitsubishi Lancer 3 and 5 (1984-1992)
➤ Replacing disc brake pads Mitsubishi Galant 6 and 7 (1987-1998)
➤ Checking the oil level in the front and rear axle… Mitsubishi Outlander 1 (2003-2008)
➤ Checking and replacing brake pads Mitsubishi Pajero 4 (2006-2021)
➤ Checking and replacing front disc brake pads Mitsubishi Carisma (1995-2004)
Link in different formats to this article
Comments and feedback from visitors
No comments yet


Add up two numbers 41 + 43


L200 4 (2005-2014, diesel) 
  • General information
  • User manual
  • Maintenance
  • Power unit
  • Diesel engine
  • Lubrication system
  • Fuel system
  • Control system
  • Transmission
  • Clutch
  • Mechanical gearbox
  • Transfer case
  • Front axle
  • Rear axle
  • Chassis and running gear
  • Car suspension
  • Steering
  • Brake system
  • Body and interior
  • Exterior (external elements)
  • Interior (internal elements)
  • Doors, locks and windows
  • Electrical equipment
  • Equipment and devices
  • Electrical circuits
MitsubishiMan.ru © 2018–2026 • Mobile version • Articles about Mitsubishi • Contacts • Sitemap: EN BG BY UA RS HR RO PL SK HU • Site search • Bookmark
Colt 2 and 3 (1983-1993) · Colt 4 and 5 (1991-2003) · Colt 5 (1995-2003) · Lancer 3 and 5 (1984-1992) · Lancer 9 (2000-2007) · Galant 5 (1983-1989) · Galant 6 and 7 (1987-1998) · L200 4 (2005-2014) · Outlander 1 (2003-2008) · Pajero 1 and 2 (1982-1999) · Pajero 4 (2006-2021) · Carisma (1995-2004) · Space Star (1998-2005) ·
This resource sets cookies 🍪 to avoid bothering you with repeated data entry.