
English Русский
Български
Беларускі
Український
Српски
Hrvatski
Română
Polski
Slovenský
Magyar
Articles Bookmark Contacts Sitemap   
Company Audi Company Ford Company Hyundai Company Kia Company Mazda Company Mercedes-Benz Company Nissan
MitsubishiMan.ru


Home Colt Lancer Galant L200 Outlander Pajero Others
L200 4 (2005-2014, diesel)

Checking the thickness of the brake disc (Mitsubishi L200 4)

  • Home
  • L200
  • 4 (2005-2014, diesel)
  • Chassis and running gear
  • Brake system
  • Checking the thickness of the brake disc
0
1. Using a micrometer, check the thickness of the disc at 8 points with a difference of 45' and at a distance of 10 mm from the outer edge of the disc. Standard value: 28.0 mm, limit value: 26.4 mm.
  • the difference between values (at least 8 points) should not exceed 0.015 mm.

Attention:
  • when installing a new brake disc, grind it on a special device to achieve the standard value; otherwise the disc runout will be higher than normal, which may lead to vibration;
  • to avoid deformation of the rotor and careless grinding, install washers under the nuts on the brake disc side (see figure); install all nuts and tighten them diagonally (crosswise) to a torque of 100 Nm.
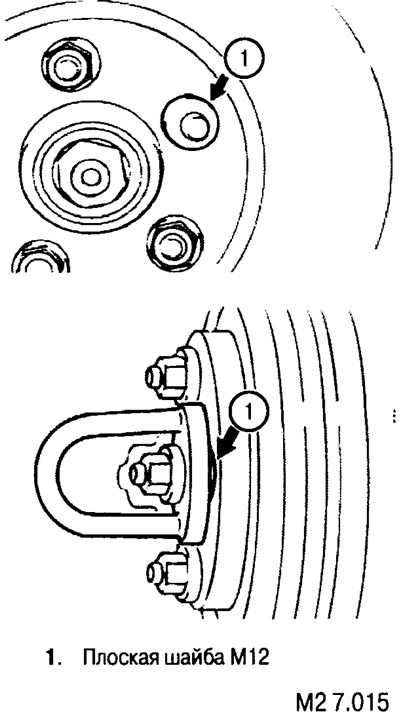


2. If the disc is thinner than the minimum value, replace it. If the thickness difference in different places of the new disc exceeds the specified value, grind it with a special device, and then check the thickness again.
This article is available at: russian, bulgarian, belarusian, ukrainian, serbian, croatian, romanian, polish, slovak, hungarian
This article was reviewed by: Nikita Romanov
Share with friends:
◀ Previous
L200 4: Brake system
Next ▶

Checking the disc brake rotor
Checking and replacing the front brake pads
Checking the rear weight dependent brake force control valve (LSPV)
Checking and adjusting the rear brake force regulator spring (without ABS)
Bleeding air from the brake line
Checking the flatness of the front brake discs and adjusting them
Checking the thickness of the rear brake shoe linings and drums
Removal and installation the brake pedal
Checking the brake light switch
General description of the braking system
Similar materials for other Mitsubishi models

➤ Checking the thickness and lateral runout of the front… Mitsubishi Colt 4 and 5 (1991-2003)
➤ Checking the thickness of brake pads Mitsubishi Lancer 3 and 5 (1984-1992)
➤ Checking the proper functioning of the parking brake Mitsubishi Galant 6 and 7 (1987-1998)
➤ Checking the brake disc Mitsubishi Outlander 1 (2003-2008)
➤ Front Brake Disc — Removal, Checking and Installation Mitsubishi Pajero 1 and 2 (1982-1999)
➤ Checking the thickness of the brake disc Mitsubishi Carisma (1995-2004)
Link in different formats to this article
Comments and feedback from visitors
No comments yet


Add up two numbers 32 + 17


L200 4 (2005-2014, diesel) 
  • General information
  • User manual
  • Maintenance
  • Power unit
  • Diesel engine
  • Lubrication system
  • Fuel system
  • Control system
  • Transmission
  • Clutch
  • Mechanical gearbox
  • Transfer case
  • Front axle
  • Rear axle
  • Chassis and running gear
  • Car suspension
  • Steering
  • Brake system
  • Body and interior
  • Exterior (external elements)
  • Interior (internal elements)
  • Doors, locks and windows
  • Electrical equipment
  • Equipment and devices
  • Electrical circuits
MitsubishiMan.ru © 2018–2026 • Mobile version • Articles about Mitsubishi • Contacts • Sitemap: EN BG BY UA RS HR RO PL SK HU • Site search • Bookmark
Colt 2 and 3 (1983-1993) · Colt 4 and 5 (1991-2003) · Colt 5 (1995-2003) · Lancer 3 and 5 (1984-1992) · Lancer 9 (2000-2007) · Galant 5 (1983-1989) · Galant 6 and 7 (1987-1998) · L200 4 (2005-2014) · Outlander 1 (2003-2008) · Pajero 1 and 2 (1982-1999) · Pajero 4 (2006-2021) · Carisma (1995-2004) · Space Star (1998-2005) ·
This resource sets cookies 🍪 to avoid bothering you with repeated data entry.