English Русский
Български
Беларускі
Український
Српски
Hrvatski
Română
Polski
Slovenský
Magyar
Articles Bookmark Contacts Sitemap   
Company Audi Company Ford Company Hyundai Company Kia Company Mazda Company Mercedes-Benz Company Nissan
MitsubishiMan.ru


Home Colt Lancer Galant L200 Outlander Pajero Others
Lancer 9 (2000-2007, petrol) Lancer 3 and 5 (1984-1992)

Checking the thickness of brake pads (Mitsubishi Lancer 3)

  • Home
  • Lancer
  • 3 (1984-1992)
  • General information
  • Maintenance
  • Checking the thickness of brake pads
0
Contents: Disc brakes ⤓ Drum brakes ⤓

Disc brakes


  • Mark the position of the wheel disk on the wheel hub with paint. This ensures that the balanced wheel can be reinstalled in its original position.
  • Raise the car, remove the wheels.


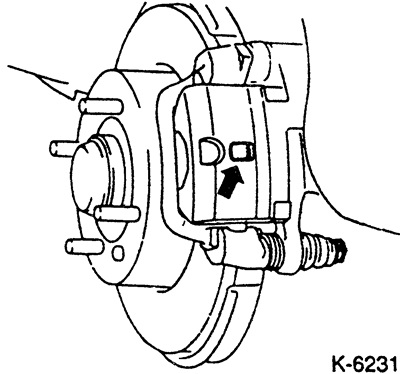
  • Inspect the brake lining thickness - without the back metal plate - through the hole in the brake caliper.
  • If in doubt, remove the brake pads and measure the thickness of the brake linings.
  • The maximum permissible brake lining thickness (wear limit) is 2.0 mm (excluding the thickness of the carrier plate). On cars with 1.2/1.5 l engines produced from 1.84 to 8.88, the wear limit is 1.0 mm.
  • When the wear limit is reached, the brake pad is replaced. It is necessary to replace all pads on one axle at the same time.
Note: According to a rough estimate, the brake pad wears out by 1 mm over a mileage of at least 1,000 km. This estimate is given for unfavorable operating conditions. Under normal operating conditions, the pads last longer. With a disc brake pad thickness of 5.0 mm (taking into account the thickness of the back plate), the remaining service life of the brake pad is at least another 3,000 km.


  • Install the wheels, observing the markings made in relation to the hubs and tighten the wheel nuts crosswise: tightening force see item 19.4.

Drum brakes


  • Raise the car from behind, see item 29.
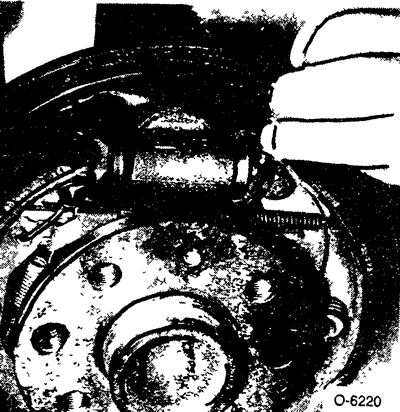
  • If the brake shields have an inspection hole, remove the rubber cap from the inspection hole and shine a portable light into the hole. The wear limit is 1.0 mm (excluding the thickness of the board).
  • If there is no inspection hole or there are any doubts, remove the brake drum.
  • Measure the thickness of the pad at the most worn place.
  • When the wear limit of 1 mm is reached, the brake pad is replaced. It is necessary to replace all pads on one axle at the same time.


  • When removing the brake drum, pull back the wheel brake cylinder cuffs and check if there is any moisture there. If there is moisture, replace the brake cylinder.

Caution: If there is a large difference between the brake pads on the left and right wheels, check the ease of movement of the wheel cylinder.

  • Install the wheels, observing the markings made in relation to the hubs and tighten the wheel nuts crosswise: tightening force see item 19.4.
This article is available at: russian, bulgarian, belarusian, ukrainian, serbian, croatian, romanian, polish, slovak, hungarian
This article was reviewed by: Dmitry Vasiliev
Share with friends:
◀ Previous
Lancer 3 and 5: Maintenance
Next ▶

Checking the brake fluid level
Brakes / Wheels / Tires
Checking the clutch fluid level
Differential Gearbox: Oil Change
Checking the rubber seals of the drive shafts
Checking the brake system pipeline
Checking the handbrake
Replacing brake fluid
Checking tire pressure
Checking the tire profile
Similar materials for other Mitsubishi models

➤ Measuring the thickness of the front disc brake pads Mitsubishi Colt 4 and 5 (1991-2003)
➤ Checking the proper functioning of the parking brake Mitsubishi Galant 6 and 7 (1987-1998)
➤ Checking the thickness of the rear drum brake shoes and… Mitsubishi L200 4 (2005-2014, diesel)
➤ Checking the level of working fluid in the brake hydraulic… Mitsubishi Outlander 1 (2003-2008)
➤ Checking and replacing brake pads Mitsubishi Pajero 4 (2006-2021)
➤ Checking the thickness of the brake disc Mitsubishi Carisma (1995-2004)
Link in different formats to this article
Comments and feedback from visitors
No comments yet


Add up two numbers 13 + 20


Lancer 9 (2000-2007, petrol) 
  • General information
  • User manual
  • Maintenance
  • Power unit
  • Repair of MPI engines
  • Repair of GDI engines
  • Engine overhaul
  • Cooling and lubrication system
  • MPI fuel injection system
  • GDI fuel injection system
  • Intake and exhaust system
  • Starting and charging system
  • Transmission
  • Automatic gearbox
  • Variator (CVT)
  • Drive shafts and gearbox
  • Chassis and running gear
  • Front suspension
  • Rear suspension
  • Steering
  • Brake system
  • Body and interior
  • Doors, locks and windows
  • Exterior (external elements)
  • Interior (internal elements)
  • Electrical equipment
  • Heater and air conditioner
  • Security system SRS
  • Equipment and devices
  • Wiring diagrams (saloon)
  • Wiring diagrams (wagon)
Lancer 3 and 5 (1984-1992) 
  • General information
  • Maintenance
  • Power unit
  • Engine repair
  • Lubrication system
  • Cooling system
  • Ignition system
  • Fuel system
  • Carburetor
  • Fuel injection
  • Diesel power system
  • Exhaust system
  • Transmission
  • Clutch
  • Car gearbox
  • Chassis and running gear
  • Front suspension
  • Rear suspension
  • Steering
  • Brake system
  • Wheels and tires
  • Body and interior
  • Exterior (external elements)
  • Interior (internal elements)
  • Heating system
  • Electrical equipment
  • Equipment and devices
  • Power devices
  • Electrical circuits
MitsubishiMan.ru © 2018–2026 • Mobile version • Articles about Mitsubishi • Contacts • Sitemap: EN BG BY UA RS HR RO PL SK HU • Site search • Bookmark
Colt 2 and 3 (1983-1993) · Colt 4 and 5 (1991-2003) · Colt 5 (1995-2003) · Lancer 3 and 5 (1984-1992) · Lancer 9 (2000-2007) · Galant 5 (1983-1989) · Galant 6 and 7 (1987-1998) · L200 4 (2005-2014) · Outlander 1 (2003-2008) · Pajero 1 and 2 (1982-1999) · Pajero 4 (2006-2021) · Carisma (1995-2004) · Space Star (1998-2005) ·
This resource sets cookies 🍪 to avoid bothering you with repeated data entry.