
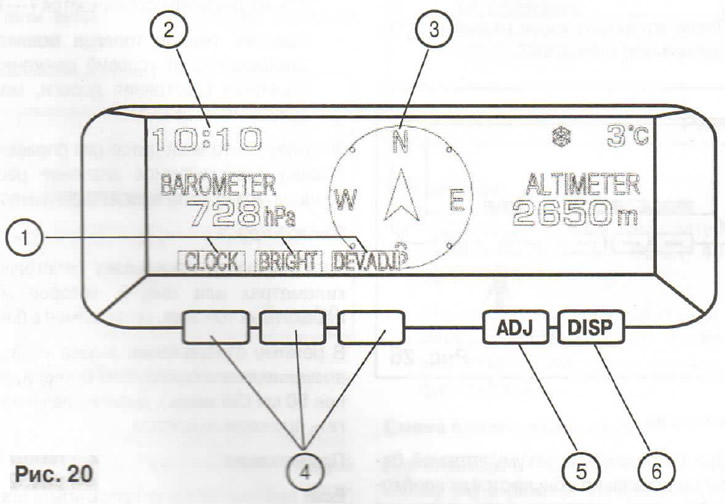
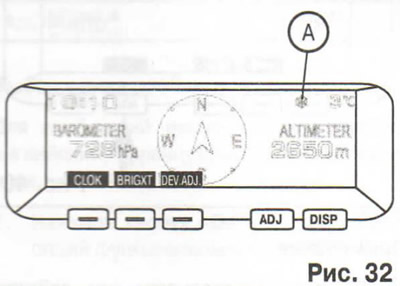
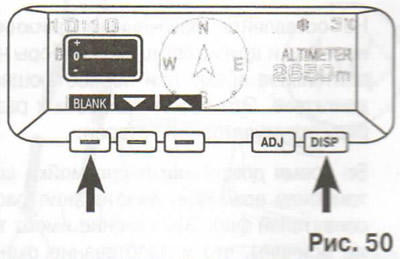
1. Pointers of currently assigned button functions (pos. 4 - function buttons). This mode displays what action will be triggered by pressing this button in the selected functionality mode
2. Digital clock
3. Electronic compass: shows the direction of the car
4. Function buttons
5. ADJ Button: This button is used to adjust the brightness of the display, to set the date and time, and to select the language of the messages
6. DISP button: Press this button to select the displayed parameter
When the ignition key is turned to the ACC position, the display turns on automatically.
Note: Using wireless devices such as radios and mobile phones near the monitor may cause the screen to temporarily dim and the compass to read incorrectly.
If a cell phone is placed in the monitor compartment, the performance of the phone may be impaired.
In some cases, the following properties of the liquid crystal display may appear.
- The appearance of small black spots, flickering of red, blue and green.
- In cold weather, the screen becomes dark or red, and the image moves slowly.
- The brightness of the display changes depending on the viewing angle.
All of these phenomena are not indications of a malfunction of the display.
Changing the display mode
By pressing the DISP button (6) (see fig. 20) sequential switching of modes 1-4 is carried out.
Modes:
- 1. Trip computer information.
- 2. Climate data.
- 3. Information about the audio system.
- 4. Date and time.
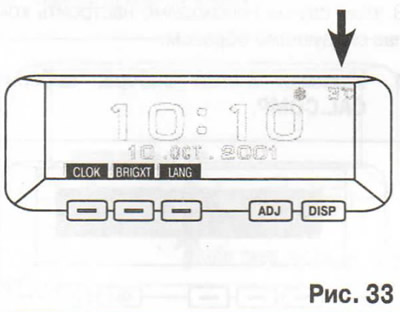
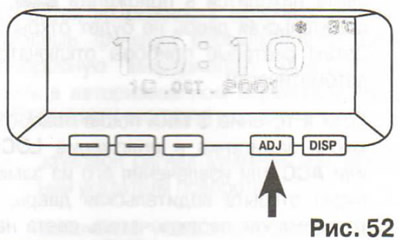
Mode 4: date and time
In this mode, the display shows the time (A) and date (IN).
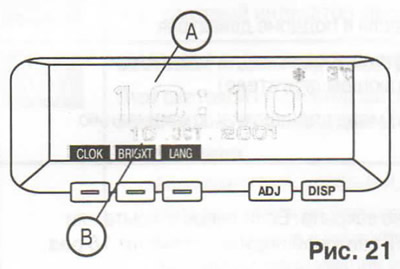
If the display mode of another parameter is selected (Not «date and time»), only the time is displayed in the upper left corner (A).
Setting the date and time
The digital clock can be set in the following modes.
- On vehicles equipped with the original MITSUBISHI MOTORS audio system: in automatic and manual modes.
- On vehicles not equipped with original MITSUBISHI MOTORS audio system: only in manual mode.
Auto mode (for cars with original MITSUBISHI MOTORS audio system)
In automatic mode, local time is set automatically by signals from local RDS stations. In this mode, the CT symbol appears on the audio system display in the lower right (local time is transmitted with RDS signal).
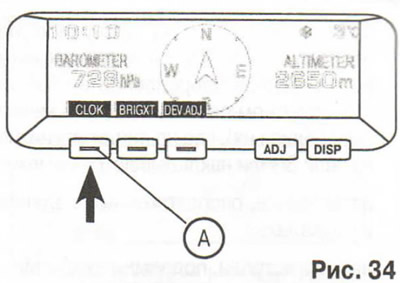
Manual setting mode:
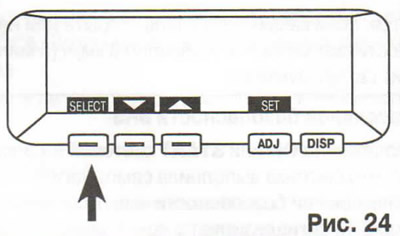
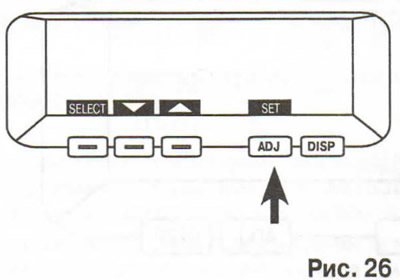
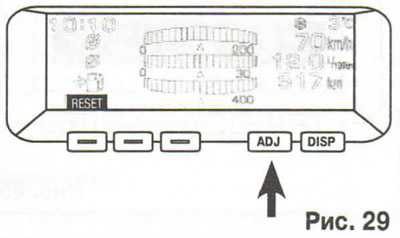
1. Press the ADJ button (5) (see fig. 20). In this case, the display will show new designations of the function buttons.
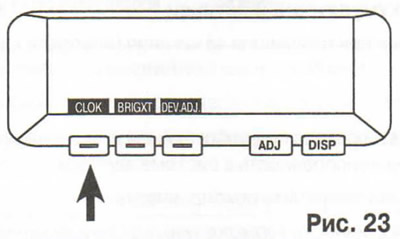
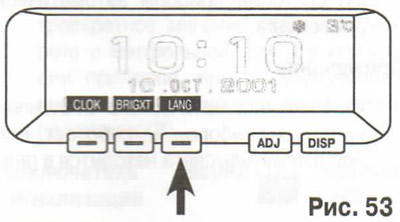
2. Press the CLOCK button (arrow) (see fig. 23).
3. Press the SELECT softkey to move to the month, day, year, hour, and minute settings. Each press of SELECT advances from hours to minutes, seconds, day, month, and year.
If you press and hold the SELECT button for more than 1 second, the system will switch to fast forward mode. When seconds are selected, the display automatically shows 0 seconds.
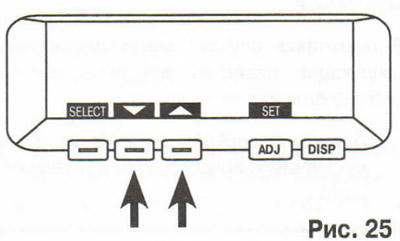
4. Setting the desired value is done by pressing the function buttons
5. After setting the clock, press the SET function button.
Note When the battery is disconnected, the display will reset to zero and the clock must be reset by repeating the steps above.
Mode 1: trip computer information
The trip computer displays the following information.
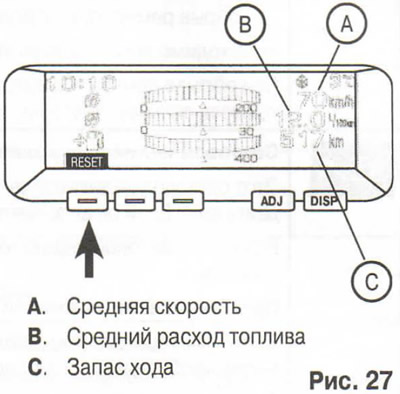
Average driving speed/average fuel consumption
These parameters display the average speed of movement (in kilometers per hour or miles per hour) and average fuel consumption (in l/100 km or km/l) since the last reset.
Zero the reading at the point at which you want to start the measurement, and the average fuel consumption will be counted from that moment.
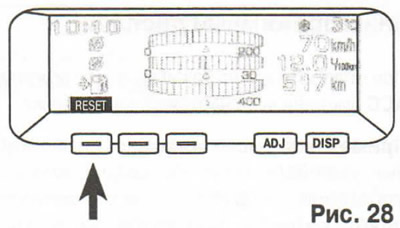
To reset the readings, press the RESET function button.
Notes:
- If the system cannot calculate a certain average speed, the display will show *-- km».
- Average fuel consumption varies depending on vehicle driving conditions (road conditions, driving style, etc.).
This parameter is displayed for reference, since the displayed fuel consumption value may differ from the actual one.
Power reserve
This parameter shows the distance (in kilometers or miles), which can be driven on the fuel remaining in the tank.
In the range display mode, if the value of this indicator becomes less than 50 km (30 miles), the display starts blinking orange.
Note: If the system cannot calculate a certain range value, the display shows «--- km».
Range is constantly changing depending on driving conditions, driving style and other interrelated factors. Accordingly, the value can only be used for reference. It is recommended to refuel as soon as the low fuel light on the instrument panel comes on.
The displayed range is calculated from the fuel consumption data. When the battery is disconnected, the fuel consumption data is erased from the memory, which reduces the accuracy of the calculations made by the system.
When the vehicle is stopped on a slope, the displayed range may change randomly. This is due to the movement of fuel in the tank on a slope and is not a malfunction.
Refueling a small amount of fuel
After refuelling, the range value will be calculated again.
However, if a small amount of fuel is added (no more than 25 l), the range data cannot be updated correctly.
In this case, do the following to get the correct data.
1. In the trip computer information window, press the Adj button to access additional button functions.
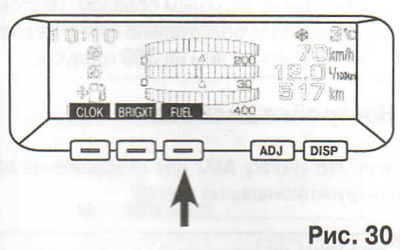
2. Press the FUEL function button and the range data will be recalculated with a beep.
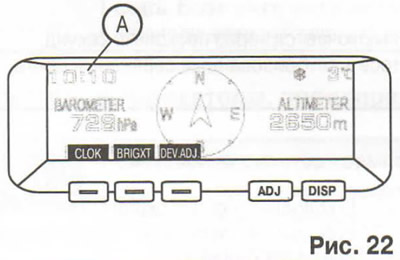
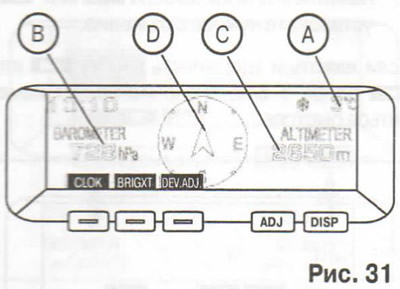
Mode 2: climate and navigation data
The climatic data window displays: ambient air temperature (A), atmospheric pressure V altitude (WITH) and electronic compass (D).
Ambient temperature
Displays the ambient temperature while the vehicle is in motion.
If the air temperature drops below about 3°C (37°F), a warning tone sounds and the warning symbol flashes on the display for about 10 seconds (A).
Attention: in such conditions, even if this symbol does not flash, there is a risk of ice formation, so drive carefully.
Even if the display shows other parameters (not climatic), the ambient temperature is displayed in the upper right corner of the screen.
Notes:
- Limits of measurement of temperature of external air - from - 44°C (-40°F) up to 50°C (122°F).
- Influenced by driving conditions, environmental conditions, etc. The displayed temperature may differ from the actual temperature.
Changing units
To change from°C to°F and back, press the button (A) in the climate data display mode and hold it for more than 3 seconds.
Shows the atmospheric pressure at the location of the vehicle.
Note. Barometer reading accuracy: 2 hPa.
Altimeter
Shows the altitude above sea level at the location of the vehicle.
Notes:
- Altimeter accuracy is 50 m (200 feet). If the car is below sea level, the altimeter shows 0 m (0 feet).
- The principle of operation of the altimeter is based on changes in atmospheric pressure. This means that its operation is affected by changes in weather and other conditions, and its reading may differ from the actual altitude.
- Fluctuations in atmospheric pressure can lead to a change in readings, even if the car is at a standstill at that time. This is not a sign of a system malfunction.
Changing units
To convert altimeter units from meters to feet and vice versa, press the button (A) in the climate data display mode and hold it for more than 3 seconds.

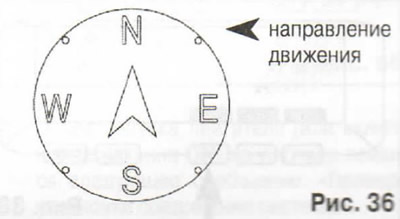
Electronic compass
The compass shows the direction of the car in one of 8 azimuths.
The compass responds to the Earth's magnetic field, so it may show the wrong direction in heavy traffic, as well as in places (or near them), where interference is superimposed on the lines of the Earth's magnetic field:
- car parks located in buildings and basements;
- highways, underground cables;
- zones above metro lines;
- transformer stations;
- areas along the railroads.
In these cases, correct compass readings are restored after the vehicle is returned to a location where the Earth's magnetic field is not distorted by interference.
Do not install ski racks, antennas, etc., which are attached with magnets, to your vehicle. This will affect the compass readings.
Setting the magnetic declination
The declination is the difference between geographic north (direction to the geographic north pole) and the direction shown by the compass needle. Since the declination is different in different places, it must be set again in each region. Otherwise, the compass will show the wrong direction.
Setting the declination is carried out as follows.
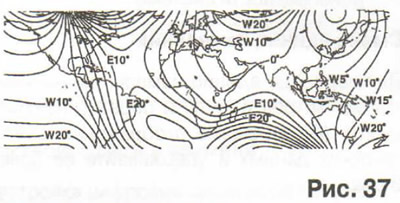
Notes:
- Declension varies in different regions; its approximate distribution is shown in the figure.
- Magnetic declination can be set in 5 degree increments, from 20 degrees west (W20) up to 20 degrees east (E20).
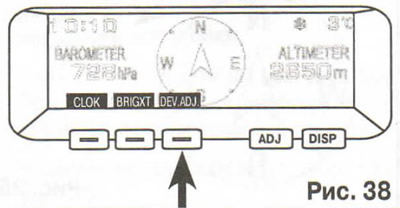
In climate display mode, press the ADJ button to display the selection buttons. After about 10 seconds, the display will automatically disappear if no button is pressed.
1. Press the buttons to select DEV.ADJ.
2. Press the selection buttons
If you press and hold the
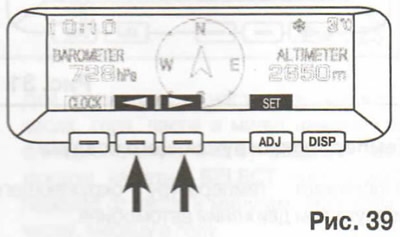
3. After setting the declination, press the SET function button.

Note. For safety reasons, these actions are allowed to be carried out if the vehicle speed does not exceed 3 km/h (2 miles per hour).
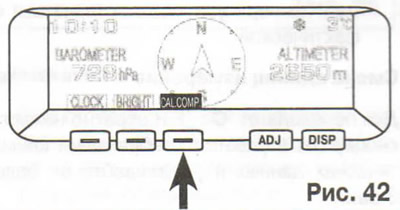
Compass setting
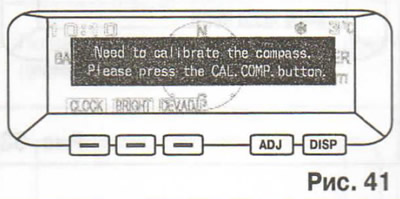
The compass is normally adjusted automatically when the vehicle is in motion. However, if human intervention is required, a message will appear on the display for approximately 7 seconds and the direction indicator will flash. In this case, you need to set up the compass as follows.
1. Press the selection buttons to select CAL.COMP.
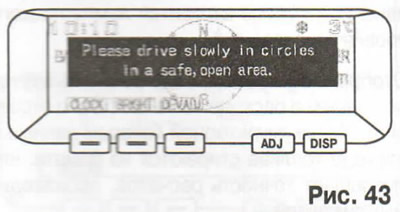
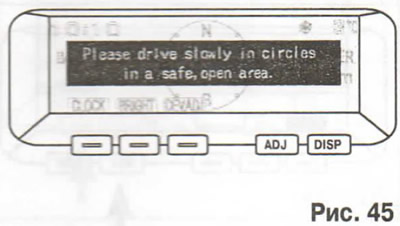
2. In a safe open area where there are no buildings or other vehicles, turn the vehicle slowly 360 degrees (make a full circle).
A warning message will appear on the display: «Please drive carefully around the circle in a safe open area».
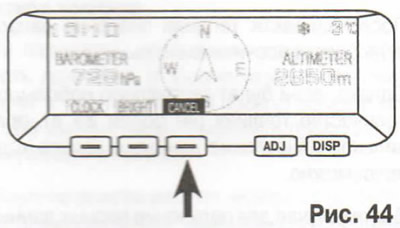
Note. When CANCEL appears on the display, press the CANCEL function button to complete the calibration and return to the display of climate information.
3. At the same time, the adjustment will be completed automatically, and the display will show the inscription «Completed the calibration» «Finishing the compass setup process».
Note. If you stop the vehicle in the middle of a turn and return to its original position in reverse, the message «Completed the calibration», even though the setup was not completed properly. Therefore, the car must be turned at least 360 degrees.
Display setting
Press the ADJ button to display the function button options.
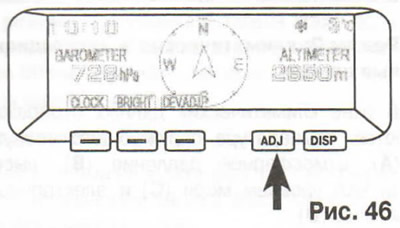
After 10 seconds, the display will automatically return to the previous mode if no button is pressed.
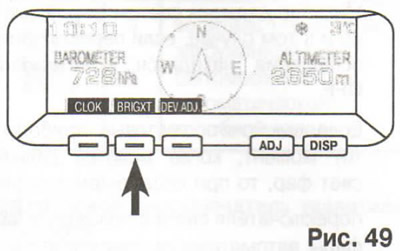
Display brightness adjustment
3. Press the BRIGHT button.
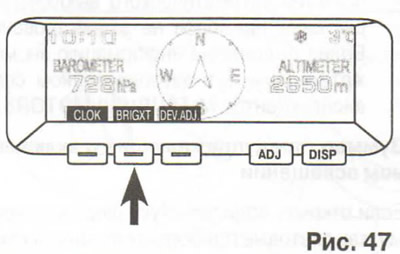
2. Press the function buttons
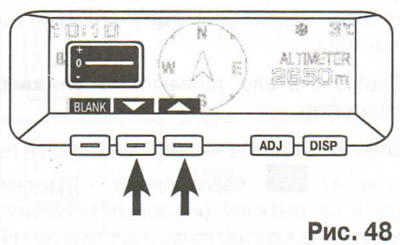
Pressing the button increases the brightness of the display.
Pressing the button decreases the brightness of the display.
3. Approximately 30 seconds after the adjustment is completed, the display will return to the previous reading mode if no button is pressed.
Notes:
- You can set the display brightness separately for when the lights are on and off.
- If you do not press any button, then after about 30 seconds the display returns to the previous indication mode.
Turning off the display
3. Press the BRIGHT button.
2. To turn off the display, press the BLANK function button. To turn the display back on, press the DISP button.
Selecting units of measurement
The units are factory set to km/h, l/300 km km and m.
| Mode | Unit | |||
| average speed | km/h | miles per hour | km/h | km/h |
| Average fuel consumption | l/100 km | miles/gallon | km/l | l/100 km |
| Power reserve | km | miles | km | km |
| Altimeter | m | feet | m | m |
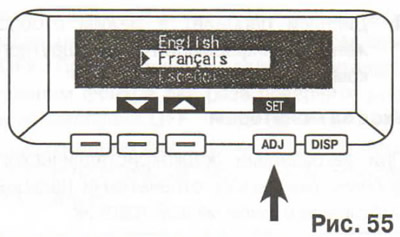
Selecting the display language
You can select English, French or Spanish for display messages.
3. Press the ADJ button to display the function button options.
2. Press the LANG button.
3. The desired language is set by pressing the function buttons
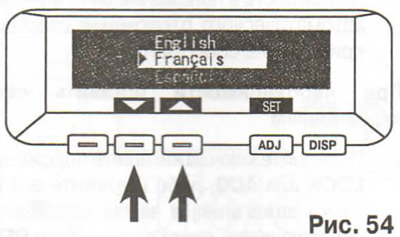
4. After selecting the language, press the SET function button.
If you want to select other units of measurement, click the button (A) and hold it for more than 3 seconds. In this case, the units of measurement will change as follows.

Note. For safety reasons, adjustments may only be made in the parking lot.
When disconnecting the battery
After disconnecting the battery, the data stored in the memory may be erased. In this case, proceed as follows.
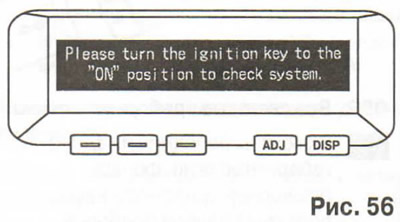
System power check
If the data is erased from the memory, when the ignition key is turned to the ACC position, the following message will appear on the display. In this case, you must do the following.
1. Start the engine (or turn the ignition key to the ON position).
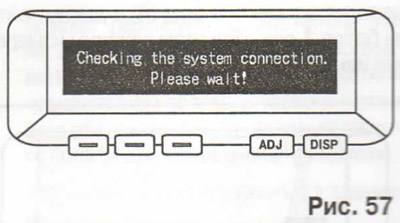
2. After starting the engine (or turn the ignition ON) the following message will appear on the display: «Checking the System Connection Establishment».
3. After a short time, a beep will sound, the connection will be established, and the following message will appear on the display: «System connection established».
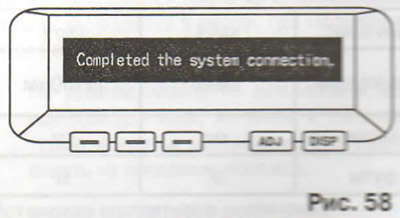
4. The display will switch to the trip computer information display mode.
Monitor care
When the liquid crystal display is dirty (e.g. fingerprints) wipe it with a dry soft cloth.
Note. Do not use a damp cloth or abrasive cleaners as this may damage the display.