



Attention:
- Do not wear the shoulder portion of the belt so that it passes under the armpit or is positioned in any other incorrect position.
- Make sure that the belt does not twist.
- The belt provides the greatest protection when the seatback is in an upright position. When the seatback is reclined, there is a greater risk that the occupant will slide out from under the belt, especially in a frontal collision, and be injured by the belt or by striking the instrument panel or seatback.
1. To fasten the seat belt, slowly pull the belt out, holding it by the side. Insert the bar into the buckle until you hear a click.
Note: If the belt is blocked and does not come out of the reel, pull the belt firmly and then release it. Then slowly pull the belt out again.
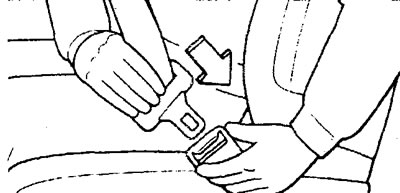
3. Pull the belt slightly to adjust the desired tension.
Warning: Pregnant women are advised to use the available seat belts after consulting with a doctor. This will reduce the risk of injury to both the woman and her unborn child. The lap belt should be positioned as low as possible, under the belly.
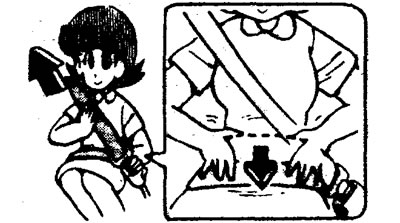
4. To unfasten the belt, hold the bar and press the button in the lock.
Note: Since the belt retracts automatically, hold it by the bar to prevent the belt from retracting too quickly. Otherwise, you may damage the vehicle.
5. Use the adjusting bar to adjust the length of the lap section of the rear seat belt.
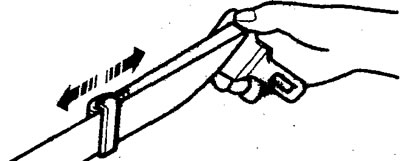
Caution: Do not adjust the seat belt length more than necessary to fasten it, as this will reduce the effectiveness of the seat belt.
Adjusting the height of the seat belt anchor point (front seats)
To raise the anchor point, slide the seat belt anchor upward. To lower the anchor point, press the locking button and slide the seat belt anchor downward to the position that is most comfortable for you and release the button. You should hear a click and be sure that the seat belt anchor is securely locked.
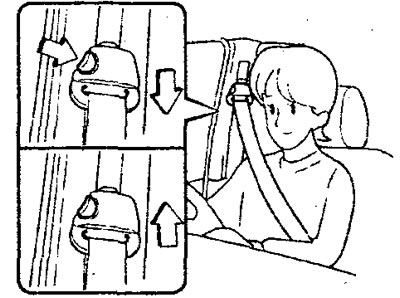
Caution: When adjusting the position of the belt attachment point, position it high enough so that the belt makes full contact with your shoulder but does not touch your neck.
Installing child seats
1. When transporting children in your car, you should always use restraining devices (child seats) of one type or another, depending on the weight and age of the child.
Attention:
- It is recommended to transport children only in the back seat and to use special child seats for transportation.
- Holding a child in your arms is not a substitute for a special restraint device (child seat).
2. Precautions for installing child seats in vehicles with a front airbag (SRS).
Please note: Vehicles equipped with a passenger airbag are provided with a warning label.
a) Do not install a child restraint system in a rear-facing position on the front passenger seat in front of the passenger air bag. The force of the passenger air bag deployment may force the child restraint system against the seatback, causing serious injury.
b) A forward-facing child seat must be installed in the rear seat of the vehicle.
c) When installing a child seat in the front seat of the vehicle, move the front seat to the rearmost position.
3. Recommendations for transporting infants and young children.
a) For infants of such a size that the shoulder belt contacts the face or neck when seated, a baby bassinet should be used instead of a child seat. For younger children, a child seat should be used.
b) The child restraint system (child seat) must correspond to the weight and height of your child and must be installed correctly in the car. The child seat is secured using the standard seat belts and special fasteners.
c) When installing a child seat, follow the instructions provided by the manufacturer of the device. Failure to follow these instructions may result in serious or fatal injury to your child.
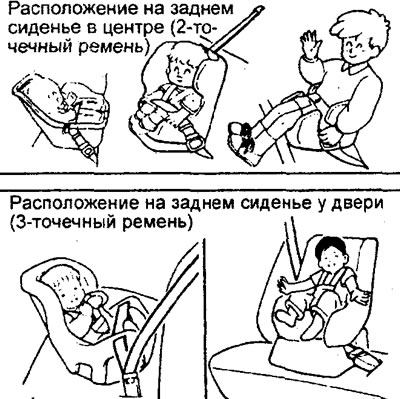
d) When the child seat is not in use, secure it with the seat belt or remove it from the vehicle to prevent it from accidentally injuring your child.
Note: Before purchasing a child seat, check to see if it fits securely in the rear seat. Sometimes the seat belt buckles located on the seat cushion can make it difficult to install some types of child seats securely. If the child seat can be moved forward on the seat cushion after tightening the belt, choose a different child seat.
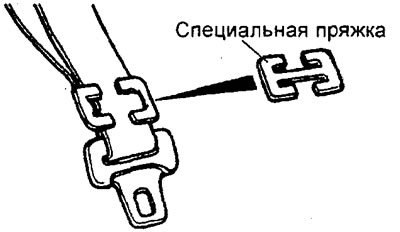
Note: For some child seats, regular fastening with seat belts may not be sufficient. In this case, use a special belt buckle that will additionally hold the child seat. Install the special buckle in accordance with the child seat manufacturer's instructions.
4. Activation of automatic locking ("ALR" mode) of the 3-point rear seat belt.
a) To set the "ALR" mode of the belt after installing the child seat, pull the belt out until it stops, then after a click, release the belt and let it retract to the position you need. After the belt is retracted, a click will be heard, indicating that the "ALR" mode of the belt is activated (in this case, the belt cannot be pulled out of the inertia reel). If necessary, tighten the belt to remove any slack in the lap section.
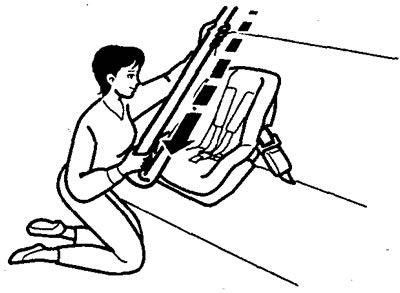
b) To deactivate the "ALR" mode, unfasten the belt and allow it to fully retract into the inertia reel, then pull it out slightly and release the belt.
Teenagers
Children for whom a child seat no longer fits must sit in the rear seat and wear a combination lap and shoulder belt.
The lap portion of the belt should fit snugly around the child's hips, below the pelvis, below the stomach. Otherwise, in an accident, the belt may cut into the stomach and cause injury to the child.
Warning: Children who are not wearing seat belts may be thrown from the vehicle in the event of an accident.