
Note: the location of the switches is shown in the figure "radio tape recorder".
1. The quality of radio signal reception can change significantly while the car is moving due to the terrain, weather: conditions and the proximity of sources of electromagnetic radiation.
Note: as the distance from the transmitting antenna of the radio station increases, the power of the radio signal decreases. For the FM band, the coverage area is within 20 - 25 km in the mode "Stereo" and 30-40 km in the mode "Mono".
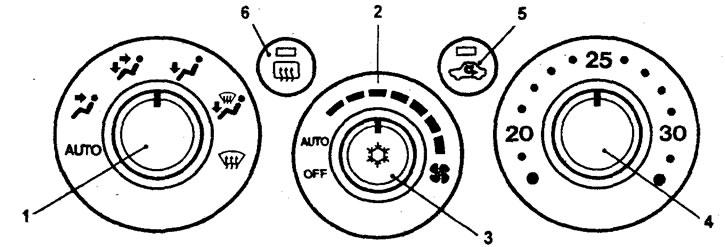
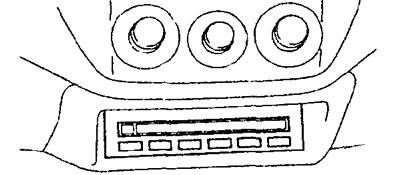
Heating and air conditioning control panel with automatic control (type 1).
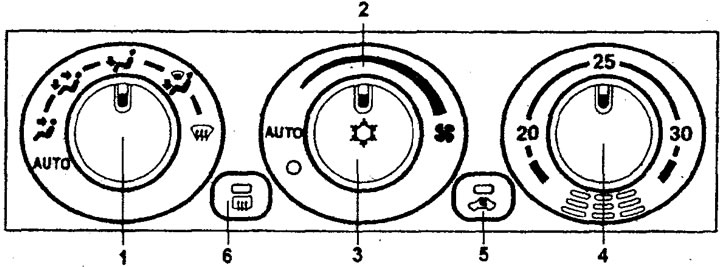
Heating and air conditioning control panel with automatic control (type 1).
Note: the description of the switches is given in the subsection "Heating and air conditioning control panel with automatic control".
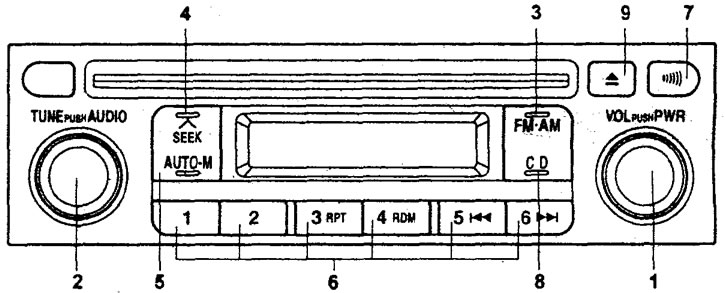
Radio tape recorder. Type.1
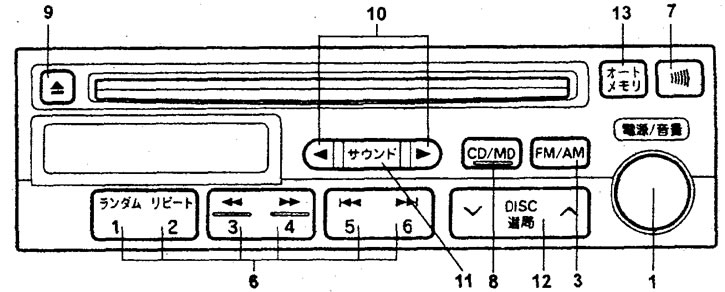
Radio tape recorder. Type.2
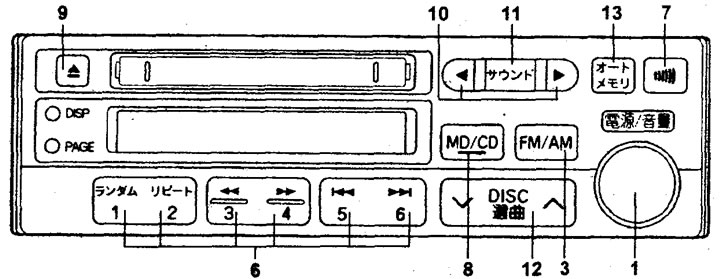
Radio tape recorder. Type.3
2. Audio cassette player.
A) About once a month, clean the tape drive of the radio with a cleaning cassette. This will ensure consistent playback quality.
6) It is not recommended to use cassettes with a duration of 120 minutes, because. due to the small thickness of the film, there is a risk of damage to the film or winding it on the elements of the tape drive mechanism.
V) Do not expose audio cassettes to high temperatures, such as by placing the cassette under the windshield. This may cause deformation of the cassette body.
3. CD player.
A) During the cold season or high humidity, due to fogging of the surface of the disc and the optical elements of the player, playback may fail. After normalization of humidity, the operation of the audio system is restored.
b) Strong vibration may cause distortion and interruptions in CD playback. This is not a malfunction.
V) It is not recommended to leave discs in the open sun. Protect the disc surface from scratches.
Radio tape recorder
Enable and disable
The audio system is activated by pressing a button (1) "PWR" (will turn on.the system that was working before the last shutdown).
Volume control
Turn the knob (1) to the right to turn up the volume, and to the left to turn it down.
Note: if the battery is disconnected for a long time, the radio memory is erased and the factory settings are restored.
Tone and balance control (type 1)
Adjustment is carried out by turning the switch (2). Switching between adjustment parameters is carried out by pressing the switch (2) "AUDIO".
BASS (bass tone).,
TREB (treble tone).
FADE (balance between front and rear speakers).
BAL (balance between right and left speakers).
Tone and balance control (type 2 and type 3)
Tone and balance adjustment by buttons (10) (◄ or ►). Switching between adjustment parameters is carried out with the button (11) "MODE". The display shows the name of the parameter, the average value and the set value.
BASS (bass tone).
TREB (treble tone).
FADE (balance between front and rear speakers).
BAL (balance between right and left speakers).
Note: If no operation is performed for approximately 7 seconds after pressing the [10] or [11] buttons, the tone and balance control mode will turn off.
Radio
Push button (3) (FM/AM) the radio is turned on, by pressing it again, the range is switched (AM or FM).
Tuning radio stations
1. Button (4) "SEEK" (type 1).
When you press a button (4) "SEEK" station search will start automatically. The search will stop when a stable signal is found. If the signal is weak, if the automatic search does not fix the setting, press the setting button again (auto search will be disabled) and manually tune in one step using the knob (2) "TUNE".
2. Button (12) "TUNE" (type 2 and type 3). Click on the right or left side of the button (12) (v or l) before the beep (automatic search for a radio station). The search will stop when a stable signal is found. If the automatic search does not fix the tuning due to a weak signal from the radio station, then press the tuning button again (auto search will be disabled) and complete the manual setting one step at a time. During stereo reception, the indicator lights up on the display "ST".
Note: for the AM band, the tuning step is 9 kHz, for the FM band, the tuning step is 0.1 MHz.
3. Button (5) "AUTO-M" (type 1).
When you press a button (5) "AUTO-M" the automatic search and memorization of radio stations will turn on.
Auto station search mode allows you to automatically tune radio stations to the settings buttons (6) With "1" By "6", if a stable signal is found. During stereo reception, the indicator lights up on the display "ST".
4. Button (13) "AUTO-MEMO" (type 2 and type 3).
Button (13) "AUTO-MEMO" designed for automatic programming of settings:
- A) Select a range, then press the button (13) "AUTO-MEMO" to the beep. The symbol will appear on the display "A" and it will automatically search for radio stations.
- b) Found stations (no more than 8) will be sequentially stored in the memory of the radio. If no stations are found, a dotted line will appear on the display.
- V) With each short press of the button (13) will switch to the tuned radio station in the order they are learned.
Programming settings
The settings of the most frequently listened to radio stations can be memorized. To do this, tune in to the desired radio station, then press and hold one of the buttons (6) to the beep. Switching to the tuned radio station is carried out by briefly pressing the desired button.
Note: if the batteries are not used for a long time, the memory of the radio is erased and the factory settings are restored.
Traffic Information
The choice of this function is carried out by the button (7). On the territory of the Russian Federation, this function does not work.
Note: on new radios, the frequency is set to 1620 kHz.
Antenna
Attention: before washing the car and driving into a low-ceilinged area, make sure that this action will not damage the antenna.
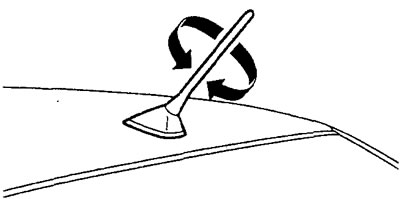
Whip antenna
The detachable whip antenna is located on the roof of the car.
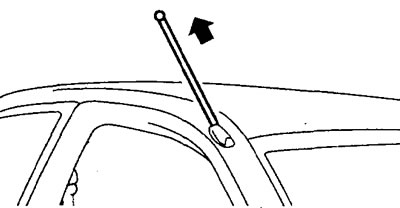
Retractable Antenna
This antenna is operated manually. To do this, grab the upper end of the antenna and pull it up until resistance occurs.
CD player (type 1 and type 2)
Switching to the CD player mode is carried out with the button (8).
Loading the CD
Insert the CD into the loading slot and push lightly.
Ejecting a CD
Press the button to eject the CD (9).
Record selection
To select an entry (track) press the button "5" (6) or "6" (6) (number less - "|◄◄", the number is greater - "►►|"), until the number of the required entry appears on the display with the indicator "TRACK".
Selecting a section of a recording (type 2)
This function is designed to jump to any fragment of the recording, located before or after the current playback location. To do this, click on the button "3" (6) or "4" (6) ("◄◄" or "►►"). Rewind will stop when the button is released (when jumping back, take into account the current playback location).
Repeat Recording
To loop through the current track, press the button "3" (6) (type 1) or "2" (6) (type 2) "RPT". The display will show "RPT". To turn off repeat, press the button again.
Random selection of records
To play CD tracks in random order, press the button "4" (6) (type 1) or "1" (6) (type 2) "RDM". The display will show "RDM". To continue playing the recording, press the button again "RDM".
Disc selection (type 2 or type 3)
The choice of disks is carried out using the button (12) (v or l).
Error messages
The following messages may appear on the radio display:
| Code | Malfunction |
| E01 E02 | Failed to read data (CD defect) |
| E03 E | CD playback mechanism defect |
| E HOT | Playback stopped due to player overheating. |
| No DISC | CD not inserted |
Mini disc player (type 3)
Switching to the mini-disc player mode is carried out with the button (8) "MD/CD".
Ejecting MDs
The ejection of mini-discs is carried out with the button (9).
Loading MDs
Insert the MD into the slot and push it forward slightly.
Record selection
To select an entry (track) press the button "5" (6) or "6" (6) (number less - "|◄◄", the number is greater - "►►|"), until the number of the required entry appears on the display with the indicator "TRACK".
Selecting a section of a recording
This function is designed to jump to any fragment of the recording, located before or after the current playback location. To do this, click on the button "3" (6) or "4" (6) ("◄◄" or "►►"). Rewind will stop when the button is released (when jumping back, take into account the current playback location).
Repeat Recording
To loop through the current track, press the button "2" (6) "RPT". The display will show "RPT". To turn off repeat, press the button again.
Random selection of records
To play the MD recordings in random order, press the button "1" (6) "RDM". The display will show "RDM". To continue playing the recording, press the button again "RDM".
CD changer or MD changer (type 2 or type 3)
CO - changer (type 3)
Switching to CD player mode is done by double pressing the button (8) "MD/CD".
MD - changer (type 2)
Switching to the MD player mode is done by double pressing the button (8) "CD/MD".
Note:
- - The CD changer or MD changer can only be used when the radio is switched on.
- - Adjustment of volume, timbre and balance is carried out using the radio.
- - After removing the disc from the CD changer or MD changer, the radio will turn on.
1. The CD or MD player is turned on when a disc is inserted into the player. Note: Disc playback will stop when you press the eject button "EJECT" on the CD player.
2. The CD changer or MD changer is designed for six discs. To install or remove a drive, do the following:
A) Press one of the six drive select buttons. After that, the indicator above the pressed button will light up.
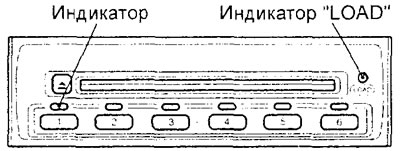
indicator indicator "LOAD"
CD changer.
b) If the indicator "LOAD" does not light up, then the disk is already installed. To eject it, press the eject button "EJECT" on the CD changer. After removing the disc, you can install a new one, label side up.
b) If the indicator "LOAD" lights up, it means the disk can be installed.
Note: The operation of a CD changer or MD changer is exactly the same as that of a CD player.