
English Русский
Български
Беларускі
Український
Српски
Hrvatski
Română
Polski
Slovenský
Magyar
Articles Bookmark Contacts Sitemap   
Company Audi Company Ford Company Hyundai Company Kia Company Mazda Company Mercedes-Benz Company Nissan
MitsubishiMan.ru


Home Colt Lancer Galant L200 Outlander Pajero Others
Lancer 9 (2000-2007, petrol) Lancer 3 and 5 (1984-1992)

Wheel replacement (Mitsubishi Lancer 9)

  • Home
  • Lancer
  • 9 (2000-2007, petrol)
  • General information
  • User manual
  • Wheel replacement
0
1. If you need to change a tire on the road, gradually reduce speed and move the car to a safe place.

2. Stop the vehicle on a level place with firm ground.

3. Stop the engine and turn on the hazard warning lights.

4. Securely apply the parking brake and move the selector to position "P" (models with a CVT or automatic transmission).

Note: If necessary, block the wheel diagonally opposite the one to be replaced.


5. Remove the spare wheel by unscrewing the retainer using the wheel brace.
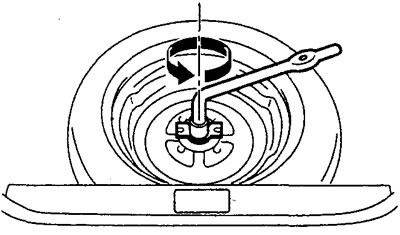


6. Replace the wheel.

a) Remove the decorative cap (if installed).
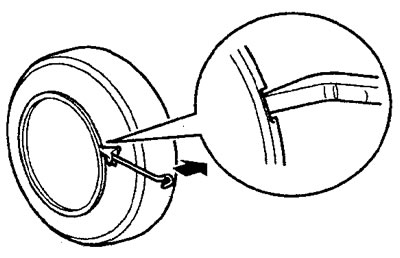


b) Loosen the mounting nuts of the wheel being replaced by one turn.

c) Install the jack (see the section "Jacking the car").

d) Turn the jack handle to raise the vehicle.


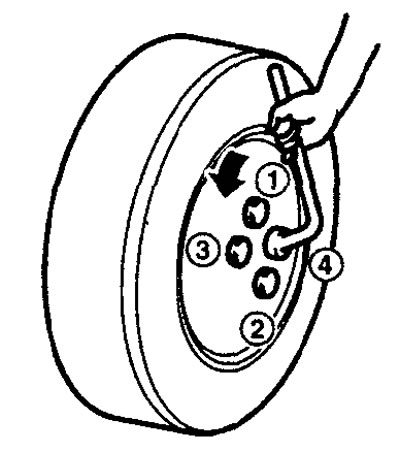
d) Unscrew the wheel mounting nuts in the order of the numbers shown in the figure.
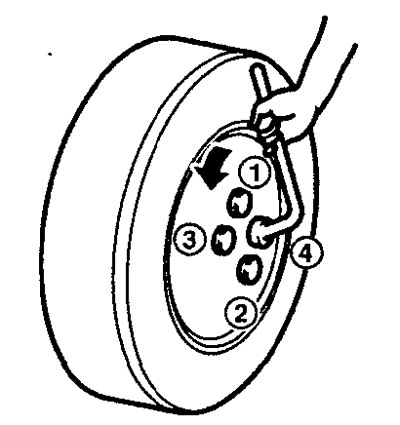


Note: Only raise the vehicle high enough to remove or change a wheel.


e) Before installing the wheel, remove rust from the mounting surface with a wire brush or similar tool. Installing a wheel without good metal-to-metal contact on the mounting surface may cause the wheel nuts to become loose and even cause the wheel to come off while driving. Therefore, check that the nuts are securely fastened.
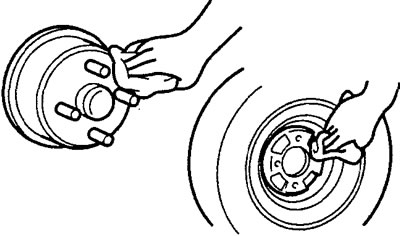


Note:
  • - When replacing with a standard wheel, after the first 1600 km of mileage, check the reliability of the lug nuts.
  • - Do not install an unbalanced wheel as a spare.
  • - Avoid installing mixed types and sizes of tires/wheels, as this will negatively affect driving safety


g) Install the spare wheel and tighten the mounting nuts by hand.
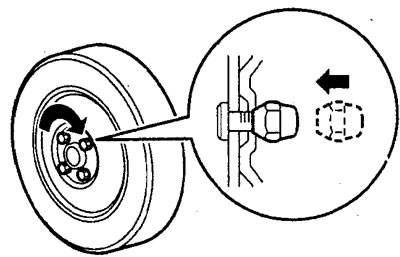


Steel disk.
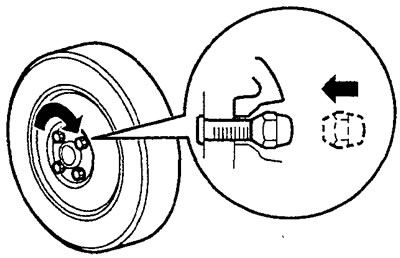


Aluminum disk.
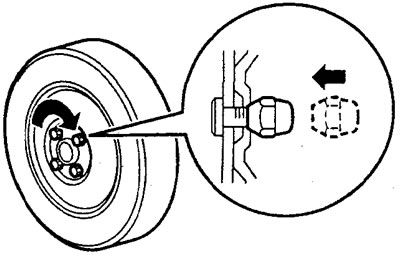


Aluminum disk ("spare wheel").


h) Lower the vehicle and tighten the wheel nuts in the sequence shown in the figure. When tightening the nuts, do not use an extension wrench or press on it with your foot.

Tightening torque: 88-108 Nm


7. Check the air pressure in the installed tire.

Note: Be sure to replace the tire valve cap as dirt and moisture may enter the valve, causing air leakage.


8. Before driving, make sure all tools, jack and flat tire are securely stored in their storage areas to reduce the possibility of injury during a collision or sudden braking.
This article is available at: russian, bulgarian, belarusian, ukrainian, serbian, croatian, romanian, polish, slovak, hungarian
This article was reviewed by: Arseny Pavlov
Share with friends:
◀ Previous
Lancer 9: User manual
Next ▶

Jacking up a car
Spare tire, jack and tools
Engine malfunctions while driving
Jump starting with an additional battery
Starting the engine
Replacement with «dokatka»
Recommendations for choosing tires
Checking tire pressure and condition
Tire replacement
Features of using aluminum wheels
Similar materials for other Mitsubishi models

➤ Gearbox, wheel drive — external inspection for tightness Mitsubishi Colt 4 and 5 (1991-2003)
➤ Wheel rotation Mitsubishi Galant 6 and 7 (1987-1998)
➤ Checking tire wear and wheel alignment Mitsubishi L200 4 (2005-2014, diesel)
➤ Locking and unlocking the steering wheel Mitsubishi Outlander 1 (2003-2008)
➤ Replacing a damaged wheel Mitsubishi Pajero 1 and 2 (1982-1999)
➤ Steering wheel adjustment Mitsubishi Carisma (1995-2004)
Link in different formats to this article
Comments and feedback from visitors
No comments yet


Add up two numbers 38 + 44


Lancer 9 (2000-2007, petrol) 
  • General information
  • User manual
  • Maintenance
  • Power unit
  • Repair of MPI engines
  • Repair of GDI engines
  • Engine overhaul
  • Cooling and lubrication system
  • MPI fuel injection system
  • GDI fuel injection system
  • Intake and exhaust system
  • Starting and charging system
  • Transmission
  • Automatic gearbox
  • Variator (CVT)
  • Drive shafts and gearbox
  • Chassis and running gear
  • Front suspension
  • Rear suspension
  • Steering
  • Brake system
  • Body and interior
  • Doors, locks and windows
  • Exterior (external elements)
  • Interior (internal elements)
  • Electrical equipment
  • Heater and air conditioner
  • Security system SRS
  • Equipment and devices
  • Wiring diagrams (saloon)
  • Wiring diagrams (wagon)
Lancer 3 and 5 (1984-1992) 
  • General information
  • Maintenance
  • Power unit
  • Engine repair
  • Lubrication system
  • Cooling system
  • Ignition system
  • Fuel system
  • Carburetor
  • Fuel injection
  • Diesel power system
  • Exhaust system
  • Transmission
  • Clutch
  • Car gearbox
  • Chassis and running gear
  • Front suspension
  • Rear suspension
  • Steering
  • Brake system
  • Wheels and tires
  • Body and interior
  • Exterior (external elements)
  • Interior (internal elements)
  • Heating system
  • Electrical equipment
  • Equipment and devices
  • Power devices
  • Electrical circuits
MitsubishiMan.ru © 2018–2026 • Mobile version • Articles about Mitsubishi • Contacts • Sitemap: EN BG BY UA RS HR RO PL SK HU • Site search • Bookmark
Colt 2 and 3 (1983-1993) · Colt 4 and 5 (1991-2003) · Colt 5 (1995-2003) · Lancer 3 and 5 (1984-1992) · Lancer 9 (2000-2007) · Galant 5 (1983-1989) · Galant 6 and 7 (1987-1998) · L200 4 (2005-2014) · Outlander 1 (2003-2008) · Pajero 1 and 2 (1982-1999) · Pajero 4 (2006-2021) · Carisma (1995-2004) · Space Star (1998-2005) ·
This resource sets cookies 🍪 to avoid bothering you with repeated data entry.