
English Русский
Български
Беларускі
Український
Српски
Hrvatski
Română
Polski
Slovenský
Magyar
Articles Bookmark Contacts Sitemap   
Company Audi Company Ford Company Hyundai Company Kia Company Mazda Company Mercedes-Benz Company Nissan
MitsubishiMan.ru


Home Colt Lancer Galant L200 Outlander Pajero Others
Pajero 4 (2006-2021) Pajero 1 and 2 (1982-1999)

Replacing a damaged wheel (Mitsubishi Pajero 1)

  • Home
  • Pajero
  • 1 (1982-1999)
  • General information
  • User manual
  • Replacing a damaged wheel
0
If you get a flat tire, stop the car in a safe place and turn off the engine.

1. Turn on the hazard warning lights and place a sign warning of the malfunction at a sufficient distance from the vehicle. Ask passengers to leave the cabin.
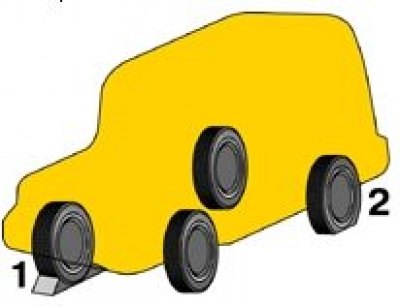


2. Place the vehicle on a level, firm surface and apply the parking brake. To prevent the vehicle from rolling after jacking it up, block (1) the flat tire diagonally opposite the flat tire (2).

3. Prepare the spare tire, jack, jack handle and tools.
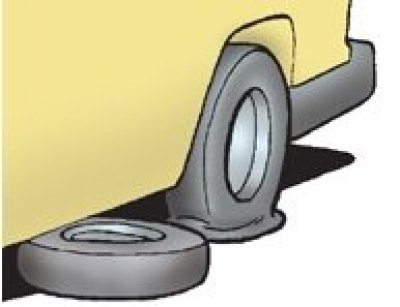


4. Place the spare tire under the car body near the jack; this will reduce the risk of injury if the vehicle comes off the jack.

5. Use the provided wrench to remove the wheel lug nuts.
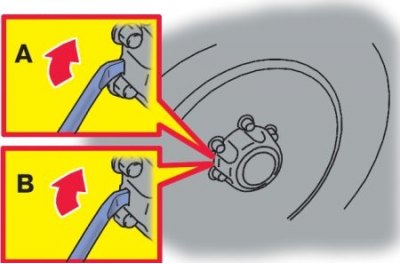


6. Loosen the wheel mounting nuts using an impact wrench. Do not remove the nuts yet (A - cars with steel wheels, B - cars with cast aluminum wheels)


7. See subsection 1.33.2 to determine the jacking point near the flat tire, then install the jack and raise the car so that the wheel no longer touches the ground.
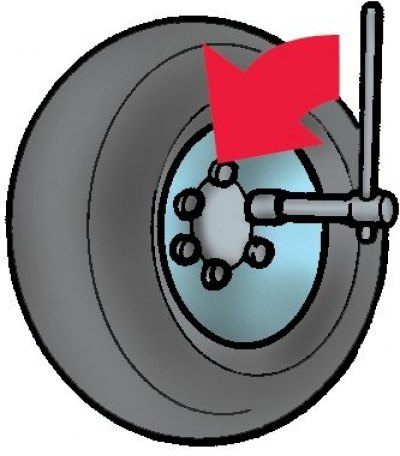


8. Remove the wheel nuts, then remove the wheel.
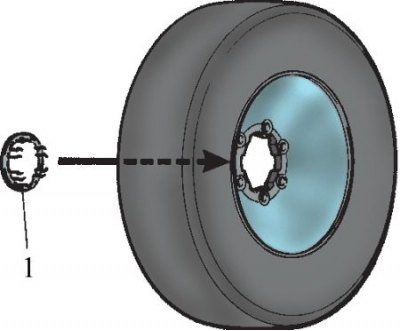


9. Remove the cap fastening (1) covering the mounting nuts from the other side of the wheel.
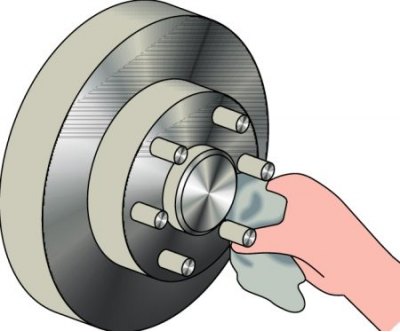


10. Remove any dirt from the wheel hub surface and from the mounting bolt holes on the wheel, then install the spare wheel.
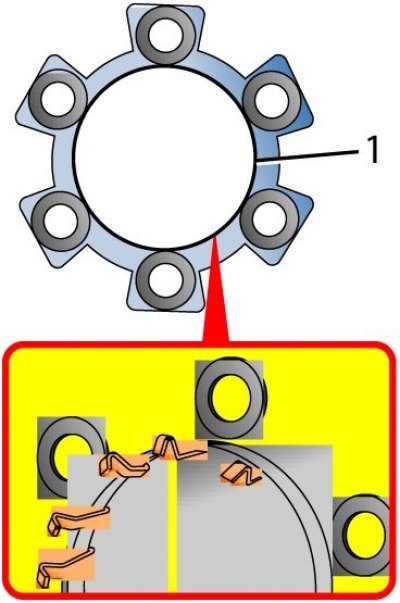


11. Install the cap mount onto the spare tire. Install the mount so that its tabs fit into the corresponding cutouts (1) on the wheel.

Please note: The front wheel cap mount is gold colored and the rear wheel cap mount is ribbed colored.
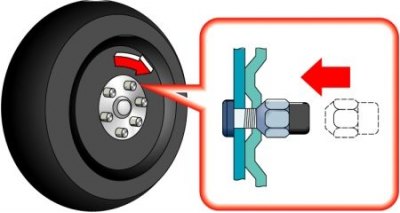


12. On vehicles with steel wheel rims, install the wheel mounting nuts (conical shape) tapered end inwards, then secure them with your fingers so that the wheel does not wobble.
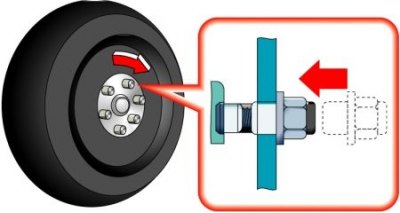


13. On vehicles with aluminum wheels, temporarily tighten the wheel mounting rails (flange nuts) so that the flanges touch the wheel and it does not wobble.


Caution: If all four wheels have been replaced with steel rims, use cone-shaped lug nuts.


Caution: Never lubricate wheel nuts or bolts, otherwise they will not hold securely.
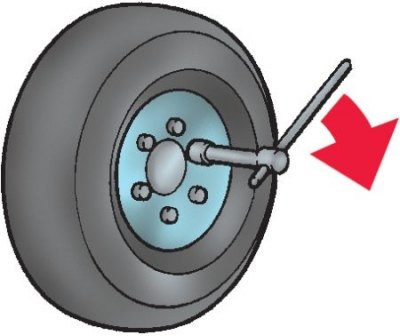


14. Slowly lower the vehicle then gradually tighten all wheel nuts until they are tightened to the specified torque.

The required tightening torque is 100–120 Nm.

Caution: When tightening the wheel nuts, do not apply too much force.


Caution: For example, do not press down on the wrench with your foot, and do not use a very long crowbar or pipe to increase leverage when using the impact wrench.


15. Lower the jack and remove it from underneath the vehicle. Place the jack in place and place the flat tire on the spare tire bracket. Repair a flat tire as soon as possible.

16. Check the tire pressure. The recommended pressure is indicated on the plate located on the inside of the driver's door.

Caution: If the steering wheel vibrates when driving after replacing a wheel, contact a specialist to check the balance of this wheel.


Attention! For driving safety, try not to install wheels with different types of tires on your vehicle or use non-standard sized wheels.
This article is available at: russian, bulgarian, belarusian, ukrainian, serbian, croatian, romanian, polish, slovak, hungarian
This article was reviewed by: Arseny Pavlov
Share with friends:
◀ Previous
Pajero 1 and 2: User manual
Next ▶

Heated windshield and door glass
Interior heating
Air conditioner switch
Heater and air conditioner
Adjusting the volume and direction of air
Towing a car
Identification numbers and information plates
Engine and transmission identification number
Underhood signs
Similar materials for other Mitsubishi models

➤ Checking, replacing grease and adjusting rear wheel… Mitsubishi Colt 2 and 3 (1983-1993)
➤ Replacing the coolant Mitsubishi Lancer 3 and 5 (1984-1992)
➤ Replacing wheel sensor rotors Mitsubishi Galant 6 and 7 (1987-1998)
➤ Replacing the coolant Mitsubishi L200 4 (2005-2014, diesel)
➤ Locking and unlocking the steering wheel Mitsubishi Outlander 1 (2003-2008)
➤ Replacing the wheel mounting bolt Mitsubishi Space Star (1998-2005)
Link in different formats to this article
Comments and feedback from visitors
No comments yet


Add up two numbers 35 + 32


Pajero 4 (2006-2021) 
  • General information
  • User manual
  • Troubleshooting
  • Maintenance
  • Technical specifications
  • Power unit
  • Engine repair
  • Cooling system
  • Lubrication system
  • Fuel system
  • Engine management system
  • Intake and exhaust system
  • Engine electrical equipment
  • Transmission
  • Clutch
  • Manual gearbox
  • Automatic gearbox
  • Drive shafts
  • Chassis and running gear
  • Front suspension
  • Rear suspension
  • Brake system
  • Steering
  • Body and interior
  • Exterior (external elements)
  • Interior (internal elements)
  • Doors, locks and windows
  • Body dimensions
  • Electrical equipment
  • Safety system (SRS)
  • Air conditioner
  • Equipment and devices
  • Electrical diagrams
Pajero 1 and 2 (1982-1999) 
  • General information
  • User manual
  • Seats and seat belts
  • Instruments and controls
  • Driving and operation
  • Maintenance
  • Power unit
  • Gasoline engines
  • Diesel engines
  • Ignition system
  • Engine electrical equipment
  • Cooling and lubrication system
  • Power and exhaust system
  • Fuel system (gasoline)
  • Fuel system (diesel)
  • Transmission
  • Clutch
  • Mechanical gearbox
  • Automatic gearbox
  • Drive shafts and axles
  • Chassis and running gear
  • Front suspension
  • Rear suspension
  • Steering
  • Brake system
  • Body and interior
  • Exterior (external elements)
  • Interior (internal elements)
  • Doors, locks and windows
  • Electrical equipment
  • Equipment and devices
  • Heater and air conditioner
  • Cruise control
  • Headlights and lighting
  • Electrical circuits
MitsubishiMan.ru © 2018–2026 • Mobile version • Articles about Mitsubishi • Contacts • Sitemap: EN BG BY UA RS HR RO PL SK HU • Site search • Bookmark
Colt 2 and 3 (1983-1993) · Colt 4 and 5 (1991-2003) · Colt 5 (1995-2003) · Lancer 3 and 5 (1984-1992) · Lancer 9 (2000-2007) · Galant 5 (1983-1989) · Galant 6 and 7 (1987-1998) · L200 4 (2005-2014) · Outlander 1 (2003-2008) · Pajero 1 and 2 (1982-1999) · Pajero 4 (2006-2021) · Carisma (1995-2004) · Space Star (1998-2005) ·
This resource sets cookies 🍪 to avoid bothering you with repeated data entry.