
English Русский
Български
Беларускі
Український
Српски
Hrvatski
Română
Polski
Slovenský
Magyar
Articles Bookmark Contacts Sitemap   
Company Audi Company Ford Company Hyundai Company Kia Company Mazda Company Mercedes-Benz Company Nissan
MitsubishiMan.ru


Home Colt Lancer Galant L200 Outlander Pajero Others
Galant 6 and 7 (1987-1998) Galant 5 (1983-1989, petrol)

Removal and installation the throttle body (Mitsubishi Galant 6)

  • Home
  • Galant
  • 6 (1987-1998)
  • Power unit
  • Power and exhaust systems
  • Removal and installation the throttle body
0
Contents: Removal ⤓ Installation ⤓
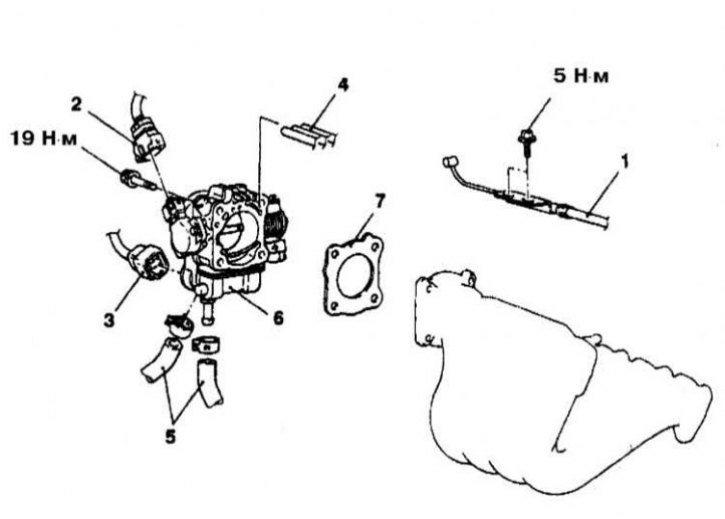

Throttle Body Installation Details for 1.5L Models
1 - Throttle cable; 2 - TPS wiring connector; 3 - Idle speed control servo wiring connector; 4 - Vacuum hoses; 5 - Water tract hoses; 6 - Throttle body; 7 - Sealing gasket
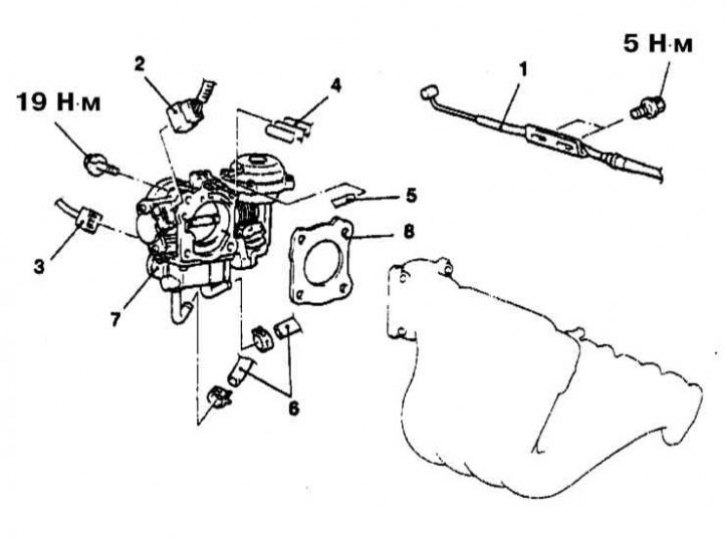


Throttle Body Installation Details for 1.8L Models
1 - Throttle cable; 2 - TPS wiring connector; 3 - Idle speed control servo wiring connector; 4 - Vacuum hoses; 5 - Vacuum hose (models with thermostat); 6 - Water tract hoses; 7 - Throttle body; 8 - Sealing gasket
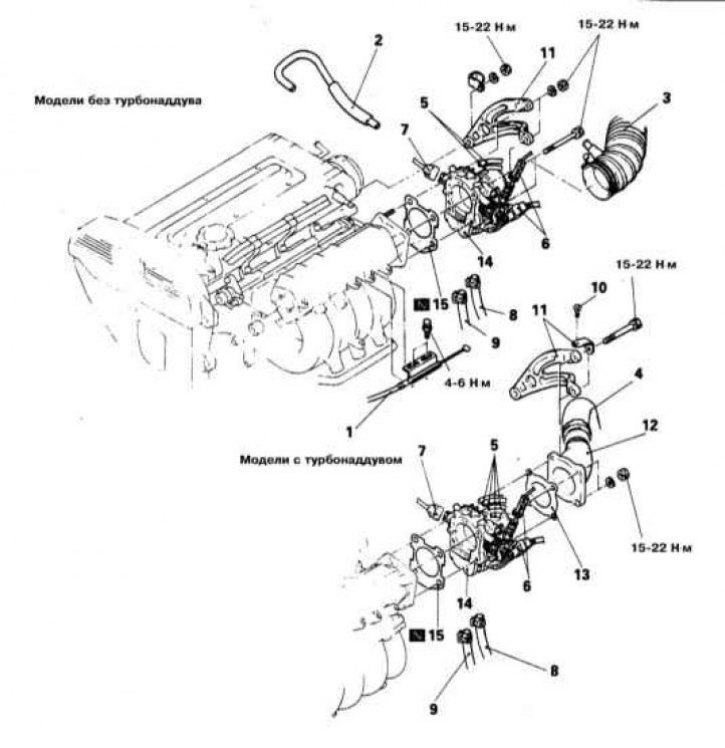


Throttle Body Installation Details for 1.6L and 2.0L DOHC Models
1 - Throttle cable; 2 - Ventilation hose; 3 - Air intake duct; 4 - Air sleeve C; 5 - Vacuum hose; 6 - IAC Drive Motor and Closed Throttle Position Switch Wiring Connectors; 7 - TPS wiring connector; 8 - Water tract transit hose; 9 - Water circuit bypass hose; 10 - Ground plate mounting screw; 11 - Throttle body support bracket and ground plate; 12 - Air duct connection branch pipe; 13 - Sealing gasket; 14 - Throttle body; 15 - Sealing gasket
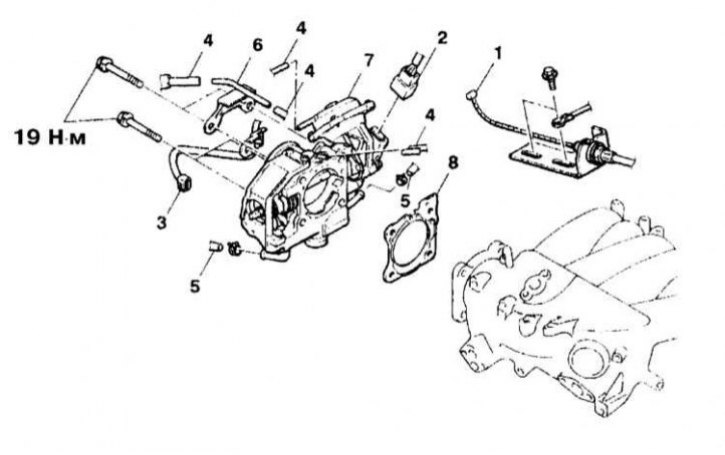


Throttle Body Installation Details for 3.0L SOHC and DOHC Models
1 - Throttle cable; 2 - TPS wiring connector; 3 - Idle speed control servo wiring connector (I - AC); 4 - Vacuum hoses; 5 - Water tract hose; 6 - Vacuum tube; 7 - Throttle body; 8 - Sealing gasket
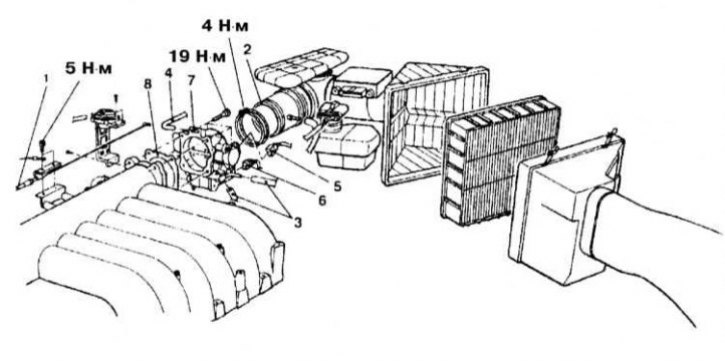


Throttle Body Installation Details for 3.5L Models
1 - Throttle cable; 2 - Air intake duct; 3 - Heating system hoses; 4 - Vacuum hose; 5 - TPS wiring connector; 6 - Idle speed control servo wiring connector; 7 - Throttle body; 8 - Sealing gasket


Removal


1. The details of the throttle body installation on various engines are shown in the illustrations.

2. Release the pressure in the fuel system (see Section Relieving pressure in the fuel system).


3. Drain the cooling system.
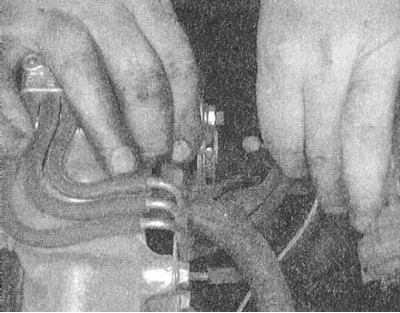


4. Mark the position of the adjusting bolt on the throttle cable mounting flange. Remove the bolt and disconnect the cable from the throttle lever on the throttle body. Move the cable to the side.

5. Disconnect the ventilation hose and air supply hose from the throttle body and move it aside.

6. Label and disconnect the vacuum hoses.
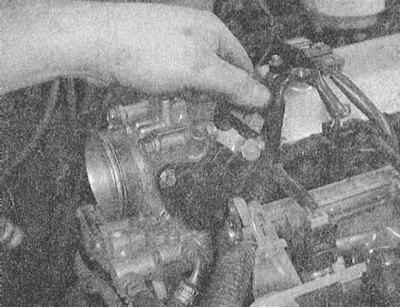


7. Mark and disconnect the electrical wiring connected to the throttle body.

8. Disconnect the transit and bypass hoses of the water path from the base of the throttle body.

9. If equipped, disconnect the ground bus and remove the throttle body support bracket and ground plate from the engine.

10. Remove the air duct connection pipe and its sealing gasket.
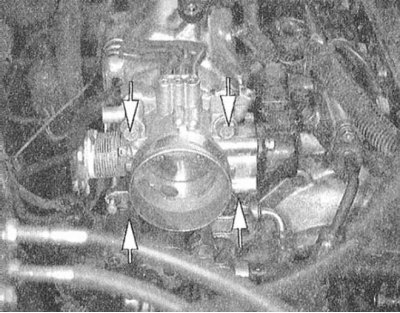


11. Unscrew the mounting screws and remove the throttle body from the engine. Remove the sealing gasket - it must be replaced during installation.

Installation


1. Carefully clean all mating surfaces, place a new sealing gasket on the pressure chamber of the intake manifold.

2. Install the throttle body. Screw in and tighten the mounting bolts to the required torque.

3. After replacing the sealing gasket, install the air intake duct connection pipe.

4. If equipped, install the support bracket and ground plate. Screw in the mounting bolts and tighten them to the required torque (15÷22 Nm).

5. Screw in the ground plate mounting screw.

6. Connect the water line hoses to the throttle body and secure them with new clamps.

7. Following the markings applied during dismantling, restore the original connection of the vacuum hoses and electrical wiring.

8. Connect the gas cable by screwing the adjusting bolt back into its original position. Check that the cable is adjusted correctly.

9. Connect the air intake duct and ventilation hose.

10. If removed, reinstall the battery and connect the wires to it (first the positive, then the negative).

11. Fill the engine with fresh coolant (see Chapter Settings and ongoing maintenance).
This article is available at: russian, bulgarian, belarusian, ukrainian, serbian, croatian, romanian, polish, slovak, hungarian
This article was reviewed by: Dmitry Vasiliev
Share with friends:
◀ Previous
Galant 6 and 7: Power and exhaust systems
Next ▶

Relieving pressure in the fuel system
Power and exhaust system specifications
General information about the power supply and exhaust systems
Removal and installation of fuel lines and injection injectors
Checking the condition and replacing fuel lines and their fittings
Checking the proper functioning of the injectors
Removal and installation the fuel pressure regulator
Removal and installation the fuel tank relief valve
Similar materials for other Mitsubishi models

➤ Throttle Body — Checking and Cleaning Mitsubishi Colt 4 and 5 (1991-2003)
➤ Throttle body Mitsubishi Lancer 9 (2000-2007, petrol)
➤ Drop-down body side Mitsubishi L200 4 (2005-2014, diesel)
➤ Removal and installation the throttle body Mitsubishi Outlander 1 (2003-2008)
➤ Throttle body — removal and installation Mitsubishi Pajero 1 and 2 (1982-1999)
➤ Cleaning the throttle body Mitsubishi Carisma (1995-2004)
Link in different formats to this article
Comments and feedback from visitors
No comments yet


Add up two numbers 33 + 43


Galant 6 and 7 (1987-1998) 
  • General information
  • Introduction to guide
  • User manual
  • Driving and operation
  • Maintenance
  • Power unit
  • Dismantling the engine
  • Engine overhaul
  • Cooling and heating
  • Power and exhaust systems
  • Engine electrical equipment
  • Engine management systems
  • Transmission
  • Mechanical gearbox
  • Automatic gearbox
  • Clutch
  • Drive shafts and transfer case
  • Chassis and running gear
  • Brake system
  • Car suspension
  • Steering
  • Body and interior
  • Exterior (external elements)
  • Interior (internal elements)
  • Doors, locks and windows
  • Electrical equipment
  • Equipment and devices
  • Wiring diagrams Galant
  • Wiring diagrams Mirage
  • Wiring diagrams Diamante
Galant 5 (1983-1989, petrol) 
  • General information
  • Troubleshooting
  • Maintenance
  • Power unit
  • Engine repair
  • Engine overhaul
  • Cooling and heating
  • Fuel and exhaust system
  • Engine electrical equipment
  • Reducing exhaust toxicity
  • Transmission
  • Manual gearbox
  • Automatic gearbox
  • Clutch and drive shafts
  • Chassis and running gear
  • Brake system
  • Car suspension
  • Steering
  • Body and interior
  • Exterior (external elements)
  • Interior (internal elements)
  • Doors, locks and windows
  • Electrical equipment
  • Equipment and devices
  • Electrical diagrams
MitsubishiMan.ru © 2018–2026 • Mobile version • Articles about Mitsubishi • Contacts • Sitemap: EN BG BY UA RS HR RO PL SK HU • Site search • Bookmark
Colt 2 and 3 (1983-1993) · Colt 4 and 5 (1991-2003) · Colt 5 (1995-2003) · Lancer 3 and 5 (1984-1992) · Lancer 9 (2000-2007) · Galant 5 (1983-1989) · Galant 6 and 7 (1987-1998) · L200 4 (2005-2014) · Outlander 1 (2003-2008) · Pajero 1 and 2 (1982-1999) · Pajero 4 (2006-2021) · Carisma (1995-2004) · Space Star (1998-2005) ·
This resource sets cookies 🍪 to avoid bothering you with repeated data entry.