
English Русский
Български
Беларускі
Український
Српски
Hrvatski
Română
Polski
Slovenský
Magyar
Articles Bookmark Contacts Sitemap   
Company Audi Company Ford Company Hyundai Company Kia Company Mazda Company Mercedes-Benz Company Nissan
MitsubishiMan.ru


Home Colt Lancer Galant L200 Outlander Pajero Others
Galant 6 and 7 (1987-1998) Galant 5 (1983-1989, petrol)

Checking the condition and replacing the guide bearing (Mitsubishi Galant 6)

  • Home
  • Galant
  • 6 (1987-1998)
  • Transmission
  • Clutch
  • Checking the condition and replacing the guide bearing
0
1. A needle bearing is used as a clutch guide bearing, which is pressed into a special seat in the end of the rear crankshaft journal. The bearing is packed with grease at the manufacturer and does not require additional lubrication. This bearing ensures the fixation of the front journal of the primary shaft of the gearbox. The bearing condition should be checked every time the clutch components are removed. If there is no confidence in the correctness of the bearing condition assessment, it should be replaced.

Note: If the engine is removed from the vehicle, the appropriate steps below should be omitted.


2. Remove the transmission (see Chapter Manual gearbox).

3. Remove the clutch components (see Section Removal, condition check and installation of clutch assembly components).

4. Using a flashlight, assess the degree of wear and general condition of the guide bearing. Replace if necessary.
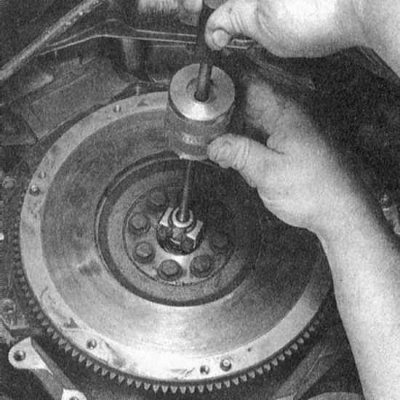


5. The bearing can be removed using a special tool (a hammer with a sliding striker) - ask in car accessory stores.

6. There is also an alternative method of removing the bearing from its seat.

The article was obtained from this portal MitsubishiMan.ru


7. Prepare a metal or wooden rod (punch) that fits tightly into the bearing hub.
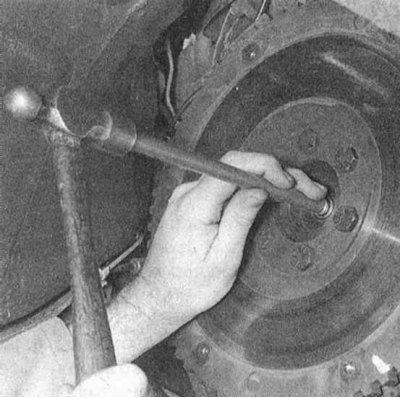


8. Fill the cavity of the seat under the bearing with thick grease, then begin to drive the drift into the hub of the assembly - the bearing will be squeezed out of the shaft journal due to the hydraulic pressure developed in the cavity.
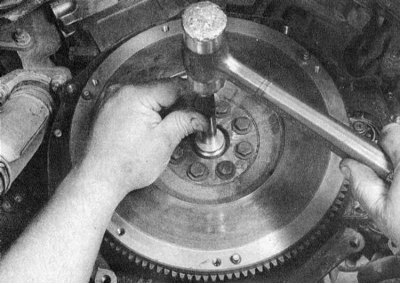


9. A suitable sized socket head or a section of pipe of the appropriate diameter (slightly smaller than the bearing diameter) can be used as a mandrel when fitting a new bearing into the shaft journal. The outer surface of the bearing should be lightly lubricated before fitting.

Note: The bearing is inserted into the socket with the sealing side facing out.


10. Reinstall the clutch assembly, gearbox, and any other components removed for access. Ensure that the appropriate fasteners are tightened to the specified torque.
This article is available at: russian, bulgarian, belarusian, ukrainian, serbian, croatian, romanian, polish, slovak, hungarian
This article was reviewed by: Dmitry Vasiliev
Share with friends:
◀ Previous
Galant 6 and 7: Clutch
Next ▶

Removal, checking and installation the release bearing and clutch release fork
Removal, inspection and installation of clutch assembly components
Clutch — General information and component condition check
Clutch and transmission line specifications
Adjusting the clutch pedal
Clutch cable adjustment, cable assembly removal and installation (Mirage models)
Removal and installation the clutch master cylinder
Removal and installation the clutch slave cylinder
Bleeding air from the hydraulic circuit of the clutch release drive
Similar materials for other Mitsubishi models

➤ Valve Stem Guide Bushing — Checking and Replacing Mitsubishi Colt 5 (1995-2003, petrol)
➤ Replacing spark plugs / checking electrical connections Mitsubishi Lancer 3 and 5 (1984-1992)
➤ Checking and replacing the air filter element Mitsubishi L200 4 (2005-2014, diesel)
➤ Checking the condition of the battery and its terminals Mitsubishi Outlander 1 (2003-2008)
➤ Replacing guide bushings Mitsubishi Pajero 1 and 2 (1982-1999)
➤ Checking and replacing front disc brake pads Mitsubishi Carisma (1995-2004)
Link in different formats to this article
Comments and feedback from visitors
No comments yet


Add up two numbers 12 + 41


Galant 6 and 7 (1987-1998) 
  • General information
  • Introduction to guide
  • User manual
  • Driving and operation
  • Maintenance
  • Power unit
  • Dismantling the engine
  • Engine overhaul
  • Cooling and heating
  • Power and exhaust systems
  • Engine electrical equipment
  • Engine management systems
  • Transmission
  • Mechanical gearbox
  • Automatic gearbox
  • Clutch
  • Drive shafts and transfer case
  • Chassis and running gear
  • Brake system
  • Car suspension
  • Steering
  • Body and interior
  • Exterior (external elements)
  • Interior (internal elements)
  • Doors, locks and windows
  • Electrical equipment
  • Equipment and devices
  • Wiring diagrams Galant
  • Wiring diagrams Mirage
  • Wiring diagrams Diamante
Galant 5 (1983-1989, petrol) 
  • General information
  • Troubleshooting
  • Maintenance
  • Power unit
  • Engine repair
  • Engine overhaul
  • Cooling and heating
  • Fuel and exhaust system
  • Engine electrical equipment
  • Reducing exhaust toxicity
  • Transmission
  • Manual gearbox
  • Automatic gearbox
  • Clutch and drive shafts
  • Chassis and running gear
  • Brake system
  • Car suspension
  • Steering
  • Body and interior
  • Exterior (external elements)
  • Interior (internal elements)
  • Doors, locks and windows
  • Electrical equipment
  • Equipment and devices
  • Electrical diagrams
MitsubishiMan.ru © 2018–2026 • Mobile version • Articles about Mitsubishi • Contacts • Sitemap: EN BG BY UA RS HR RO PL SK HU • Site search • Bookmark
Colt 2 and 3 (1983-1993) · Colt 4 and 5 (1991-2003) · Colt 5 (1995-2003) · Lancer 3 and 5 (1984-1992) · Lancer 9 (2000-2007) · Galant 5 (1983-1989) · Galant 6 and 7 (1987-1998) · L200 4 (2005-2014) · Outlander 1 (2003-2008) · Pajero 1 and 2 (1982-1999) · Pajero 4 (2006-2021) · Carisma (1995-2004) · Space Star (1998-2005) ·
This resource sets cookies 🍪 to avoid bothering you with repeated data entry.