
English Русский
Български
Беларускі
Український
Српски
Hrvatski
Română
Polski
Slovenský
Magyar
Articles Bookmark Contacts Sitemap   
Company Audi Company Ford Company Hyundai Company Kia Company Mazda Company Mercedes-Benz Company Nissan
MitsubishiMan.ru


Home Colt Lancer Galant L200 Outlander Pajero Others
Lancer 9 (2000-2007, petrol) Lancer 3 and 5 (1984-1992)

Replacing spark plugs / checking electrical connections (Mitsubishi Lancer 3)

  • Home
  • Lancer
  • 3 (1984-1992)
  • General information
  • Maintenance
  • Replacing spark plugs / checking electrical connections
0
Contents: Removal ⤓ Installation ⤓ Checking electrical connections ⤓
The following special tool is required:
  • Spark plug wrench, available for sale as related products.
  • Additionally, it is recommended to purchase special pliers, for example, HAZET 1849, which make it easier to remove spark plug tips.

The following replacement parts should be purchased:
  • 4 spark plugs, spark plug type see p. 5.1.

Removal


  • Disconnect all spark plug tips, pulling them off by holding the tip, not the wire. The pliers mentioned above make removal easier.
  • If possible, blow out the spark plug recesses in the cylinder head with compressed air to prevent dirt from getting into the spark plug holes when removing the spark plugs.
  • Unscrew the spark plugs with a spark plug wrench and inspect each spark plug. If you have some experience, you can draw conclusions about the engine operating modes based on the appearance of the spark plug. The following rules apply:

Electrodes and insulator
  • neutral grey = normal spark plug operation and correct mixture composition
  • black = too rich mixture
  • light gray = lean mixture
  • oily = spark plug failure or poor piston ring fit (check compression).
  • Check for leakage in the insulator. Leakage currents are visible as thin, irregular traces on the surface of the insulator. If traces of leakage currents are found, check for cracks in the spark plug connector and replace the spark plug if necessary.

Installation
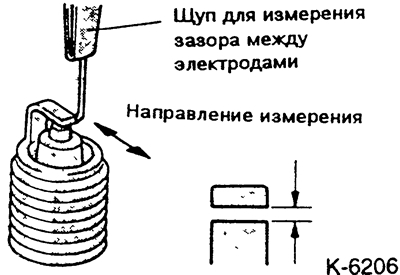


  • Measure the gap between the electrodes using a feeler gauge.

New spark plugs usually have the gap set correctly, see p. 5.2.


  • When adjusting the gap between the electrodes, bend the ground electrode. There is a simple, practical tool for this, otherwise you can bend the ground electrode by lightly tapping it. When bending, place a small screwdriver on the edge of the spark plug thread, but in no case on the central electrode, as this can damage it.
  • Wipe the spark plug threads with a clean cloth.
  • Screw in the spark plugs until they touch the cylinder head. Caution: Do not allow the spark plugs to become skewed.
  • Tighten the spark plugs to 25 Nm. If you do not have a torque wrench, tighten the spark plug by another 90° (1/d of a turn) using a spark plug wrench. Tighten used spark plugs by 15°. If you overtighten, the spark plug may break when unscrewing it or the thread in the cylinder head may be damaged. In this case, repair the thread using UTC or Heli-Coil inserts.
  • Install spark plug caps in accordance with the firing sequence 1-3-4-2.
  • Check the reliability of the fit of the tips and wires by shaking them in different directions.

Checking electrical connections


  • Check the reliability of the connection of all wires to the ignition coil, as well as to the ignition distributor. Replace damaged contacts.
  • Clean rusty contacts with sandpaper or a wire brush, or perhaps spray with contact aerosol.
  • The contacts should not be wet, otherwise wipe and spray with contact aerosol.
  • Bend the ignition wires and check for cracks. If cracks are present, replace the ignition wire.

(The original material is here: «MITSUBISHIMAN.ru»)
This article is available at: russian, bulgarian, belarusian, ukrainian, serbian, croatian, romanian, polish, slovak, hungarian
This article was reviewed by: Dmitry Vasiliev
Share with friends:
◀ Previous
Lancer 3 and 5: Maintenance
Next ▶

Checking the frost resistance of the coolant
Checking the tightness of the cooling system
Replacing the coolant
Checking the coolant level
Checking the oil level
Cleaning / replacing the air filter
Removal Water from a Diesel Fuel Filter / Replacing a Fuel Filter
Checking/replacing the V-belt. Tensioning/replacing the toothed belt
External inspection of the muffler
Checking the lambda probe
Similar materials for other Mitsubishi models

➤ Removal spark plugs, checking electrical connections Mitsubishi Colt 4 and 5 (1991-2003)
➤ Checking the condition and replacing spark plugs Mitsubishi Galant 6 and 7 (1987-1998)
➤ Checking and replacing the air filter element Mitsubishi L200 4 (2005-2014, diesel)
➤ Preliminary operations for checking electrical equipment Mitsubishi Outlander 1 (2003-2008)
➤ Wheels — Checking and replacing Mitsubishi Pajero 1 and 2 (1982-1999)
➤ Checking and cleaning spark plugs Mitsubishi Carisma (1995-2004)
Link in different formats to this article
Comments and feedback from visitors
No comments yet


Add up two numbers 36 + 18


Lancer 9 (2000-2007, petrol) 
  • General information
  • User manual
  • Maintenance
  • Power unit
  • Repair of MPI engines
  • Repair of GDI engines
  • Engine overhaul
  • Cooling and lubrication system
  • MPI fuel injection system
  • GDI fuel injection system
  • Intake and exhaust system
  • Starting and charging system
  • Transmission
  • Automatic gearbox
  • Variator (CVT)
  • Drive shafts and gearbox
  • Chassis and running gear
  • Front suspension
  • Rear suspension
  • Steering
  • Brake system
  • Body and interior
  • Doors, locks and windows
  • Exterior (external elements)
  • Interior (internal elements)
  • Electrical equipment
  • Heater and air conditioner
  • Security system SRS
  • Equipment and devices
  • Wiring diagrams (saloon)
  • Wiring diagrams (wagon)
Lancer 3 and 5 (1984-1992) 
  • General information
  • Maintenance
  • Power unit
  • Engine repair
  • Lubrication system
  • Cooling system
  • Ignition system
  • Fuel system
  • Carburetor
  • Fuel injection
  • Diesel power system
  • Exhaust system
  • Transmission
  • Clutch
  • Car gearbox
  • Chassis and running gear
  • Front suspension
  • Rear suspension
  • Steering
  • Brake system
  • Wheels and tires
  • Body and interior
  • Exterior (external elements)
  • Interior (internal elements)
  • Heating system
  • Electrical equipment
  • Equipment and devices
  • Power devices
  • Electrical circuits
MitsubishiMan.ru © 2018–2026 • Mobile version • Articles about Mitsubishi • Contacts • Sitemap: EN BG BY UA RS HR RO PL SK HU • Site search • Bookmark
Colt 2 and 3 (1983-1993) · Colt 4 and 5 (1991-2003) · Colt 5 (1995-2003) · Lancer 3 and 5 (1984-1992) · Lancer 9 (2000-2007) · Galant 5 (1983-1989) · Galant 6 and 7 (1987-1998) · L200 4 (2005-2014) · Outlander 1 (2003-2008) · Pajero 1 and 2 (1982-1999) · Pajero 4 (2006-2021) · Carisma (1995-2004) · Space Star (1998-2005) ·
This resource sets cookies 🍪 to avoid bothering you with repeated data entry.