



Contents: General information ⤓ Checking and adjusting ⤓ Removal and installation ⤓ Coal deposits ⤓ Normal condition of the candle ⤓ Oiling ⤓ Ash formation ⤓ Overheat ⤓ Wear ⤓ Too early ignition ⤓ Detonation ⤓ Conductive gloss ⤓ Splashing ⤓ Short circuit of electrodes ⤓ Mechanical damage ⤓
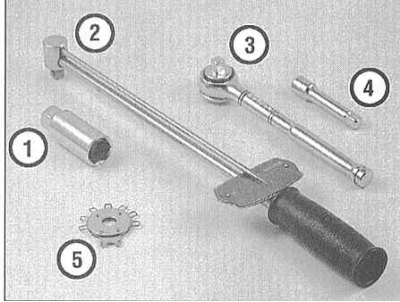
Tools needed when replacing spark plugs
1 — Spark plug head - Equipped with a special elastic insert, eliminating the possibility of accidental damage to the porcelain insulator when unscrewing the spark plug.
2 - Torque wrench - Although not a mandatory tool, it provides a reliable guarantee of the correct tightening force of the spark plugs.
3 - Ratchet drive - Used in combination with a spark plug head and torque wrench.
4 — Extension - Depending on the model and its auxiliary units, access to the spark plugs may be limited to varying degrees, so using extensions of the appropriate shape and design will make the procedure much easier.
5 - Device for measuring and adjusting spark plug gaps - Several types of this type of tool are available - make sure that the tool is equipped with a feeler gauge that matches the size of the spark plug gaps on your vehicle.
If the original spark plugs are to be reinstalled on the engine after checking their condition, they must be screwed strictly into the previous cylinders - mark them accordingly.
General information
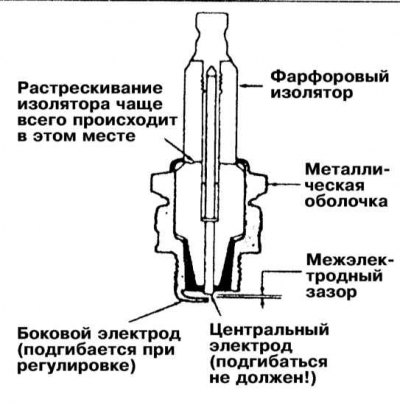
The spark plug is a metal shell framing a ceramic (porcelain) insulator. In the axial part of the insulator, there is a vertical channel into which the pin of the central electrode is inserted. The upper part of the pin is connected to a threaded tip screwed into the upper part of the insulator, the lower part protrudes from below, forming the working part of the electrode. The side electrode is welded directly to the metal of the spark plug assembly shell and, bending at 90°, comes out to the central part of the lower end surface of the spark plug, located directly above the end of the working part of the central electrode. The air gap formed between the two electrodes is called the interelectrode gap and is one of the main operating parameters of the spark plug. The gap size must be set strictly in accordance with the regulatory requirements determined by the types of spark plugs and the engine. When voltage (20÷50 kV) is applied to the spark plug from the ignition coil, a spark is formed between the electrodes, ensuring ignition of the air-fuel mixture in the engine combustion chamber. The intensity of spark formation is actually determined by the size of the interelectrode gap.
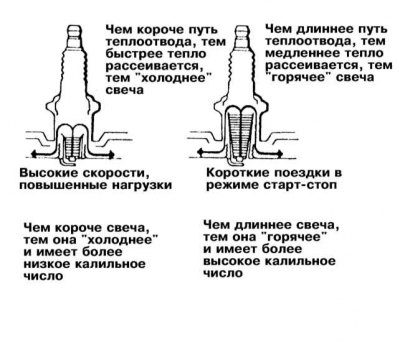
Another fundamental parameter of any spark plug is its heat rating. The heat rating determines the ability of the spark plug to dissipate heat. The longer the lower threaded part of the spark plug shell (the deeper the electrodes are inserted into the combustion chamber), the hotter its operating temperature will be. Installing excessively "cold" spark plugs on the engine leads to rapid formation of oil and carbon deposits on their electrodes, which ultimately leads to misfires. Using too "hot" spark plugs can lead to problems associated with ignition timing (too early ignition), and a diesel effect can occur when the engine continues to run for some time after the ignition is turned off. The following rule is usually applied: when driving long distances at high speeds, colder spark plugs should be used, while "hot" spark plugs are more suitable for operating a car in a busy urban cycle, characterized by frequent short trips. The best compromise is always achieved by using the original spark plugs recommended by the vehicle manufacturer (see Specifications).
Checking and adjusting
During normal operation of the vehicle, the spark plug gap increases by an average of 0.025 mm for every 4,000 km of travel, which leads to a gradual decrease in spark intensity. Adjust/replace spark plugs strictly in accordance with the Schedule of routine vehicle maintenance (see Section Schedule of current maintenance of Mitsubishi Galant/Mirage/Diamante cars).
1. In most cases, replacing spark plugs requires a special spark plug head (with an elastic insert inside) complete with a ratchet drive, as well as a set of wrench drive extensions and a device for checking and adjusting interelectrode gaps. A special tool is also available for safely disconnecting the high-voltage wire tips from the spark plug tails, although its use is not strictly required. Using a torque wrench will allow you to achieve the correct tightening force for the spark plugs.
2. It is best to always keep a set of replacement spark plugs with the correct interelectrode gap adjustment in your car. When buying new spark plugs, make sure that they meet the parameters of your car's engine. The necessary information is provided in Specifications to this Chapter, as well as on the VECI label attached under the hood (in case of discrepancies, the information from VECI shall prevail).
3. Start removing the spark plugs only after the engine has completely cooled down. In order not to waste time, use the pause to check the condition of the replacement set. Carefully inspect the new spark plugs - if the slightest cracks are found in the insulator, the corresponding spark plug should be rejected. Measure the size of the interelectrode gaps of the new set (see below).
4. The spark plug gap is checked by inserting the appropriate feeler gauge into the gap and must meet the requirements given in the specifications/on the VECI label. The feeler gauge of the required thickness must slide between the side and center electrodes of the spark plug with slight resistance. The gap can be adjusted using a special device, usually included in the measuring device - bend the side electrode of the spark plug accordingly.
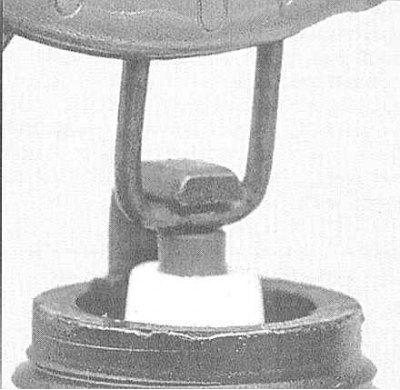 | 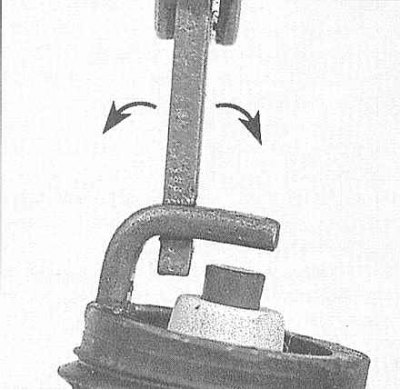 |
5. If the side electrode is not positioned exactly above the central one, adjust its position accordingly. Make sure there are no cracks or other damage in the porcelain insulator of the spark plug. The presence of any kind of defects in the insulator is unacceptable.
Removal and installation
1. To avoid disruption of the ignition order when connecting the electrical wiring, each spark plug should be serviced individually.
2. Wait until the engine has cooled down completely. Disconnect the negative cable from the battery.
If your car stereo system is equipped with a security code, make sure you have the correct combination to activate the audio system before disconnecting the battery!
3. If equipped, remove the center cover. On 3.0L (SOHC and DOHC engines) and 3.5L models, the upper section of the intake manifold must be removed to gain access to the rear bank spark plugs (see Chapter Engine).
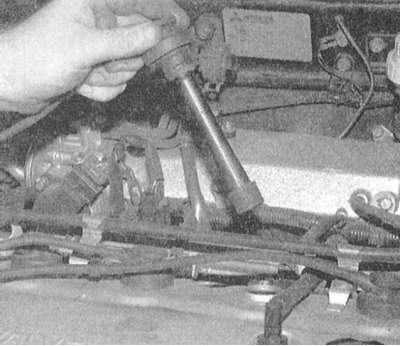
4. Disconnect the high-voltage wire from the spark plug of the first cylinder - pull only by the tip, and under no circumstances by the wire! It would be wise to use a special tool.
5. If you have a source of compressed air on hand, use it to remove debris from the spark plug niches of the engine (a regular bicycle pump will work just as well for this purpose).
When using compressed air, remember to wear safety glasses!
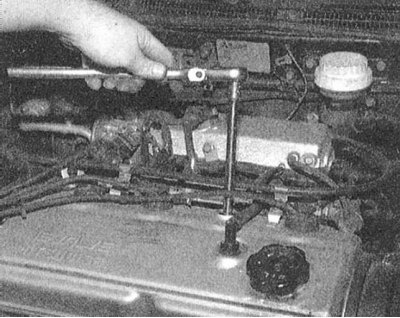
6. Remove the spark plug using a socket wrench with a special spark plug head equipped with a rubber insert (if necessary, first drop a little penetrating oil into the spark plug recess).
7. Compare the removed spark plug with the identification card shown in the photographic insert, which will allow you to qualitatively assess the general condition of the engine. Also assess the condition of the high-voltage wire tips, replace defective components.
8. Before screwing in new spark plugs, lightly lubricate their threaded part with anti-seize sealant. Manually screw one of the new spark plugs into the corresponding hole in the engine. After making sure that the spark plug is not warped in the thread, tighten it with the required force (if you have a torque wrench at hand). To make the procedure of screwing in the spark plug easier, pull a piece of flexible fuel hose onto its tail. This eliminates the possibility of stripping the thread, since the slightest biting will simply cause the hose to turn.
9. Using a rotary and reciprocating motion, place the tip of the high-voltage wire onto the spark plug tail.
Before connecting the spark plug wires, assess their condition.
10. Repeat the procedure for the remaining spark plugs, performing each step in turn to avoid disturbing the firing order.
11. Reinstall all components removed for access purposes.
Coal deposits
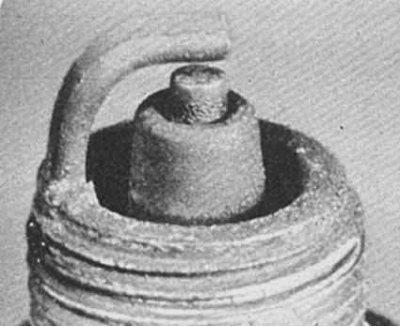
Symptoms: The presence of soot indicates an over-enriched fuel-air mixture or weak spark intensity. It causes misfires, makes starting difficult and leads to instability of engine operation.
Recommendations: Check if the air cleaner is clogged, the fuel level in the float chamber is too high, the choke is stuck and the contacts are too worn. Try using spark plugs with a longer insulator, which increases resistance to contamination.
Normal condition of the candle
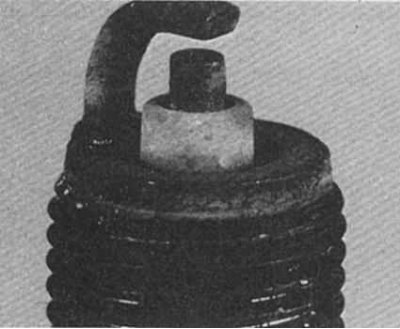
Symptoms: Gray-brown color and slight wear of the electrodes. The glow number of the spark plugs corresponds to the type of engine and its general condition.
Recommendations: When replacing spark plugs, install spark plugs of the same type.
Oiling
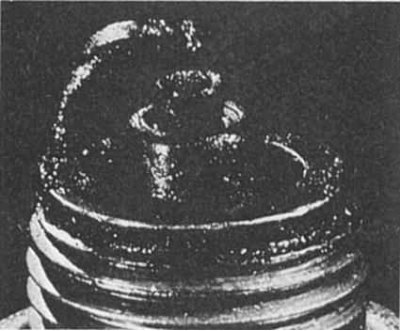
Symptoms: Oiling of the spark plug is caused by wear of the oil-deflecting caps. Oil gets into the combustion chamber through worn valve guides or piston rings. It causes misfires, makes starting difficult and leads to instability of engine operation.
Recommendations: Perform mechanical repairs and replace spark plugs.
Ash formation
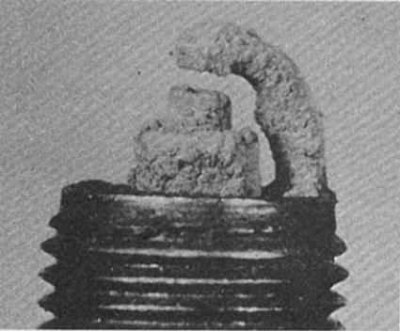
Symptoms: Soft, brownish deposits on one or both spark plug electrodes. They are caused by oil and/or fuel additives. Excessive buildup can insulate the electrodes and cause misfires and rough running under acceleration.
Recommendations: If deposits accumulate quickly, replace the oil seals to prevent oil from entering the combustion chambers. Try changing the fuel brand.
Overheat
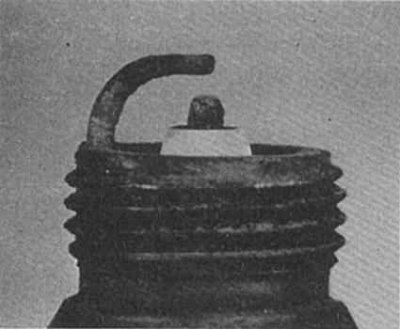
Symptoms: Porous, white insulator, erosion of electrodes and absence of any deposits. Leads to a reduction in spark plug life.
Recommendations: Check that the spark plug heat range is correct, that the ignition timing is set correctly, that the fuel/air mixture is not too lean, that there are no vacuum leaks in the intake manifold, and that the valves are not stuck. Also check the coolant level and that the radiator is not clogged.
Wear
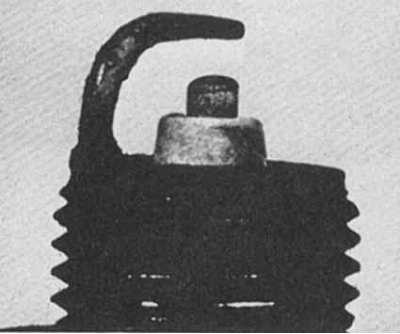
Symptoms: Rounding of the electrodes with a small accumulation of deposits at the working end. The color is normal. It leads to difficulty in starting the engine in cold, wet weather and increased fuel consumption.
Recommendations: Replace the spark plugs with new ones of the same type.
Too early ignition
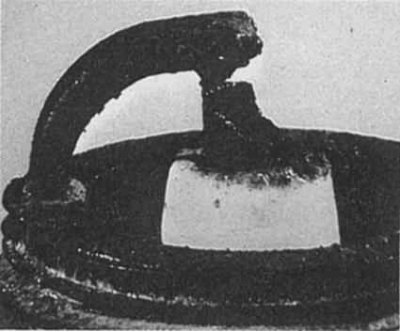
Symptoms: The electrodes are melted. The insulator is white, but may also be contaminated due to misfires or foreign particles entering the combustion chambers. May cause engine failure.
Recommendations: Check the glow plug rating, ignition timing, mixture quality (is it too lean), is the cooling system clogged, and is the lubrication system functioning properly.
Detonation
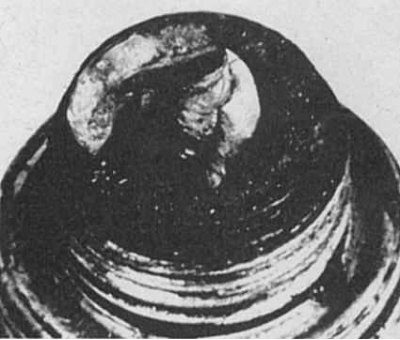
Symptoms: Insulators may be chipped or cracked. Inaccurate spark plug gap adjustment techniques may also damage the insulator. Piston damage may result.
Conductive gloss
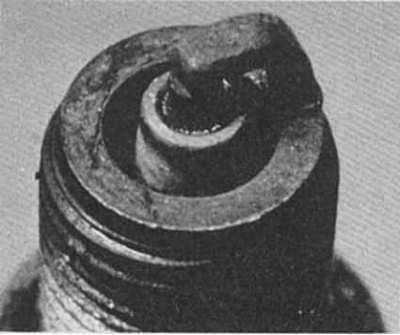
Symptoms: The insulator has a yellowish color and a polished appearance. Indicates a sudden increase in temperature in the combustion chambers during sharp acceleration. Normal deposits melt, acquiring the appearance of a varnish coating. Leads to misfires at high speeds.
Recommendations: Change the spark plugs (colder ones, while maintaining the same driving style).
Splashing
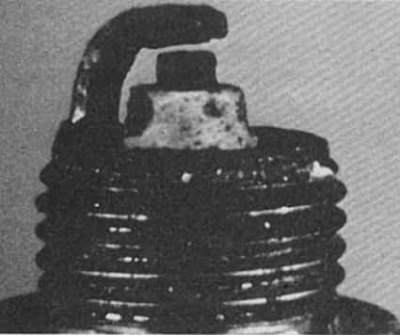
Symptoms: After a long period of misfire, deposits may become loose while the combustion chamber remains at operating temperature. At high speeds, deposits flake off the piston and stick to the hot insulator, causing misfires.
Recommendations: Replace the spark plugs or clean and reinstall the old ones.
Short circuit of electrodes
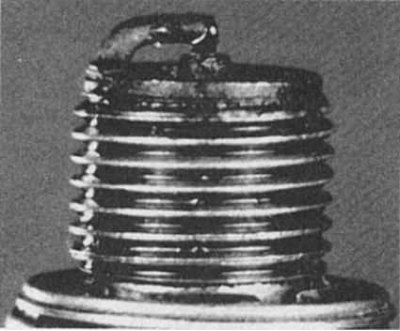
Symptoms: Combustion waste gets into the interelectrode space. Solid deposits accumulate, forming a bridge between the electrodes. Leads to ignition failure in the cylinder.
Recommendations: Remove deposits from the interelectrode space.
Mechanical damage
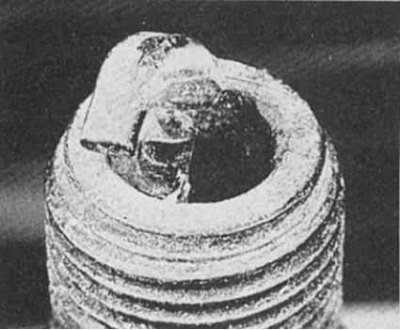
Symptoms: Can be caused by foreign materials entering the combustion chamber or occur when the piston hits a spark plug that is too long. Leads to cylinder failure and piston damage.
Recommendations: Remove foreign particles from engine and/or replace.