
English Русский
Български
Беларускі
Український
Српски
Hrvatski
Română
Polski
Slovenský
Magyar
Articles Bookmark Contacts Sitemap   
Company Audi Company Ford Company Hyundai Company Kia Company Mazda Company Mercedes-Benz Company Nissan
MitsubishiMan.ru


Home Colt Lancer Galant L200 Outlander Pajero Others
Galant 6 and 7 (1987-1998) Galant 5 (1983-1989, petrol)

Replacing the air cleaner filter element (Mitsubishi Galant 6)

  • Home
  • Galant
  • 6 (1987-1998)
  • General information
  • Maintenance
  • Replacing the air cleaner filter element
0
Contents: All models except those equipped…⤓ 2.0L Turbocharged Models ⤓
The filter element is replaced regularly in accordance with the vehicle's routine maintenance schedule. During vehicle operation, the filter condition should be checked fairly frequently, especially in very dusty areas.

All models except those equipped with a 2.0L turbocharged engine


1. Disconnect the negative cable from the battery.

Warning! If the car stereo system is equipped with a security code, make sure you have the correct combination to activate the audio system before disconnecting the battery!
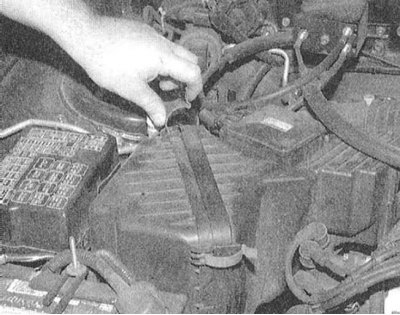


2. Release the air cleaner cover fastening latches.
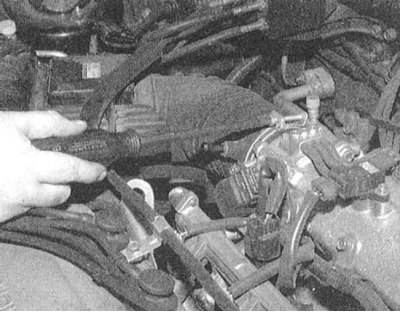


3. Loosen the air hose clamp on the throttle body.
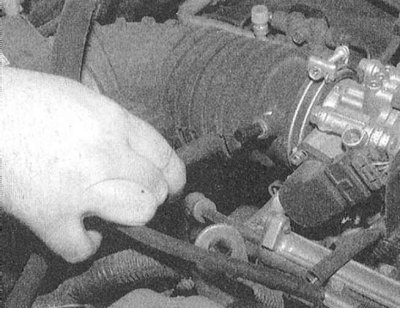


4. Disconnect the ventilation pipe from the air intake.
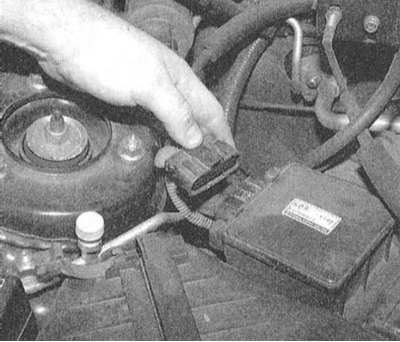


5. Disconnect the electrical wiring from the mass air flow (MAF) sensor.
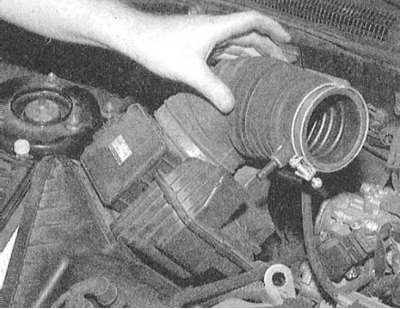


6. Separate the air cleaner cover from the housing and remove it together with the exhaust duct.
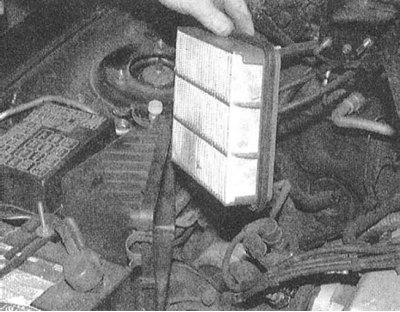


7. Remove the filter element from the air cleaner housing.

8. Visually assess the condition of the filter element, replace it if it is heavily contaminated. A moderately dusty filter can be blown out with compressed air (through the rear surface).


Attention! Always wear safety glasses when using compressed air! The filter element made of waxed paper cannot be washed with oils or solvents.If a satisfactory result cannot be achieved by purging, replace it.


Caution! To avoid premature wear of internal engine components and flares in the exhaust tract, do not operate the vehicle with the air filter removed!


9. Thoroughly wipe the inside surfaces of the air cleaner housing and cover.

10. Install the replacement filter element, making sure it is seated correctly in the casing.

11. Replace the air cleaner cover.

12. Connect the air outlet duct to the throttle body and tighten the mounting clamp securely.

13. Connect the wiring to the MAF sensor.

14. Snap the air cleaner cover fastening clips into place.

15. Connect the negative cable to the battery.

2.0L Turbocharged Models


1. Disconnect the negative cable from the battery.

Warning! If the car stereo system is equipped with a security code, make sure you have the correct combination to activate the audio system before disconnecting the battery!
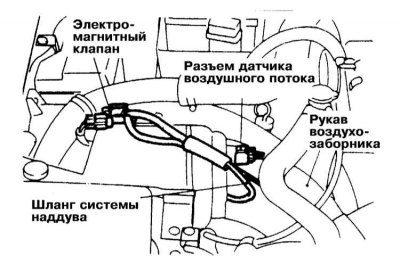


2. The connection diagram of the components of the intake air tract is shown in the illustration.


3. Disconnect the electrical wiring from the air flow sensor (volume flow).

4. Loosen the boost hose fastener.

5. Disconnect the solenoid valve assembly with the hoses connected to it.

6. Loosen the air cleaner mounting bolts.

7. Release the clips and remove the air cleaner cover.

Caution! Be careful not to damage the air flow sensor attached to the cover!


8. Remove the filter element.

9. Visually assess the condition of the filter element, replace it if it is heavily contaminated. A moderately dusty filter can be blown out with compressed air (through the rear surface).

Attention! Always wear safety glasses when using compressed air! The filter element made of waxed paper cannot be washed with oils or solvents.If a satisfactory result cannot be achieved by purging, replace it.


Caution! To avoid premature wear of internal engine components and flares in the exhaust tract, do not operate the vehicle with the air filter removed!


10. Thoroughly wipe the inside surfaces of the air cleaner housing and cover.

11. Insert a new filter element into the air cleaner housing. Install and secure the assembly cover with clamps.

12. Install the air cleaner assembly in its original place, screw in and tighten the mounting bolts.

13. Connect the air intake hose.

14. Connect the solenoid valve.

15. Connect the wiring to the air flow sensor.

16. Connect the negative cable to the battery.
This article is available at: russian, bulgarian, belarusian, ukrainian, serbian, croatian, romanian, polish, slovak, hungarian
This article was reviewed by: Dmitry Vasiliev
Share with friends:
◀ Previous
Galant 6 and 7: Maintenance
Next ▶

Checking and adjusting valve clearances — Mirage only
Checking the condition of the protective covers of the drive shafts
Checking the condition / servicing disc brakes
Checking the condition of the brake lines
Replacing ATF automatic transmission and differential final drive
Cooling system maintenance
Replacing the fuel filter
Checking and replacing the PCV valve
Checking the condition and replacing spark plugs
Checking the condition, adjusting the tension force and replacing the drive belts
Similar materials for other Mitsubishi models

➤ Cleaning and replacing the air filter Mitsubishi Colt 4 and 5 (1991-2003)
➤ Cleaning / replacing the air filter Mitsubishi Lancer 3 and 5 (1984-1992)
➤ Checking and replacing the air filter element Mitsubishi L200 4 (2005-2014, diesel)
➤ Replacing bulbs in headlights and taillights Mitsubishi Outlander 1 (2003-2008)
➤ Replacing the fuel filter element Mitsubishi Pajero 1 and 2 (1982-1999)
➤ Replacing the oil filter Mitsubishi Carisma (1995-2004)
Link in different formats to this article
Comments and feedback from visitors
No comments yet


Add up two numbers 25 + 11


Galant 6 and 7 (1987-1998) 
  • General information
  • Introduction to guide
  • User manual
  • Driving and operation
  • Maintenance
  • Power unit
  • Dismantling the engine
  • Engine overhaul
  • Cooling and heating
  • Power and exhaust systems
  • Engine electrical equipment
  • Engine management systems
  • Transmission
  • Mechanical gearbox
  • Automatic gearbox
  • Clutch
  • Drive shafts and transfer case
  • Chassis and running gear
  • Brake system
  • Car suspension
  • Steering
  • Body and interior
  • Exterior (external elements)
  • Interior (internal elements)
  • Doors, locks and windows
  • Electrical equipment
  • Equipment and devices
  • Wiring diagrams Galant
  • Wiring diagrams Mirage
  • Wiring diagrams Diamante
Galant 5 (1983-1989, petrol) 
  • General information
  • Troubleshooting
  • Maintenance
  • Power unit
  • Engine repair
  • Engine overhaul
  • Cooling and heating
  • Fuel and exhaust system
  • Engine electrical equipment
  • Reducing exhaust toxicity
  • Transmission
  • Manual gearbox
  • Automatic gearbox
  • Clutch and drive shafts
  • Chassis and running gear
  • Brake system
  • Car suspension
  • Steering
  • Body and interior
  • Exterior (external elements)
  • Interior (internal elements)
  • Doors, locks and windows
  • Electrical equipment
  • Equipment and devices
  • Electrical diagrams
MitsubishiMan.ru © 2018–2026 • Mobile version • Articles about Mitsubishi • Contacts • Sitemap: EN BG BY UA RS HR RO PL SK HU • Site search • Bookmark
Colt 2 and 3 (1983-1993) · Colt 4 and 5 (1991-2003) · Colt 5 (1995-2003) · Lancer 3 and 5 (1984-1992) · Lancer 9 (2000-2007) · Galant 5 (1983-1989) · Galant 6 and 7 (1987-1998) · L200 4 (2005-2014) · Outlander 1 (2003-2008) · Pajero 1 and 2 (1982-1999) · Pajero 4 (2006-2021) · Carisma (1995-2004) · Space Star (1998-2005) ·
This resource sets cookies 🍪 to avoid bothering you with repeated data entry.