
English Русский
Български
Беларускі
Український
Српски
Hrvatski
Română
Polski
Slovenský
Magyar
Articles Bookmark Contacts Sitemap   
Company Audi Company Ford Company Hyundai Company Kia Company Mazda Company Mercedes-Benz Company Nissan
MitsubishiMan.ru


Home Colt Lancer Galant L200 Outlander Pajero Others
Galant 6 and 7 (1987-1998) Galant 5 (1983-1989, petrol)

Checking the condition / servicing disc brakes (Mitsubishi Galant 6)

  • Home
  • Galant
  • 6 (1987-1998)
  • General information
  • Maintenance
  • Checking the condition / servicing disc brakes
0
Warning! Remember that the dust generated by the brake mechanisms may contain asbestos, which is extremely harmful to human health. Never blow off dust with compressed air or inhale it; wear a protective mask or respirator when servicing the mechanisms. Never use gasoline or petroleum-based solvents to wipe brake system components - use only branded cleaning agents or methyl alcohol! Try to use only asbestos-free components when replacing brake pads.


Note: More detailed illustrative material in Chapter Brake system.


1. The condition of the brake system components, in addition to regular checks specified in the routine maintenance schedule, should be assessed every time the wheels are removed or when signs of malfunctioning of the system occur. Disc brake pads are usually equipped with special indicators that notify of excessive wear of the friction linings with a characteristic squeal when braking. The symptoms listed below may be a sign of a malfunction of the brake components:
  • a) When braking, the car loses directional stability (pulls to one side);
  • b) When braking, the brakes make a squealing or squeaking noise;
  • c) The foot brake pedal travel increases excessively;
  • d) When pressing the brake pedal, pulsations are felt;
  • e) There are traces of brake fluid leakage (usually on the inner surface of the wheel rims and tires).

2. Loosen the wheel mounting bolts/nuts.

3. Jack up the car and place it on supports.

4. Remove the wheels.
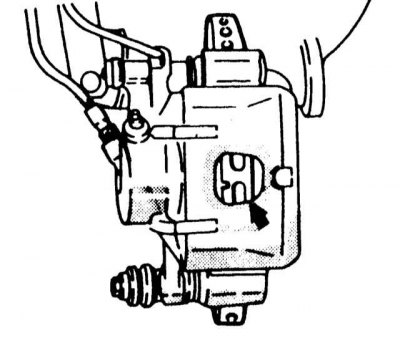


5. The support of each brake mechanism is equipped with two pads - internal and external. The ends of the pads are clearly visible through a special viewing window in the support body after removing the wheel.


The article was taken from the website [MitsubishiMan.ru]

6. The residual thickness of the friction lining of the inner shoe is assessed visually through the above-mentioned inspection window. If the linings are worn beyond the permissible limit (see Specifications), it is necessary to carry out a comprehensive replacement of the brake pads.

Note: Remember that the friction linings are riveted or glued to a metal backing, the thickness of which should not be taken into account when measuring.


7. If it is difficult to visually assess the remaining pad thickness, or if there is a need for a more detailed inspection of the pads, remove the caliper(s) and take out the pads for a more detailed examination (see Chapter Brake system).

8. After the pads have been removed from the caliper, clean them with a special agent and measure the remaining thickness of the linings with a ruler or a caliper with a vernier scale.

9. Use a micrometer to measure the thickness of the brake discs. Compare the measurement results with the standard requirements (see Specifications). If the thickness of any of the discs is outside the permissible range, replace it (see Chapter Brake system). If the disk thickness is normal, check its general condition. Pay attention to such defects as deep scratches, grooves, scuffs, traces of overheating, etc., if necessary, remove the disk and have it turned (see Chapter Brake system).

10. Before refitting the wheels, inspect all brake lines for signs of damage, wear, degradation due to aging of the material, signs of leaks, kinks, twists and other deformations (especially near the points of connection of flexible brake hoses to the brake calipers). Check that the hose clamps are securely fastened. Make sure that none of the brake hoses come into contact with sharp corners of adjacent body components, the exhaust system or the suspension (at any position of the steering wheel). If necessary, make appropriate repairs or adjust the routing of the lines. Replace defective components (see Chapter Brake system).
This article is available at: russian, bulgarian, belarusian, ukrainian, serbian, croatian, romanian, polish, slovak, hungarian
This article was reviewed by: Dmitry Vasiliev
Share with friends:
◀ Previous
Galant 6 and 7: Maintenance
Next ▶

Checking the condition of the brake lines
Replacing ATF automatic transmission and differential final drive
Lubrication of chassis components
Checking the condition of the suspension and steering components
Wheel rotation
Checking the condition of the protective covers of the drive shafts
Checking and adjusting valve clearances — Mirage only
Replacing the air cleaner filter element
Cooling system maintenance
Replacing the fuel filter
Similar materials for other Mitsubishi models

➤ Front disc brakes — device Mitsubishi Colt 4 and 5 (1991-2003)
➤ Checking disc brakes Mitsubishi Lancer 9 (2000-2007, petrol)
➤ Checking the condition of ball joints and dust boots Mitsubishi L200 4 (2005-2014, diesel)
➤ Cylinder Block — Checking Condition Mitsubishi Outlander 1 (2003-2008)
➤ Checking the condition of the camshaft Mitsubishi Pajero 1 and 2 (1982-1999)
➤ Rear Disc Brakes — Removal, Checking and Installation Mitsubishi Carisma (1995-2004)
Link in different formats to this article
Comments and feedback from visitors
No comments yet


Add up two numbers 17 + 39


Galant 6 and 7 (1987-1998) 
  • General information
  • Introduction to guide
  • User manual
  • Driving and operation
  • Maintenance
  • Power unit
  • Dismantling the engine
  • Engine overhaul
  • Cooling and heating
  • Power and exhaust systems
  • Engine electrical equipment
  • Engine management systems
  • Transmission
  • Mechanical gearbox
  • Automatic gearbox
  • Clutch
  • Drive shafts and transfer case
  • Chassis and running gear
  • Brake system
  • Car suspension
  • Steering
  • Body and interior
  • Exterior (external elements)
  • Interior (internal elements)
  • Doors, locks and windows
  • Electrical equipment
  • Equipment and devices
  • Wiring diagrams Galant
  • Wiring diagrams Mirage
  • Wiring diagrams Diamante
Galant 5 (1983-1989, petrol) 
  • General information
  • Troubleshooting
  • Maintenance
  • Power unit
  • Engine repair
  • Engine overhaul
  • Cooling and heating
  • Fuel and exhaust system
  • Engine electrical equipment
  • Reducing exhaust toxicity
  • Transmission
  • Manual gearbox
  • Automatic gearbox
  • Clutch and drive shafts
  • Chassis and running gear
  • Brake system
  • Car suspension
  • Steering
  • Body and interior
  • Exterior (external elements)
  • Interior (internal elements)
  • Doors, locks and windows
  • Electrical equipment
  • Equipment and devices
  • Electrical diagrams
MitsubishiMan.ru © 2018–2026 • Mobile version • Articles about Mitsubishi • Contacts • Sitemap: EN BG BY UA RS HR RO PL SK HU • Site search • Bookmark
Colt 2 and 3 (1983-1993) · Colt 4 and 5 (1991-2003) · Colt 5 (1995-2003) · Lancer 3 and 5 (1984-1992) · Lancer 9 (2000-2007) · Galant 5 (1983-1989) · Galant 6 and 7 (1987-1998) · L200 4 (2005-2014) · Outlander 1 (2003-2008) · Pajero 1 and 2 (1982-1999) · Pajero 4 (2006-2021) · Carisma (1995-2004) · Space Star (1998-2005) ·
This resource sets cookies 🍪 to avoid bothering you with repeated data entry.