
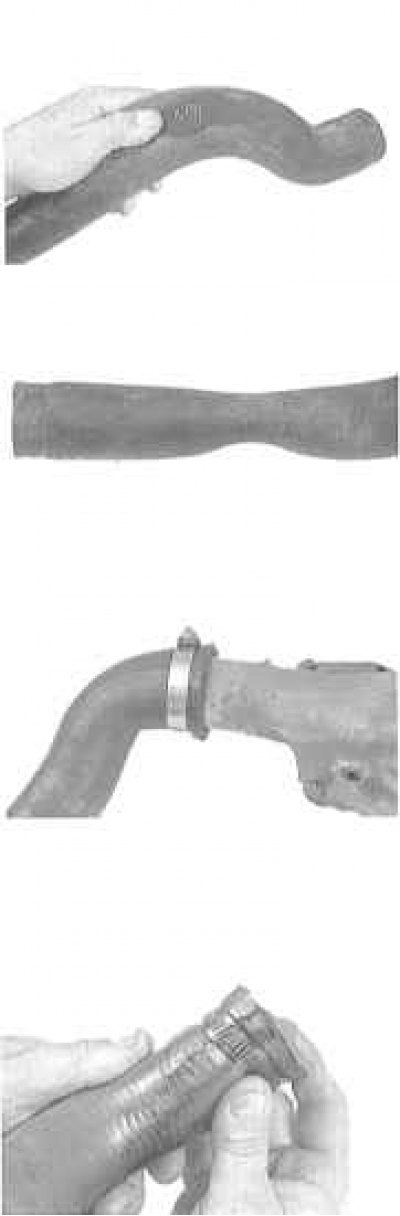
Examples of typical defects in radiator hoses
1 - Check hoses for frayed areas.
2 - The softening of rubber indicates the beginning of its destruction as a result of aging.
3 - Too tight tightening of the clamp in order to more securely fix the hardened hose on the fitting / nozzle does not help stop the leak, but only leads to the destruction of the hose material.
4 - Check all hoses for blisters and signs of oil seepage at the ends. Cracks and small breaks in the rubber are more easily detected when the hose is squeezed.
1. A wide range of engine failures is associated with a malfunction of the cooling system. On models equipped with AT, this system also provides ATF cooling, thereby maintaining the most favorable conditions for the operation of the transmission.
2. Checking the condition of the components of the cooling system should be carried out after the power unit has completely cooled down (at least three hours after the engine has stopped).
Attention! Never remove the radiator filler cap when the engine is hot!
3. Remove the cover from the radiator or expansion tank, for which first turn it to the left until the first stop. If a hiss is heard indicating excessive pressure in the system, wait for it to stop, then press the cap with the palm of your hand down and continue turning to the left until it is completely released. Rinse the cover thoroughly inside and out with clean water. Wipe the filler neck of the radiator. All traces of corrosion must be completely removed from the surfaces to be cleaned. The coolant in the system must be relatively clear. If the fluid is rust colored, the system must be flushed and refilled with fresh mix (see Section Maintenance of the cooling system). If the fluid level does not reach the top, add a little more mixture of the required composition to the radiator / tank.
4. Carefully inspect the upper and lower radiator hoses, as well as the interior heating hoses, which have a smaller diameter and are located between the power unit and the bulkhead of the engine compartment. Inspect hoses along their entire length and replace defective components if cracks, bulges or signs of aging are found. Small cracks are usually easier to see when the hose is squeezed. Regardless of condition, hoses should be replaced approximately every two years.
5. Check that all hoses are securely fastened to their fittings / nozzles. Coolant leaks usually show up as rusty or white streaks on surrounding surfaces. If the hoses are fixed to the fittings / pipes with twist-type clamps, it would be reasonable to replace the latter with more reliable worm or screw ones.
6. By blowing with compressed air or using a soft brush, remove old leaves, insect remains and other debris from the gaps between the radiator heat exchanger plates. Take care not to damage the soft heat exchanger plates or cut your fingers on their sharp edges.
7. Every second check, as well as at the first signs of malfunctioning of the cooling system, check the radiator cap with pressure (see below). If there is no suitable equipment at hand, contact a service station for help.
8. After removing the cap from the radiator or expansion tank, use the appropriate adapter to connect a hand pump equipped with a pressure gauge to the system.
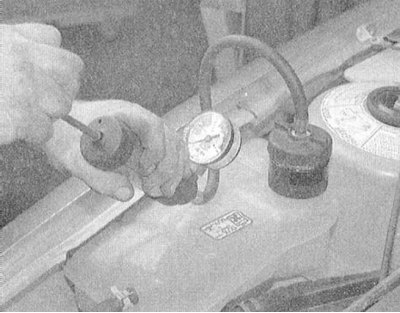
9. Operate the pump handle to pressurize the system to the maximum reading on the pressure gauge connected to the pump.
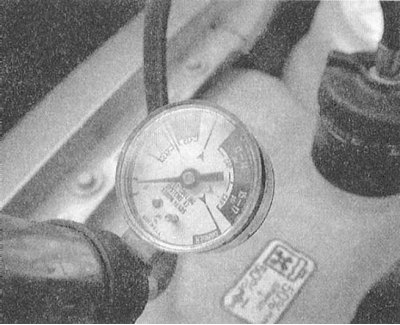
10. Observe the pressure gauge for some time - if the pressure in the system drops, then there is a leak. Identification of the source of the leak is carried out during a repeated thorough inspection of all components of the cooling path (pump up the pressure again).
11. If visual inspection fails to identify the source of the leak, pressurize again to maximum pressure and leave the system under pressure for a while. After about 30 minutes, check the pressure gauge reading - if it has fallen by less than 20%, the state of the system can be considered satisfactory, otherwise you should contact a car service specialist for help.
12. Another cause of coolant loss is internal leakage. These kinds of leaks are usually associated with a leak in the cylinder head gaskets or the appearance of cracks in the body of the block and lead to the ingress of coolant into the engine oil and engine combustion chambers. At the same time, the oil begins to emulsify, taking on a milky consistency, while the exhaust smoke at the moment the engine is started turns out to be saturated with water vapor, giving it a thick white color. Another sign of internal coolant leaks is the formation of a greenish or white coating on the electrodes of the spark plugs - by examining the plugs one by one, a leaking cylinder can be identified.