English Русский
Български
Беларускі
Український
Српски
Hrvatski
Română
Polski
Slovenský
Magyar
Articles Bookmark Contacts Sitemap   
Company Audi Company Ford Company Hyundai Company Kia Company Mazda Company Mercedes-Benz Company Nissan
MitsubishiMan.ru


Home Colt Lancer Galant L200 Outlander Pajero Others
Galant 6 and 7 (1987-1998) Galant 5 (1983-1989, petrol)

Cooling system maintenance (Mitsubishi Galant 6)

  • Home
  • Galant
  • 6 (1987-1998)
  • General information
  • Maintenance
  • Cooling system maintenance
0
Contents: Emptying ⤓ Flushing ⤓ Refueling ⤓
Do not allow antifreeze to come into contact with exposed areas of the body or painted surfaces of the vehicle. Wash away accidental splashes immediately with plenty of water. Remember that antifreeze is a highly toxic liquid and its ingestion, even in small quantities, can have the most serious consequences (including death). Never leave antifreeze stored in a loosely closed container and immediately collect any coolant spilled on the floor. Remember that the sweet smell of antifreeze can attract the attention of children and animals. Consult with local authorities about methods of disposing of used coolant. In many regions of the world, special collection points for various types of waste have been set up. Never pour old coolant into the sewer or onto the ground!

In recent years, non-toxic types of antifreeze have been developed, but they also require care in handling.

1. Regularly, in accordance with the vehicle's routine maintenance schedule (see Section Schedule of current maintenance of Mitsubishi Galant/Mirage/Diamante cars), the cooling system must be drained, flushed and filled with a fresh mixture of antifreeze and water. This type of maintenance helps prevent the development of corrosion inside the cooling system and significantly increases the efficiency of the system.

2. During maintenance, it is also mandatory to check the condition of all system hoses and the radiator filler cap (see Section Checking the condition of the cooling system components). Defective components are subject to replacement. Do not forget about the precautions that must be observed when servicing the cooling system (see the warning at the beginning of the Section). Remember that used coolant must be disposed of and under no circumstances should it be drained into the sewer.


Emptying


1. Set the parking brake and support the wheels with wheel chocks; if necessary, jack up the vehicle and place it on supports. The actual maintenance procedures should only be performed after the engine has completely cooled down, i.e., several hours after the end of the trip.

2. Remove the cap from the expansion tank/radiator.

To avoid getting burned, never remove the radiator/expansion tank cap until the engine has completely cooled down!

3. If the vehicle is equipped accordingly, remove the crankcase protection elements.

4. Place a drain container under the radiator drain valve, open the valve and drain the coolant into the prepared container.

To reduce the risk of accidental damage to a plastic valve, pre-soak it with penetrating oil.
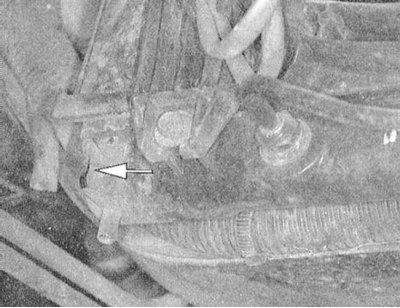

5. Once the radiator is drained, close the valve and remove the drain pan from under the car. If necessary, reinstall the crankcase guard.

6. Lower the car to the ground.

Flushing


1. After completely draining the cooling system (see above), pour a special flushing liquid into it (in extreme cases, ordinary soft water will do).

2. Start the engine and wait until the upper radiator hose is hot to the touch.


3. After turning off the engine, wait until it has cooled down completely and drain the system again.

4. Repeat the described procedure until the liquid drained from the radiator is completely free of scale particles and becomes absolutely transparent.

5. Flush the expansion tank separately.

6. After tightening the drain valve and, if necessary, restoring the original connection of all hoses, fill the system with fresh coolant of the required composition, then remove air locks from the cooling tract (see below).

Refueling


1. Slowly pour fresh antifreeze and water into the radiator, 50/50. Continue pouring until the fluid level rises to the bottom of the filler neck. Add coolant to the expansion tank, bringing its level to the bottom mark (FULL COLD) on the tank wall. Wait five minutes and check the coolant level in the radiator again, adjusting if necessary.

2. Without installing the radiator cap, start the engine and warm it up until the thermostat valve opens (the liquid should start to circulate through the radiator, and the upper hose of the latter will warm up).

3. Turn off the engine and let it cool down. Add some more liquid to the radiator, bringing its level to the lower edge of the filler neck.

4. Squeeze the upper radiator hose to release any air, and add a little more coolant if necessary. Replace the radiator cap.

5. Move the interior heating system control handle to maximum heating, turn on the heater fan to maximum speed.

6. Start the engine, warm it up to normal operating temperature and check the system for signs of leaks.


7. Overheating of the unit indicates the presence of air locks in the cooling tract. Turn off the engine and let it cool down - the air should leave the tract automatically. Repeat the procedure until the required temperature mode of the running engine is achieved.

8. Check the coolant level in the expansion tank again and make the appropriate adjustments if necessary.
This article is available at: russian, bulgarian, belarusian, ukrainian, serbian, croatian, romanian, polish, slovak, hungarian
This article was reviewed by: Dmitry Vasiliev
Share with friends:
◀ Previous
Galant 6 and 7: Maintenance
Next ▶

Replacing the air cleaner filter element
Checking and adjusting valve clearances — Mirage only
Checking the condition of the protective covers of the drive shafts
Checking the condition / servicing disc brakes
Checking the condition of the brake lines
Replacing the fuel filter
Checking and replacing the PCV valve
Checking the condition and replacing spark plugs
Checking the condition, adjusting the tension force and replacing the drive belts
Checking the condition of the exhaust system components
Similar materials for other Mitsubishi models

➤ Cooling System Hoses — Maintenance and Repair Mitsubishi Colt 4 and 5 (1991-2003)
➤ Checking the tightness of the cooling system Mitsubishi Lancer 3 and 5 (1984-1992)
➤ Electronic immobilizer (anti-theft system that blocks… Mitsubishi L200 4 (2005-2014, diesel)
➤ Checking for leaks in the cooling system Mitsubishi Outlander 1 (2003-2008)
➤ Airbag System Maintenance Mitsubishi Pajero 1 and 2 (1982-1999)
➤ Checking the tightness of the cooling system Mitsubishi Carisma (1995-2004)
Link in different formats to this article
Comments and feedback from visitors
No comments yet


Add up two numbers 45 + 26


Galant 6 and 7 (1987-1998) 
  • General information
  • Introduction to guide
  • User manual
  • Driving and operation
  • Maintenance
  • Power unit
  • Dismantling the engine
  • Engine overhaul
  • Cooling and heating
  • Power and exhaust systems
  • Engine electrical equipment
  • Engine management systems
  • Transmission
  • Mechanical gearbox
  • Automatic gearbox
  • Clutch
  • Drive shafts and transfer case
  • Chassis and running gear
  • Brake system
  • Car suspension
  • Steering
  • Body and interior
  • Exterior (external elements)
  • Interior (internal elements)
  • Doors, locks and windows
  • Electrical equipment
  • Equipment and devices
  • Wiring diagrams Galant
  • Wiring diagrams Mirage
  • Wiring diagrams Diamante
Galant 5 (1983-1989, petrol) 
  • General information
  • Troubleshooting
  • Maintenance
  • Power unit
  • Engine repair
  • Engine overhaul
  • Cooling and heating
  • Fuel and exhaust system
  • Engine electrical equipment
  • Reducing exhaust toxicity
  • Transmission
  • Manual gearbox
  • Automatic gearbox
  • Clutch and drive shafts
  • Chassis and running gear
  • Brake system
  • Car suspension
  • Steering
  • Body and interior
  • Exterior (external elements)
  • Interior (internal elements)
  • Doors, locks and windows
  • Electrical equipment
  • Equipment and devices
  • Electrical diagrams
MitsubishiMan.ru © 2018–2026 • Mobile version • Articles about Mitsubishi • Contacts • Sitemap: EN BG BY UA RS HR RO PL SK HU • Site search • Bookmark
Colt 2 and 3 (1983-1993) · Colt 4 and 5 (1991-2003) · Colt 5 (1995-2003) · Lancer 3 and 5 (1984-1992) · Lancer 9 (2000-2007) · Galant 5 (1983-1989) · Galant 6 and 7 (1987-1998) · L200 4 (2005-2014) · Outlander 1 (2003-2008) · Pajero 1 and 2 (1982-1999) · Pajero 4 (2006-2021) · Carisma (1995-2004) · Space Star (1998-2005) ·
This resource sets cookies 🍪 to avoid bothering you with repeated data entry.