



Contents: Oil drain ⤓ Filling with oil ⤓
To change the engine oil, you will need the following tools:
- I am a Pit or a hydraulic lift with stands.
- Special tool for unscrewing the filter (Oil filter pliers, strap wrench or HAZET tool 2172).
- A set of wrench heads for unscrewing the oil drain plug bolt, as well as a container for collecting used oil (if the oil is not sucked out) with a capacity of at least 6 liters.
The following replacement parts are required:
- Only if oil is not sucked out: Copper sealing ring of the oil drain plug bolt (sometimes included in the oil filter packaging).
- Oil filter cartridge. When purchasing, please state the model and year of manufacture.
- Depending on the engine type, from 3.8' to 5.6 liters of engine oil. Use only oil specified by MITSUBISHI, see p. 2.
Amount of oil to be replaced:
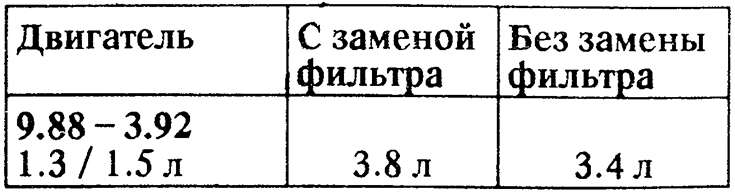
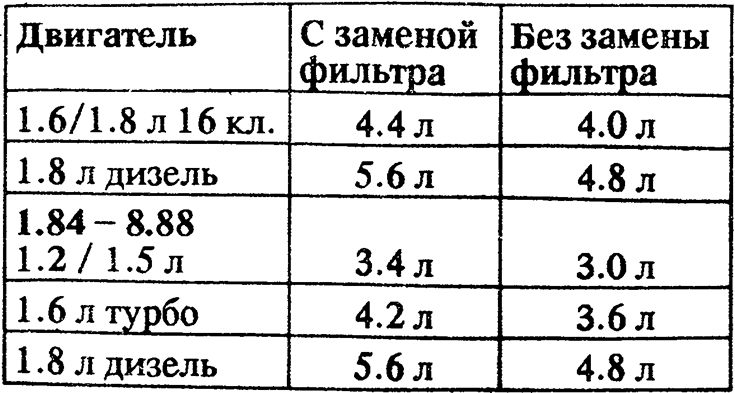
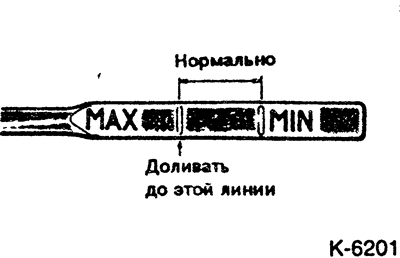
- The oil level should be between the MAX and MIN marks on the end of the dipstick.
The oil is changed at different intervals depending on the engine type, see "Maintenance Schedule". As a rule, the oil filter is changed at the same time. Under severe operating conditions, such as frequent cold engine starts and very dusty roads, the oil and oil filter should be changed more often. The oil can be sucked out through a probe (at a petrol station) and an oil measuring tube. In any case, you should buy oil at the appropriate petrol station.
Oil drain
- Warm up the engine to operating temperature (coolant temperature 80° - 90°C) by driving the car 10-15 km.
Note: Engine oil can also be sucked out using a probe.
- Raise the car to a horizontal position, see item 29.
- Unscrew the oil filler cap.
- Place a container under the oil pan to collect the oil.
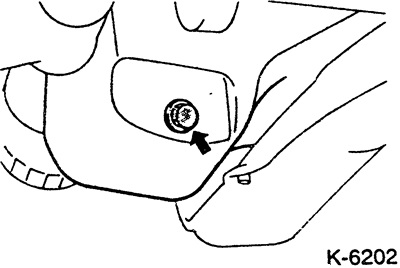
- Unscrew the oil drain plug on the oil pan -arrow- and drain the oil from the engine. Caution: Be careful when draining. The oil is hot.
Note: If metal filings or abrasion products are found in the drained oil, this indicates damage, such as crankshaft bearings or connecting rods. To prevent consequences, thoroughly flush the oil channels after engine repair.
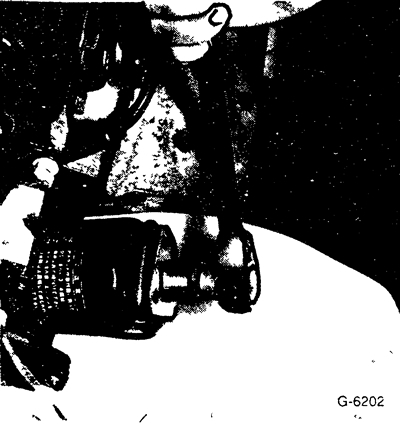
F Remove the oil filter. The oil filter is located at the front of the engine block. To remove the oil filter, you need a special tool, such as the HAZET 2171. You can also insert a sharp screwdriver into the oil filter from the side. This will cause oil to flow - place a container underneath.
Filling with oil
- Screw in the oil drain plug and tighten to 40 Nm.
- Wash the oil filter flange on the engine block with oil. Remove any filter gasket that may remain there.
- Lightly lubricate the rubber gasket of the oil filter with engine oil.
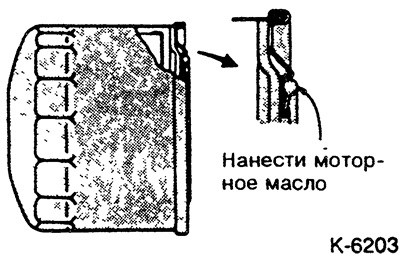
Screw on the new oil filter by hand. After the oil filter gasket has seated against the engine block, tighten the filter one more turn. Tightening torque: 15 Nm. Follow the oil filter manufacturer's instructions.
Caution: The oil filter can only be installed on the corresponding vehicle model.
Fill in new oil through the oil filler neck on the cylinder head. Then check the engine oil level with an oil dipstick.
Note: It is recommended to always add ½ liter of oil less, warm up the engine and after a few minutes check the oil level with an oil dipstick and top up if necessary. When overfilling the oil, the excess oil should be sucked out, otherwise the seals and catalytic converter may be damaged.
- After a test drive, check the tightness of the drain plug and oil filter, carefully tighten if necessary.
- Stop the warmed up engine and after 2 minutes check the oil level again, adjust the oil level if necessary.
- For better control of engine operation, when changing, always fill in the same type and also the same brand of oil, therefore it is advisable to place a sticker on the engine with the brand and viscosity of the filled oil each time you change the oil.
- Indiscriminate change of oil types is harmful. Motor oils of the same type but different brands should not be mixed if possible. Motor oils of the same type and brand but different viscosity can be added if necessary when changing seasons without consequences.