
English Русский
Български
Беларускі
Український
Српски
Hrvatski
Română
Polski
Slovenský
Magyar
Articles Bookmark Contacts Sitemap   
Company Audi Company Ford Company Hyundai Company Kia Company Mazda Company Mercedes-Benz Company Nissan
MitsubishiMan.ru


Home Colt Lancer Galant L200 Outlander Pajero Others
Galant 6 and 7 (1987-1998) Galant 5 (1983-1989, petrol)

Clutch cable adjustment, cable assembly removal and installation (Mirage models) (Mitsubishi Galant 6)

  • Home
  • Galant
  • 6 (1987-1998)
  • Transmission
  • Clutch
  • Clutch cable adjustment, cable assembly removal and installation (Mirage models)
0
Contents: Adjustment ⤓ Removal ⤓ Installation ⤓
Note: The hydraulic clutch drive used on other models does not require adjustment.


Adjustment
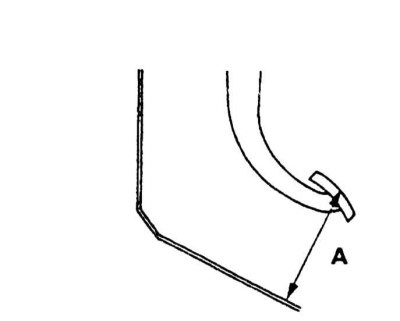


1. Measure the height of the clutch pedal position (A). Compare the measurement result with the requirements of the Specifications (162÷165 mm).

Note: Adjusting the pedal height on these models is not possible and if the measurement results are outside the acceptable range, the pedal assembly needs to be replaced.


2. Press the clutch pedal several times and evaluate the amount of its free travel (until resistance occurs). If the measurement result is outside the permissible range (17÷22 mm), make the appropriate adjustment (see below).

3. The adjustment is made by rotating the cable sheath adjustment nut located on the engine compartment bulkhead.

4. Depress the clutch pedal several times and repeat the check.

Removal


1. Loosen the cable by turning the adjustment wheel counterclockwise.

2. Release the cable clamps.

3. Remove the cotter pin and disconnect the cable from the clutch actuator lever on the gearbox housing.

4. Disconnect the cable from the clutch pedal and remove it from the car - try to remember the assembly route.


Installation


1. Install the cable on the vehicle, laying it in accordance with the route recorded during assembly dismantling. Connect the cable to the clutch pedal and actuator lever and secure it with all the provided fasteners.

Note: The fastening cotter pin must be replaced without fail.


2. Lubricate all contact points of the cable assembly.

3. Adjust the pedal free travel (see above).
This article is available at: russian, bulgarian, belarusian, ukrainian, serbian, croatian, romanian, polish, slovak, hungarian
This article was reviewed by: Dmitry Vasiliev
Share with friends:
◀ Previous
Galant 6 and 7: Clutch
Next ▶

Adjusting the clutch pedal
Checking the condition and replacing the guide bearing
Removal, checking and installation the release bearing and clutch release fork
Removal, inspection and installation of clutch assembly components
Clutch — General information and component condition check
Removal and installation the clutch master cylinder
Removal and installation the clutch slave cylinder
Bleeding air from the hydraulic circuit of the clutch release drive
Similar materials for other Mitsubishi models

➤ Clutch release cable — removal, installation and adjustment Mitsubishi Colt 2 and 3 (1983-1993)
➤ Removal and installation the clutch cable Mitsubishi Lancer 3 and 5 (1984-1992)
➤ Checking the brake fluid levels in the master cylinder… Mitsubishi L200 4 (2005-2014, diesel)
➤ Instrument cluster backlight adjustment rheostat Mitsubishi Outlander 1 (2003-2008)
➤ Clutch release cable drive parts Mitsubishi Pajero 1 and 2 (1982-1999)
➤ Adjusting the selector cable Mitsubishi Carisma (1995-2004)
Link in different formats to this article
Comments and feedback from visitors
No comments yet


Add up two numbers 19 + 11


Galant 6 and 7 (1987-1998) 
  • General information
  • Introduction to guide
  • User manual
  • Driving and operation
  • Maintenance
  • Power unit
  • Dismantling the engine
  • Engine overhaul
  • Cooling and heating
  • Power and exhaust systems
  • Engine electrical equipment
  • Engine management systems
  • Transmission
  • Mechanical gearbox
  • Automatic gearbox
  • Clutch
  • Drive shafts and transfer case
  • Chassis and running gear
  • Brake system
  • Car suspension
  • Steering
  • Body and interior
  • Exterior (external elements)
  • Interior (internal elements)
  • Doors, locks and windows
  • Electrical equipment
  • Equipment and devices
  • Wiring diagrams Galant
  • Wiring diagrams Mirage
  • Wiring diagrams Diamante
Galant 5 (1983-1989, petrol) 
  • General information
  • Troubleshooting
  • Maintenance
  • Power unit
  • Engine repair
  • Engine overhaul
  • Cooling and heating
  • Fuel and exhaust system
  • Engine electrical equipment
  • Reducing exhaust toxicity
  • Transmission
  • Manual gearbox
  • Automatic gearbox
  • Clutch and drive shafts
  • Chassis and running gear
  • Brake system
  • Car suspension
  • Steering
  • Body and interior
  • Exterior (external elements)
  • Interior (internal elements)
  • Doors, locks and windows
  • Electrical equipment
  • Equipment and devices
  • Electrical diagrams
MitsubishiMan.ru © 2018–2026 • Mobile version • Articles about Mitsubishi • Contacts • Sitemap: EN BG BY UA RS HR RO PL SK HU • Site search • Bookmark
Colt 2 and 3 (1983-1993) · Colt 4 and 5 (1991-2003) · Colt 5 (1995-2003) · Lancer 3 and 5 (1984-1992) · Lancer 9 (2000-2007) · Galant 5 (1983-1989) · Galant 6 and 7 (1987-1998) · L200 4 (2005-2014) · Outlander 1 (2003-2008) · Pajero 1 and 2 (1982-1999) · Pajero 4 (2006-2021) · Carisma (1995-2004) · Space Star (1998-2005) ·
This resource sets cookies 🍪 to avoid bothering you with repeated data entry.