English Русский
Български
Беларускі
Український
Српски
Hrvatski
Română
Polski
Slovenský
Magyar
Articles Bookmark Contacts Sitemap   
Company Audi Company Ford Company Hyundai Company Kia Company Mazda Company Mercedes-Benz Company Nissan
MitsubishiMan.ru


Home Colt Lancer Galant L200 Outlander Pajero Others
L200 4 (2005-2014, diesel)

Installing the intake camshaft covers (Mitsubishi L200 4)

  • Home
  • L200
  • 4 (2005-2014, diesel)
  • Power unit
  • Diesel engine
  • Installing the intake camshaft covers
0
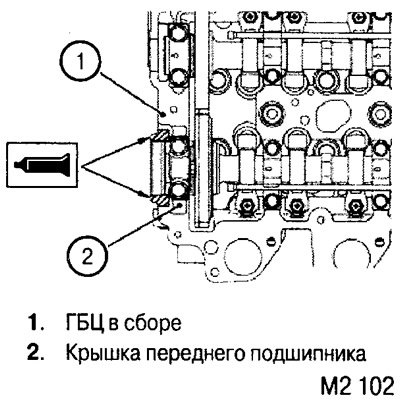
1. When installing the front bearing cap, apply 3M ATD N® 8660 sealant or equivalent.

Note: The cover must be installed within no more than 3 minutes after applying the sealant.


2. After lubricating the sealing ring with engine oil, install the oil line.

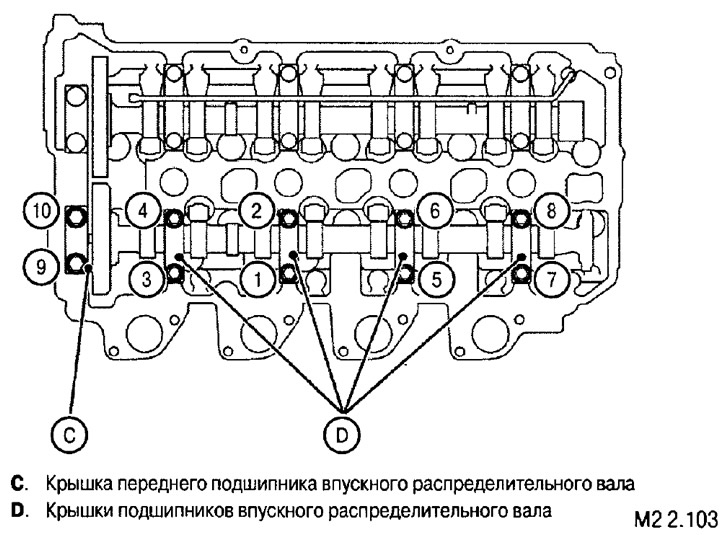
3. Tighten the cover mounting screws in the order shown in the figure to the following torques:
  • medium caps: 11±1 Nm.
  • front bearing cover: 20±1 Nm.


Installing the camshaft oil seal


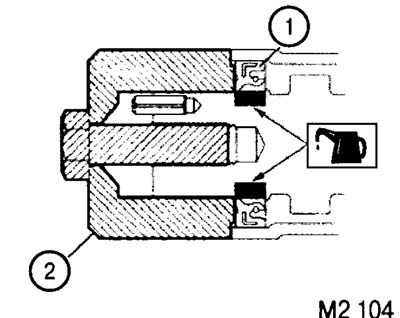
1. Apply a small amount of engine oil to the inner working surface of the oil seal (1) and press it in using a mandrel (2).


The source of the article is available at: mitsubishiman.ru
This article is available at: russian, bulgarian, belarusian, ukrainian, serbian, croatian, romanian, polish, slovak, hungarian
This article was reviewed by: Nikita Romanov
Share with friends:
◀ Previous
L200 4: Diesel engine
Next ▶

Installing the intake camshaft assembly
Installing an additional gear on the intake camshaft
Installing the exhaust camshaft bearing caps
Installing the exhaust camshaft assembly
Rocker assembly
Checking and adjusting camshafts and valves
Connecting rod and piston group — design description
Removal the connecting rod caps
Removal the piston with connecting rod assembly
Assembly of connecting rod, piston, pin, piston rings
Similar materials for other Mitsubishi models

➤ Camshaft — Checking and Installing Mitsubishi Colt 4 and 5 (1991-2003)
➤ Removal and installation the camshaft of a gasoline engine Mitsubishi Lancer 3 and 5 (1984-1992)
➤ Checking the condition of the protective covers of the… Mitsubishi Galant 6 and 7 (1987-1998)
➤ Removal, Checking and Installing the Oil Pan (2WD Models) Mitsubishi Outlander 1 (2003-2008)
➤ Installing the camshaft and camshaft seal Mitsubishi Pajero 4 (2006-2021)
➤ Checking the vacuum in the intake manifold Mitsubishi Carisma (1995-2004)
Link in different formats to this article
Comments and feedback from visitors
No comments yet


Add up two numbers 38 + 32


L200 4 (2005-2014, diesel) 
  • General information
  • User manual
  • Maintenance
  • Power unit
  • Diesel engine
  • Lubrication system
  • Fuel system
  • Control system
  • Transmission
  • Clutch
  • Mechanical gearbox
  • Transfer case
  • Front axle
  • Rear axle
  • Chassis and running gear
  • Car suspension
  • Steering
  • Brake system
  • Body and interior
  • Exterior (external elements)
  • Interior (internal elements)
  • Doors, locks and windows
  • Electrical equipment
  • Equipment and devices
  • Electrical circuits
MitsubishiMan.ru © 2018–2026 • Mobile version • Articles about Mitsubishi • Contacts • Sitemap: EN BG BY UA RS HR RO PL SK HU • Site search • Bookmark
Colt 2 and 3 (1983-1993) · Colt 4 and 5 (1991-2003) · Colt 5 (1995-2003) · Lancer 3 and 5 (1984-1992) · Lancer 9 (2000-2007) · Galant 5 (1983-1989) · Galant 6 and 7 (1987-1998) · L200 4 (2005-2014) · Outlander 1 (2003-2008) · Pajero 1 and 2 (1982-1999) · Pajero 4 (2006-2021) · Carisma (1995-2004) · Space Star (1998-2005) ·
This resource sets cookies 🍪 to avoid bothering you with repeated data entry.