
English Русский
Български
Беларускі
Український
Српски
Hrvatski
Română
Polski
Slovenský
Magyar
Articles Bookmark Contacts Sitemap   
Company Audi Company Ford Company Hyundai Company Kia Company Mazda Company Mercedes-Benz Company Nissan
MitsubishiMan.ru


Home Colt Lancer Galant L200 Outlander Pajero Others
Lancer 9 (2000-2007, petrol) Lancer 3 and 5 (1984-1992)

Removal and installation the camshaft of a gasoline engine (Mitsubishi Lancer 3)

  • Home
  • Lancer
  • 3 (1984-1992)
  • Power unit
  • Engine repair
  • Removal and installation the camshaft of a gasoline engine
0
Contents: Removal ⤓ Installation ⤓
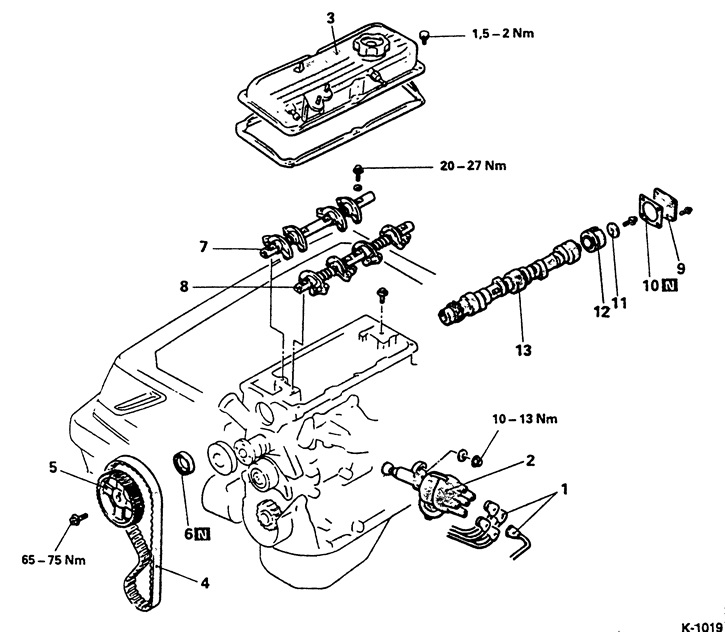
The picture shows the 1.2/1.3/1.5L engine produced from January 1984 to August 1990.


Removal


Carburetor engine: Remove the air filter, see p. 6.6.

Disconnect ignition wire "1" from the distributor cap.

Remove the ignition distributor "2", see p. 4.8.

Carburetor engine: Remove the fuel pump, see p. 6.4.

Unbolt cylinder head "3".

Remove toothed belt "4", see p. 1.6.

Loosen the camshaft gear fastening, holding the gear or camshaft from turning. To lock the camshaft, insert a solid screwdriver from the side under the rocker shaft so that the shaft pin rests against the screwdriver when unscrewing the bolt. The second option is to lock the camshaft gear with a rod from the front. To do this, insert a suitable rod or screwdriver into the hole in the gear and rest it against the upper edge of the cylinder head. To avoid damaging the cylinder head, put a wooden gasket. Holding the screwdriver, unscrew the camshaft fastening bolt. Remove the gear; if necessary, you can remove it with light blows from a rubber hammer.

Remove seal "6".

Unbolt and remove the rocker arm block -7/8-.


Note: Before doing this, loosen the valve clearance adjustment screws. First, loosen all rocker arm axle mounting bolts by half a turn, then slowly and evenly unscrew.


Up to 8.90: Unbolt the back cover "9" and remove it together with the gasket "10".

Up to 8.90: Unscrew the mounting bolt through the hole in the cylinder head, see Fig. K-1020. 11 - Thrust flange, 12 - Camshaft thrust bearing housing.

Carefully pull the camshaft out through the hole in the cylinder head on the gearbox side.

Installation


Wash all parts in gasoline, clean mating surfaces.

(The article was taken from the website: «www.MitsubishiMan.ru»)

Before 8.90: Check the axial play of the camshaft. To do this, insert a feeler gauge between the thrust bearing housing and the camshaft. Permissible value: 0.05 + 0 20 mm, wear limit. 0.4 mm. If the measurement result exceeds the wear limit, replace the thrust bearing housing and repeat the check. If the play is still large, replace the camshaft.

Lightly lubricate the camshaft and insert it into the cylinder head.

Caution: Be careful not to damage the bearing races.
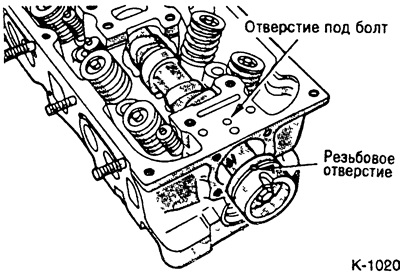


Up to 8.90: Insert the camshaft with the thrust bearing housing into the cylinder head. The threaded hole in the camshaft thrust bearing housing must be facing up. Then align the threaded hole with the bolt hole on the cylinder head, insert the bolt and tighten.


Before 8.90: Screw on the back cover with a new gasket.

From 9.90: Install the camshaft so that the locating pin faces upward.

Lubricate the rocker arm block with engine oil, install, tighten the bolts in small portions and finally tighten with a force of 24 Nm (8 valve engine). The tightening force on a 12 valve engine is 32 Nm.
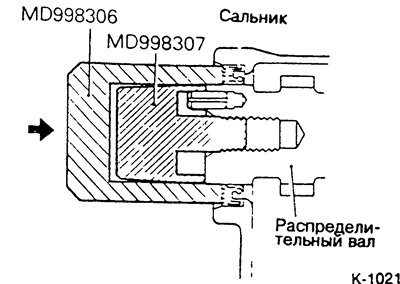


Install the camshaft oil seal using special tools MD-998306/7. To do this, first screw tool MD-998307 into the camshaft. Lubricate the surface of the tool with a thin layer of clean engine oil.

Lubricate the sealing lips of the oil seal with engine oil and push the oil seal in.

Using light hammer blows on the MD-998306 tool, drive the seal into the cylinder head.

Note: If you do not have special tools, you can use 2 tubes of suitable diameters. Do not damage the seal when installing.


Install and secure the camshaft gear.

Install the timing belt, see p. 1.6.

Carburetor engine: Install the fuel pump with 2 new gaskets, see p. 6.4.

Adjust valve clearances, see paragraph 1.18.

Install the cylinder head cover.

Install the ignition distributor, see p. 4.8.

Place the spark plug wires onto the distributor cap.

Carburetor engine: Install the air filter.
This article is available at: russian, bulgarian, belarusian, ukrainian, serbian, croatian, romanian, polish, slovak, hungarian
This article was reviewed by: Dmitry Vasiliev
Share with friends:
◀ Previous
Lancer 3 and 5: Engine repair
Next ▶

Removal and installation the cylinder head of a gasoline engine / replacing the cylinder head gasket
Cylinder head of a gasoline engine — device
Removal and installation a timing belt on a gasoline engine
Adjusting the tension of the timing belt of a gasoline engine
Removal and installation of a gasoline engine
Diesel engine — device
Toothed belt transmission of a diesel engine — device
Timing Belt Tension Adjustment — Diesel Engine
Removal and installation a toothed belt of a diesel engine
Removal and installation valves — all engines
Similar materials for other Mitsubishi models

➤ Engine oil change Mitsubishi Colt 4 and 5 (1991-2003)
➤ Starting the engine from an auxiliary power source Mitsubishi Galant 6 and 7 (1987-1998)
➤ Electronic immobilizer (anti-theft system that blocks… Mitsubishi L200 4 (2005-2014, diesel)
➤ Electronic immobilizer (engine start blocking system) Mitsubishi Outlander 1 (2003-2008)
➤ Tachometer (engine speed) Mitsubishi Pajero 1 and 2 (1982-1999)
➤ DOHC Engine Camshaft and Crankshaft Position Sensors Mitsubishi Carisma (1995-2004)
Link in different formats to this article
Comments and feedback from visitors
No comments yet


Add up two numbers 35 + 20


Lancer 9 (2000-2007, petrol) 
  • General information
  • User manual
  • Maintenance
  • Power unit
  • Repair of MPI engines
  • Repair of GDI engines
  • Engine overhaul
  • Cooling and lubrication system
  • MPI fuel injection system
  • GDI fuel injection system
  • Intake and exhaust system
  • Starting and charging system
  • Transmission
  • Automatic gearbox
  • Variator (CVT)
  • Drive shafts and gearbox
  • Chassis and running gear
  • Front suspension
  • Rear suspension
  • Steering
  • Brake system
  • Body and interior
  • Doors, locks and windows
  • Exterior (external elements)
  • Interior (internal elements)
  • Electrical equipment
  • Heater and air conditioner
  • Security system SRS
  • Equipment and devices
  • Wiring diagrams (saloon)
  • Wiring diagrams (wagon)
Lancer 3 and 5 (1984-1992) 
  • General information
  • Maintenance
  • Power unit
  • Engine repair
  • Lubrication system
  • Cooling system
  • Ignition system
  • Fuel system
  • Carburetor
  • Fuel injection
  • Diesel power system
  • Exhaust system
  • Transmission
  • Clutch
  • Car gearbox
  • Chassis and running gear
  • Front suspension
  • Rear suspension
  • Steering
  • Brake system
  • Wheels and tires
  • Body and interior
  • Exterior (external elements)
  • Interior (internal elements)
  • Heating system
  • Electrical equipment
  • Equipment and devices
  • Power devices
  • Electrical circuits
MitsubishiMan.ru © 2018–2026 • Mobile version • Articles about Mitsubishi • Contacts • Sitemap: EN BG BY UA RS HR RO PL SK HU • Site search • Bookmark
Colt 2 and 3 (1983-1993) · Colt 4 and 5 (1991-2003) · Colt 5 (1995-2003) · Lancer 3 and 5 (1984-1992) · Lancer 9 (2000-2007) · Galant 5 (1983-1989) · Galant 6 and 7 (1987-1998) · L200 4 (2005-2014) · Outlander 1 (2003-2008) · Pajero 1 and 2 (1982-1999) · Pajero 4 (2006-2021) · Carisma (1995-2004) · Space Star (1998-2005) ·
This resource sets cookies 🍪 to avoid bothering you with repeated data entry.