



Contents: Examination ⤓ Adjustment ⤓
To compensate for thermal expansion in the valve mechanism, a certain clearance must, as a rule, be provided in the valves.
If the clearance is too small, the distribution phases change, the sealing is poor, the engine power drops, the engine runs unevenly. In extreme cases, valve deformation or valve seat burnout may occur. If the clearance is too large, strong mechanical knocks occur, the distribution phases change, the engine loses power due to incomplete filling of the cylinders, and runs unevenly.
Adjusting valve clearances only brings the desired result when the valve seals are perfect, there is no unacceptable play in the guide bushings and the ends of the valve stems are not broken.
Valve clearances should be checked or adjusted after repairs or if there is valve knocking. In addition, valve clearances should be checked as part of maintenance. 16-valve engines have a hydraulic clearance compensator that compensates for any clearance automatically. These engines do not require valve clearance adjustment. If unusual noises are heard in the valve mechanism, the valve clearance compensator should be checked, see paragraph 1.19.
Checking and adjusting the valves should be done on a hot engine, but can also be done on a cold engine. In this case, the valve clearance must be rechecked on a hot engine.
Examination
Start and warm up the engine to a coolant temperature of 80°-90°C.
Turn off the engine.
Petrol engines: Remove all spark plugs.
Diesel engine: Remove the upper part of the intake manifold, see p. 1.10.
[The source of the article is available at: MitsubishiMan.ru]
Diesel engine: To make work easier, remove the glow plugs, see p. 9.4.
Remove the cylinder head cover.
Set the gearbox to neutral position and apply the handbrake.
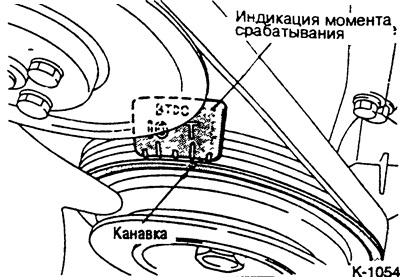
Turn the crankshaft clockwise by the central bolt until the groove on the pulley coincides with the "T" mark. Pistons of the 1st and 4th cylinders are now at TDC. The cylinders are counted from left to right. Cylinder 1 is on the V-belt side of the engine.
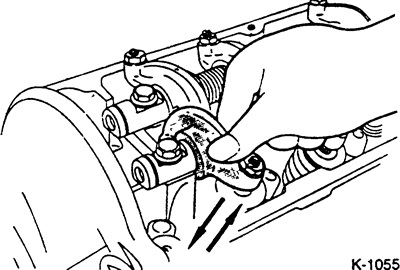
Check which cylinder is in the TDC position. To do this, move the rocker arms of cylinders 1 and 4 up and down by hand. The piston is in the TDC position if there is a gap in both the intake and exhaust valves.
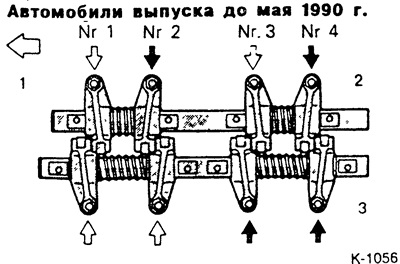
Petrol engines
1 - side of the camshaft gear,
2 - exhaust valve side,
3 - intake valve side.
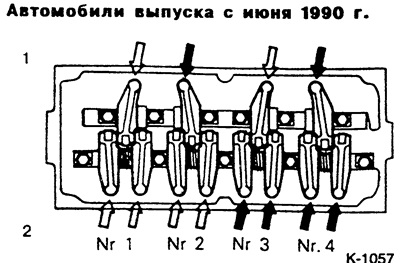
1 - exhaust valve side,
2 - intake valve side
Diesel engine
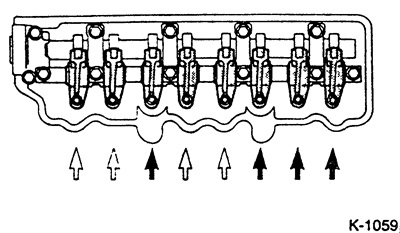
If the piston in cylinder 1 is in the TDC position, the valve clearance marked with white arrows can be adjusted.
If the piston in cylinder 4 is in the TDC position, then the valve clearance marked with black arrows can be adjusted.
Note: To change one position to another, turn the crankshaft 1 revolution clockwise.
Example: Cylinder 1 is at TDC. In cars with a petrol engine, the exhaust valves of cylinders 1 and 3, as well as the intake valves of cylinders 1 and 4, can be checked and adjusted. Then turn the crankshaft one revolution clockwise until the groove on the pulley again matches the "T" mark. Now cylinder 4 is at TDC and the exhaust valves of cylinders 2 and 4, as well as the intake valves of cylinders 3 and 4, can be checked and adjusted.
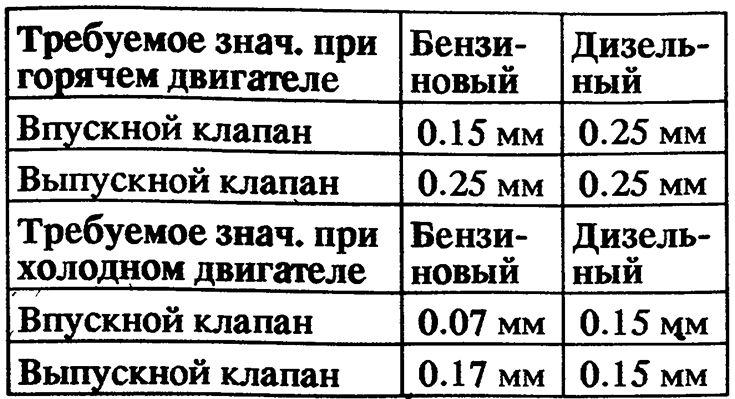
Measure the valve clearance using a feeler gauge between the rocker arm and the valve surface.
The clearance is adjusted correctly if the feeler gauge can be pulled in with tension, otherwise adjust the valve clearance.
Adjustment
Note: For engines with Jet valve, produced from approximately September 1986 to August 1988, the Jet valve adjustment is always carried out before adjusting the intake valve clearance, see also subsection at the end of this chapter.
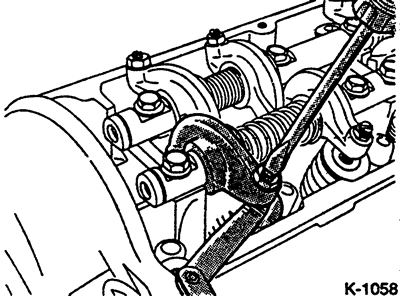
Loosen the lock nut approximately ½ turn while holding the adjusting screw with a screwdriver.
Turn the adjusting screw to set the valve clearance, while constantly moving the feeler gauge.
I'll tighten the lock nut.
Check the valve clearance again and repeat the adjustment if necessary.
Turn the crankshaft one more revolution and check and, if necessary, adjust the clearances in the other valves.
Note: It is advisable to mark the rocker arms of the valves that have already been adjusted with chalk.
After adjustment, check whether the mounting screws and rocker arm mounting brackets are properly inserted or tightened.
Caution: When adjusting valve clearances on a cold engine, it is necessary to check the clearances on a hot engine.
Install the cylinder head cover.
Gasoline engine: Screw in the spark plugs, see item 5/32.1.
Diesel engine: Screw in the glow plugs, see p. 9.4.
Diesel Engine: Install the upper part of the intake manifold, see p. 1.10.
Jet Valve Engine (produced approximately September 1986 to August 1990)
Engines with Jet valves have additional adjustment screws on the intake rocker arms to adjust the Jet valves. The Jet valve is an additional, third valve in 8-valve engines and operates from the intake rocker arms.
Adjust the Jet valve clearance before adjusting the intake valve clearance.
When adjusting the Jet valve clearance, loosen the intake valve adjusting screw.
If the cylinder head has been removed, the cylinder head bolts must be tightened before adjustment.
Jet valve clearance is adjusted in the same way as regular valve clearances.
Note: Adjustment is somewhat difficult due to the weaker spring. Be careful not to turn the adjusting screw in too far, otherwise the Jet valve may be pressed into the cylinder head.
- Required Jet Valve Clearance: 0.25mm (hot engine)
- Required Jet Valve Clearance: 0.17mm (cold engine)