
English Русский
Български
Беларускі
Український
Српски
Hrvatski
Română
Polski
Slovenský
Magyar
Articles Bookmark Contacts Sitemap   
Company Audi Company Ford Company Hyundai Company Kia Company Mazda Company Mercedes-Benz Company Nissan
MitsubishiMan.ru


Home Colt Lancer Galant L200 Outlander Pajero Others
Lancer 9 (2000-2007, petrol) Lancer 3 and 5 (1984-1992)

Compression Test — All Engines (Mitsubishi Lancer 3)

  • Home
  • Lancer
  • 3 (1984-1992)
  • Power unit
  • Engine repair
  • Compression Test — All Engines
0
Compression testing allows you to draw conclusions about the engine's condition. Namely, during testing, you can determine whether the valves, pistons, and piston rings are in order or worn out. In addition, based on the results of the test, you can determine whether the engine needs to be replaced or whether it is still subject to major repairs. A compression tester is required for testing.

Caution: A diesel engine requires a compression tester with a larger measurement range, up to approximately 40 bar. The difference in compression in individual cylinders should not exceed 1.0 bar (for a diesel engine: 3.0 bar). If the compression of one or more cylinders differs from the compression in others by more than 1.0 bar (diesel engine 3.0 bar), a valve defect, worn piston rings or cylinder surface may be suspected. When the wear limit is reached, the engine must be overhauled or replaced.


Compression pressure in bars
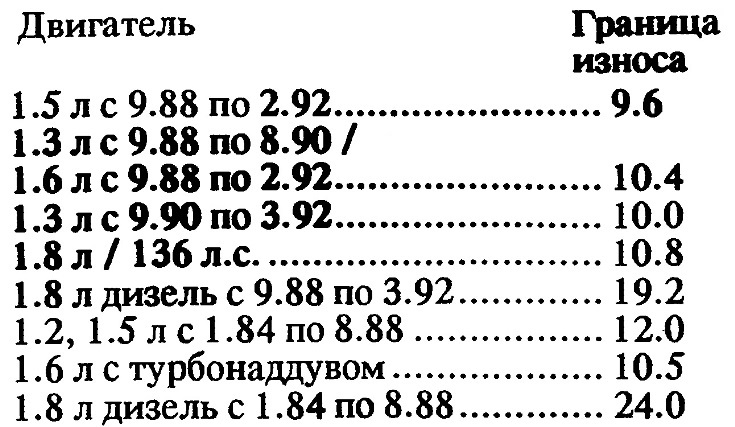


Warm up the engine to operating temperature. To do this, drive the car until the coolant reaches normal operating temperature. The readings should be 80° + 90°C.

Turn off the ignition.


Gasoline engine


Remove the spark plug wire tips from all the spark plugs. There are special pliers for this, for example, HA-ZET 1849. However, they can only be used for metal sleeves, if any.

Disconnect the ignition wires from the ignition coil.

Engine with fuel injection device: Disconnect power from the fuel pump, remove the relay connector. For the location of the relay, see section 8.8.


Blow out the spark plug recesses with compressed air and remove all the spark plugs.

Turn the engine over several times with the starter to throw out residues and carbon deposits.

Warning: Set the gearbox to neutral, apply the handbrake. When cranking the engine, do not lean over the spark plug holes, there is a risk of injury from ejected coolant or oil (if the cylinder walls are defective). For safety, cover the spark plug holes with a rag.


According to the operating instructions, insert or screw the compression gauge into the spark plug hole.

The assistant presses the gas pedal. The gas pedal must be pressed during the entire test.

Operate the starter to crank the engine approximately 8 revolutions until the compression gauge reading reaches its maximum value.

Check all cylinders in sequence and compare with the specified value.

If the compression is below the wear limit, pour some oil into the spark plug holes and repeat the compression test. If the compression increases after adding oil, the piston rings and/or cylinder walls may be worn. If the compression does not increase, the valve or cylinder head gasket is usually defective.


Screw in the spark plugs and connect the ignition wires, see item 5/32.1.

Place the ignition wire onto the ignition coil.

(Article reprinted from the website: «mitsubishiman.ru»)

Install the fuel pump relay connector.

Diesel engine


Remove the upper part of the intake manifold, see p. 1.10.

Remove the electrical wire from the high-pressure fuel pump (HPFP) switch.

Clean the injection tubes with a cleaner and remove them as a set, without damaging their curvature, see item 9.10.

Remove the injectors, see item 9.10.

Remove the holder gasket and the injector seal from the injection hole.

Crank the engine with the starter to push out the residue and carbon deposits.

Warning: Set the gearbox to neutral, apply the handbrake. When cranking the engine, do not lean over the spark plug holes - there is a risk of injury from ejected coolant or oil (if the cylinder walls are defective). For safety, cover the holes with a rag.
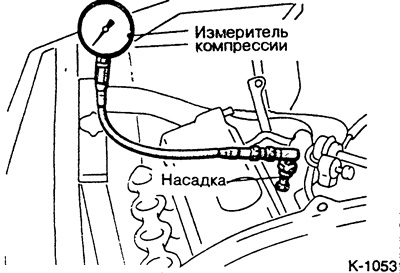


Screw the nozzle into the injection nozzle hole, then screw the compression gauge onto the nozzle.

The assistant must press the gas pedal all the way down and keep his foot on the pedal throughout the entire test.


Turn the engine at starter speed (~250 rpm) until the instrument readings stop increasing.

Check the compression in all cylinders sequentially and compare with the specified value.

If the compression is below the wear limit, pour some oil into the injector holes and repeat the compression test. If the compression increases after adding oil, the piston rings and/or cylinder walls may be worn. If the compression does not increase, the valve or cylinder head gasket is usually defective.

Install the injectors, see item 9.10.

Install injection tubes.

Install the upper part of the intake manifold, see p. 1.10.

Place the electrical wire on the fuel injection pump switch.
This article is available at: russian, bulgarian, belarusian, ukrainian, serbian, croatian, romanian, polish, slovak, hungarian
This article was reviewed by: Dmitry Vasiliev
Share with friends:
◀ Previous
Lancer 3 and 5: Engine repair
Next ▶

Checking the valve clearance compensator of a diesel engine
Checking/Adjusting Valve Clearances — All Engines
Modification of valve seats in cylinder head / modification of valves — all engines
Lapping of diesel engine valve seats
Checking Valve Guides — All Engines
Alternator V-Belt — Gasoline Engine
V-belt alternator — diesel engine
Servo pump V-belt (all engines)
Air conditioning compressor V-belt (all engines)
Checking V-Belt Tension — All Engines
Similar materials for other Mitsubishi models

➤ Replacing the fuel filter of gasoline engines Mitsubishi Colt 4 and 5 (1991-2003)
➤ Checking the compression pressure in the engine cylinders Mitsubishi Galant 6 and 7 (1987-1998)
➤ General information about diesel engines Mitsubishi L200 4 (2005-2014, diesel)
➤ Crankcase ventilation valve (petrol engines) Mitsubishi Pajero 1 and 2 (1982-1999)
➤ Bleeding the fuel system (diesel engines only) Mitsubishi Carisma (1995-2004)
Link in different formats to this article
Comments and feedback from visitors
No comments yet


Add up two numbers 44 + 32


Lancer 9 (2000-2007, petrol) 
  • General information
  • User manual
  • Maintenance
  • Power unit
  • Repair of MPI engines
  • Repair of GDI engines
  • Engine overhaul
  • Cooling and lubrication system
  • MPI fuel injection system
  • GDI fuel injection system
  • Intake and exhaust system
  • Starting and charging system
  • Transmission
  • Automatic gearbox
  • Variator (CVT)
  • Drive shafts and gearbox
  • Chassis and running gear
  • Front suspension
  • Rear suspension
  • Steering
  • Brake system
  • Body and interior
  • Doors, locks and windows
  • Exterior (external elements)
  • Interior (internal elements)
  • Electrical equipment
  • Heater and air conditioner
  • Security system SRS
  • Equipment and devices
  • Wiring diagrams (saloon)
  • Wiring diagrams (wagon)
Lancer 3 and 5 (1984-1992) 
  • General information
  • Maintenance
  • Power unit
  • Engine repair
  • Lubrication system
  • Cooling system
  • Ignition system
  • Fuel system
  • Carburetor
  • Fuel injection
  • Diesel power system
  • Exhaust system
  • Transmission
  • Clutch
  • Car gearbox
  • Chassis and running gear
  • Front suspension
  • Rear suspension
  • Steering
  • Brake system
  • Wheels and tires
  • Body and interior
  • Exterior (external elements)
  • Interior (internal elements)
  • Heating system
  • Electrical equipment
  • Equipment and devices
  • Power devices
  • Electrical circuits
MitsubishiMan.ru © 2018–2026 • Mobile version • Articles about Mitsubishi • Contacts • Sitemap: EN BG BY UA RS HR RO PL SK HU • Site search • Bookmark
Colt 2 and 3 (1983-1993) · Colt 4 and 5 (1991-2003) · Colt 5 (1995-2003) · Lancer 3 and 5 (1984-1992) · Lancer 9 (2000-2007) · Galant 5 (1983-1989) · Galant 6 and 7 (1987-1998) · L200 4 (2005-2014) · Outlander 1 (2003-2008) · Pajero 1 and 2 (1982-1999) · Pajero 4 (2006-2021) · Carisma (1995-2004) · Space Star (1998-2005) ·
This resource sets cookies 🍪 to avoid bothering you with repeated data entry.