
English Русский
Български
Беларускі
Український
Српски
Hrvatski
Română
Polski
Slovenský
Magyar
Articles Bookmark Contacts Sitemap   
Company Audi Company Ford Company Hyundai Company Kia Company Mazda Company Mercedes-Benz Company Nissan
MitsubishiMan.ru


Home Colt Lancer Galant L200 Outlander Pajero Others
Lancer 9 (2000-2007, petrol) Lancer 3 and 5 (1984-1992)

Removal and installation injectors (Mitsubishi Lancer 3)

  • Home
  • Lancer
  • 3 (1984-1992)
  • Power unit
  • Diesel power system
  • Removal and installation injectors
0
Contents: Removal ⤓ Installation ⤓
Defective injectors can cause severe engine detonation and, as a result, damage to the bearings. If such comments are present, leave the engine idling and loosen the union nuts of the injection pipeline one by one. If the detonation disappears when any union nut is loosened, this indicates the corresponding defective injector.

A defective injector can be identified by successively loosening the union nuts at high idle speed. If the number of revolutions does not change after loosening the union nut, this indicates that the corresponding injector is defective. The injector can be checked using a pressure gauge. (Workshop work; required injection pressure value: 120-130 bar). The first signs of injector malfunction are as follows:
  • false ignitions
  • detonation in one or more cylinders
  • engine overheating
  • engine power reduction
  • excessively strong black exhaust
  • increased fuel consumption.

Removal


Carefully clean the outside of the injection line and fuel return pipes with cold cleaner or diesel fuel.
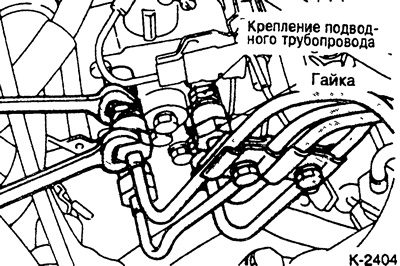


Remove the injection pipeline as a set, to do this, loosen the union nuts on the pump and injectors with a wrench. At the same time, hold the underwater pipeline mount and the injector mount with a wrench.


Caution: Do not disturb the bend shape.


Caution: After unscrewing the underwater pipeline, plug the holes with suitable plugs to prevent dirt and foreign objects from getting inside.
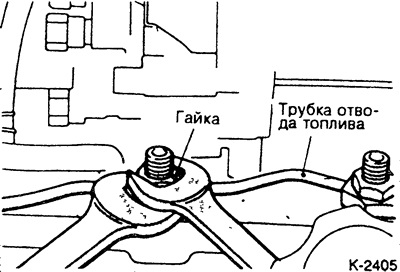


Disconnect the fuel return hose.

Remove the fuel return pipe nuts.

Caution: When doing this, hold the Allen key on the tube, otherwise it may bend or break.


Remove the fuel return pipe.
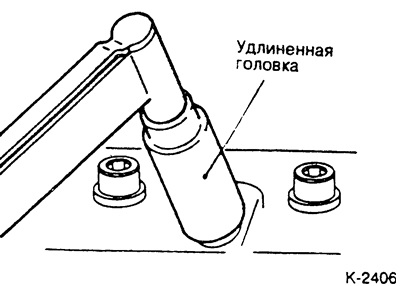


Unscrew the injectors using an extended head and fold them in the same order as they were removed. If necessary, you can mark the injectors with adhesive tape to install them in their original places.

Cover the holes under the nozzles to prevent foreign objects from getting in.
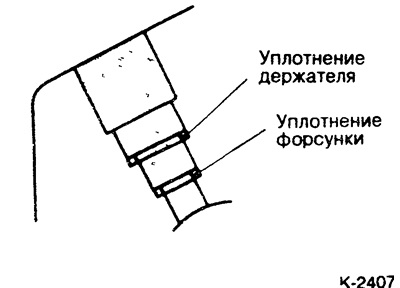


Each hole has a holder seal and a nozzle seal. These must be replaced.


Attention: Never treat the nozzle and nozzle needle with wire, a file or sandpaper. Do not mix up the parts of different nozzles.


Installation


Clean the injector holes and insert 4 new holder seals and injector seals into them.

Install the injectors and tighten to 60 Nm.

Caution: Overtightening the holder may cause deformation of the injector and, thus, the injector needle to stick or cause other damage.


Install the fuel return pipes with 4 new gaskets and tighten the nuts to 40 Nm.

Note: When doing this, hold the Allen key of the corresponding tube with a wrench.


Install the injection pipeline and tighten the nuts to 35 Nm. Hold the pipeline holders or injector holders with a wrench.
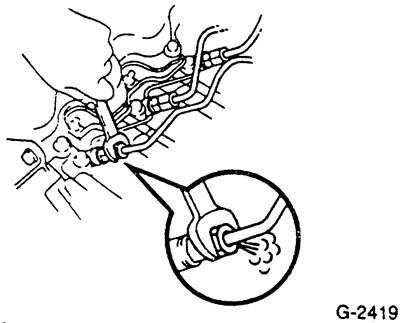


Secure the pipeline bracket.

Slightly loosen the union nuts of the injection pipes on all injector holders.

Turn the engine with the starter until diesel fuel appears at the injection pipes. Tighten the injection pipes with the prescribed force. If necessary, remove air from the fuel system using a hand pump, see paragraph 32.1.

(The source of the article is available at MitsubishiMan.ru)
This article is available at: russian, bulgarian, belarusian, ukrainian, serbian, croatian, romanian, polish, slovak, hungarian
This article was reviewed by: Dmitry Vasiliev
Share with friends:
◀ Previous
Lancer 3 and 5: Diesel power system
Next ▶

High pressure fuel pump (HPFP)
Injection system — device
Checking / adjusting the idle speed
Checking and replacing the fuel shut-off valve
Fuel supply
Checking/adjusting the start of fuel supply by the injection pump
Operation in winter
Diagnostics of faults in the fuel system of a diesel engine
Similar materials for other Mitsubishi models

➤ Checking the fuel pressure between the high pressure fuel… Mitsubishi Colt 4 and 5 (1991-2003)
➤ Removal and installation of fuel lines and injection… Mitsubishi Galant 6 and 7 (1987-1998)
➤ Fuel injectors Mitsubishi L200 4 (2005-2014, diesel)
➤ Removal and installation injectors Mitsubishi Outlander 1 (2003-2008)
➤ Injectors — removal, inspection and installation Mitsubishi Pajero 1 and 2 (1982-1999)
➤ Injectors — removal, inspection and installation Mitsubishi Carisma (1995-2004)
Link in different formats to this article
Comments and feedback from visitors
No comments yet


Add up two numbers 29 + 15


Lancer 9 (2000-2007, petrol) 
  • General information
  • User manual
  • Maintenance
  • Power unit
  • Repair of MPI engines
  • Repair of GDI engines
  • Engine overhaul
  • Cooling and lubrication system
  • MPI fuel injection system
  • GDI fuel injection system
  • Intake and exhaust system
  • Starting and charging system
  • Transmission
  • Automatic gearbox
  • Variator (CVT)
  • Drive shafts and gearbox
  • Chassis and running gear
  • Front suspension
  • Rear suspension
  • Steering
  • Brake system
  • Body and interior
  • Doors, locks and windows
  • Exterior (external elements)
  • Interior (internal elements)
  • Electrical equipment
  • Heater and air conditioner
  • Security system SRS
  • Equipment and devices
  • Wiring diagrams (saloon)
  • Wiring diagrams (wagon)
Lancer 3 and 5 (1984-1992) 
  • General information
  • Maintenance
  • Power unit
  • Engine repair
  • Lubrication system
  • Cooling system
  • Ignition system
  • Fuel system
  • Carburetor
  • Fuel injection
  • Diesel power system
  • Exhaust system
  • Transmission
  • Clutch
  • Car gearbox
  • Chassis and running gear
  • Front suspension
  • Rear suspension
  • Steering
  • Brake system
  • Wheels and tires
  • Body and interior
  • Exterior (external elements)
  • Interior (internal elements)
  • Heating system
  • Electrical equipment
  • Equipment and devices
  • Power devices
  • Electrical circuits
MitsubishiMan.ru © 2018–2026 • Mobile version • Articles about Mitsubishi • Contacts • Sitemap: EN BG BY UA RS HR RO PL SK HU • Site search • Bookmark
Colt 2 and 3 (1983-1993) · Colt 4 and 5 (1991-2003) · Colt 5 (1995-2003) · Lancer 3 and 5 (1984-1992) · Lancer 9 (2000-2007) · Galant 5 (1983-1989) · Galant 6 and 7 (1987-1998) · L200 4 (2005-2014) · Outlander 1 (2003-2008) · Pajero 1 and 2 (1982-1999) · Pajero 4 (2006-2021) · Carisma (1995-2004) · Space Star (1998-2005) ·
This resource sets cookies 🍪 to avoid bothering you with repeated data entry.