



Removal
Remove the cover down and to the left.
Remove the air filter, see p. 6.6.
Unscrew the upper part of the intake manifold from the lower part and from the holders. First unscrew the branch pipe for the exhaust outlet channel, and also remove the ventilation and intake air hoses.
Remove the glow plugs, see p. 9.4.
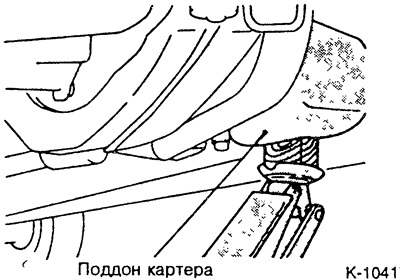
Place a special jack with a wooden pad under the oil pan and support the engine, which will allow you to remove the engine mount bracket.
Remove the V-belt, see p. 1.21.
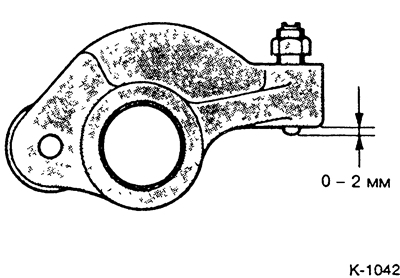
Loosen all rocker arm adjusting bolts so that the ends of the bolts protrude only 0+2 mm.
Set the crankshaft to TDC of the piston of the 1st cylinder and finish the adjustment.
Setting the piston of the 1st cylinder to TDC.
Unscrew the upper timing belt cover.
Turn the crankshaft clockwise until the camshaft wheel mark is at TDC.
There are several ways to turn the crankshaft:
1. Raise the car from the front side. Engage 5th gear, set the handbrake. Turn the raised front wheel. This rotates the crankshaft. An assistant is required to rotate the wheel
2. Place the car on a level surface. Engage 5th gear. Move the car forward.
3. Turn the crankshaft by the central bolt of the belt pulley. First, engage neutral gear and set the handbrake.
Caution: Do not turn the engine by the camshaft wheel mounting bolt. This will overload the timing belt.
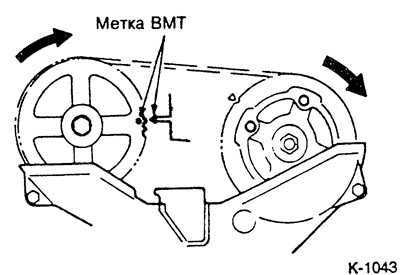
Turn the engine so that the mark on the camshaft wheel coincides with the pointer. In this case, the piston of cylinder 1 is at TDC.
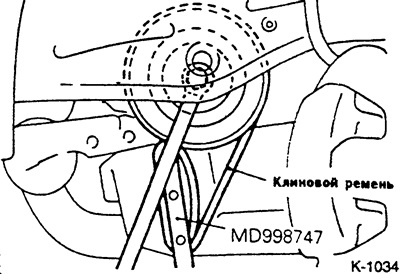
Unscrew the crankshaft belt pulley. To hold the belt pulley, use the MD-998747 tool with an old V-belt.
Caution: The V-belt must not be damaged. After using it as an auxiliary device, do not reinstall the belt under any circumstances. If you do not have a special tool, engage first gear and, with the help of a second person, lock the wheels with the brake.
Unscrew the lower timing belt cover.
Mark the direction of rotation of the toothed belt with chalk or a felt-tip pen. The toothed belt rotates clockwise.
Loosen the timing belt tension.
Remove the timing belt.
Caution: Do not disturb the TDC position of the camshaft and crankshaft with the timing belt removed. If it is necessary to turn the camshaft with the timing belt removed, make sure that the crankshaft is not in the TDC position (risk of damaging the valves and pistons). To do this, mark the position of the crankshaft gear (paint the marking on the crankshaft gear and on the engine block). Then turn the crankshaft wheel ¼ turn forward or backward.
Checking the condition of the timing belt
It is necessary to replace the timing belt if the following defects are present:
Traces of oil or coolant on the timing belt. This is usually caused by leaks in the housing or camshaft seals or leaks in the water pump.
Hardening of the rubber on the outside of the toothed belt. The belt becomes shiny, inelastic, and so hard that no trace remains from a fingernail pressed hard.
Rubber ruptures on the outer strap of the belt.
Tears and peeling of fabric on the inside of the belt.
Breaks at the base of the teeth.
Tears on the narrow side of the belt.
Severe wear on the narrow side of the belt.
Severe wear of teeth. Fraying of fabric on the loaded side of the teeth. Peeling of rubber, discoloration to white. Reduction in tooth width. Chipped teeth.
Installation
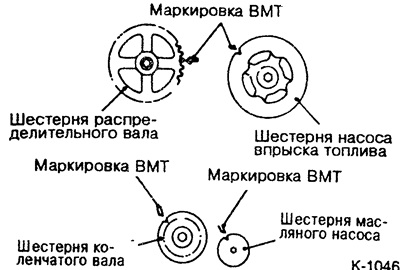
Check the TDC position of the camshaft, fuel injection pump, oil pump and crankshaft, adjust if necessary.
Caution: If it is necessary to turn the camshaft with the timing belt removed, the crankshaft must not be in the TDC position.
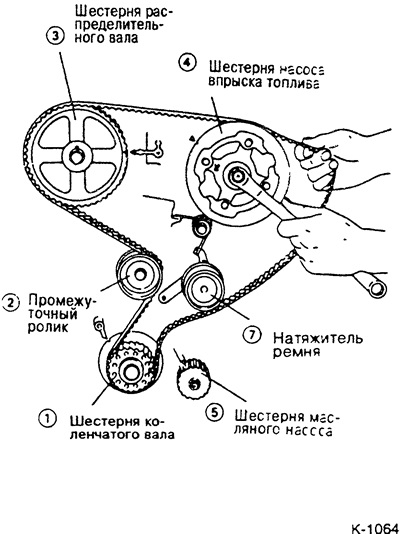
Install the toothed belt. When doing so, note the markings on the direction of rotation made during removal. A used toothed belt must only be reinstalled in the same direction of rotation.
First, place the timing belt on the crankshaft gear, then pass it through the guide roller, camshaft gear and oil pump gear. Make sure that the timing belt is placed between two adjacent gears in a taut state.
Caution: Using a bent wrench with the timing belt in place, align the TDC mark on the fuel injection pump gear with the mark on the engine.
Place the timing belt on the tension roller.
Tighten the timing belt.
Turn the timing belt clockwise until all TDC markings align.
Note: All TDC markings must match, otherwise repeat installation.
Check the timing belt tension.
Adjust valve clearances, see paragraph 1.18.
Screw on the cylinder head cover, having first installed the gaskets, see p. 1.10.
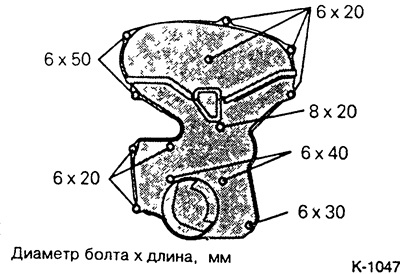
Install the upper and lower toothed belt covers. Insert the bolts according to their dimensions, as shown in the figure.
Install the V-belt, see p. 1 21.
Bolt on the upper engine mount, see p. 1 4.
Install glow plugs, see p. 9.4.
Install the upper part of the intake manifold. To do this, insert new sealing rings into the lower part of the manifold, put on the upper part and tighten the bolts alternately with a force of 15 Nm. Secure the manifold to the holders with a force of 15 Nm. Attach the exhaust pipe with a new seal and secure it with a force of 20 Nm. Put on the ventilation and air intake hoses and secure them with clamps.
Install the air filter, see p. 6.6.
Install the lower left cover.