



Contents: 8 and 12 valve petrol engines ⤓ Checking the condition of the timing…⤓ 16-valve petrol engine (1.6, 1.8 l) ⤓
8 and 12 valve petrol engines
Note: Depending on the model and year of manufacture, it may be necessary to remove additional nearby units, such as the generator, servo pump and air conditioning compressor.
Removal
Disconnect the upper engine mount, while supporting the engine, see p. 1.4.
Loosen the water pump belt pulley, pressing lightly on the V-belt with your hand to prevent the pulley from turning.
Remove the V-belt, see p. 1.21.
Set the crankshaft to TDC of the 1st cylinder and do not disturb the setting any further.
Setting the engine to TDC of the 1st cylinder
Note: At TDC, the piston was at its highest point in the cylinder. The piston occupies this position during the compression stroke and the exhaust stroke. The TDC position during the compression stroke is called the TDC ignition position, since during normal engine operation, ignition occurs shortly before this.
Remove the upper timing belt cover.
Turn the engine crankshaft clockwise until the camshaft reaches the TDC position.
The engine shaft can be turned in several ways:
1. Raise the car from the front on one side. Engage fifth gear, set the handbrake. Turn the raised front wheel. This rotates the engine crankshaft. An assistant is required to turn the wheel.
2. Place the car on a level surface. Engage fifth gear. Move the car.
3. Turn the crankshaft by the central bolt of the crankshaft belt pulley. Before doing this, set the gearbox to neutral and apply the handbrake.
Caution: Do not rotate the engine by the camshaft timing belt sprocket mounting bolt. This will overload the timing belt.
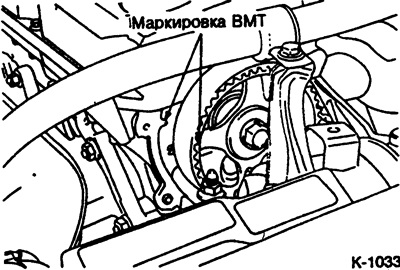
Turn the engine until the marking on the camshaft gear matches the TDC mark on the cylinder head. The engine is then set to the TDC position of the first cylinder ignition.
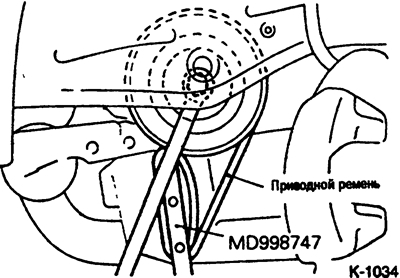
Disconnect the crankshaft pulley from the crankshaft. To hold the crankshaft from turning, the workshop uses the MD-998747 device and an old V-belt.
Caution: The V-belt must not be damaged. Never reinstall this belt, as it may be damaged when held from turning. If no device is available, engage first gear and have an assistant press the brake pedal.
Remove the lower timing belt cover.
Mark the direction of the toothed belt with chalk or a felt-tip pen. The toothed belt moves clockwise.
The article is reprinted from a web resource (mitsubishiman.ru)
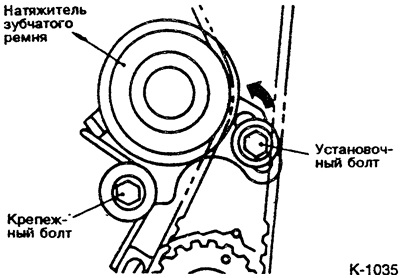
Loosen the timing belt tensioner mounting bolt.
Press the toothed belt tensioner by hand in the direction of the water pump, thereby releasing the toothed belt tension. In this position, tighten the clamping bolt so that the belt tensioner setting does not get knocked off.
Remove the timing belt.
Caution: Do not disturb the TDC position of the camshaft and crankshaft. If it is necessary to turn the camshaft with the timing belt removed, make sure that the crankshaft is not in the TDC position (risk of damaging the valves and pistons). To do this, mark the position of the crankshaft gear (paint the marking on the crankshaft gear and on the engine block). Then turn the crankshaft wheel ¼ of a turn (90°) forward or backward.
Checking the condition of the timing belt
It is necessary to replace the timing belt if the following defects are present:
Traces of oil or coolant on the timing belt. This is usually caused by leaks in the housing or camshaft seals or leaks in the water pump.
Hardening of the rubber on the outside of the toothed belt. The belt becomes shiny, inelastic and so hard that no trace remains from a fingernail pressed hard.
Rubber tears on the outside of the belt.
Tears and peeling of fabric on the inside of the belt.
Breaks at the base of the teeth.
Tears on the narrow side of the belt.
Severe wear on the narrow side of the belt.
Severe wear of teeth. Fraying of fabric on the loaded side of the teeth. Peeling of rubber, discoloration to white. Reduction in the width of the teeth.
Chipped teeth.
Installation
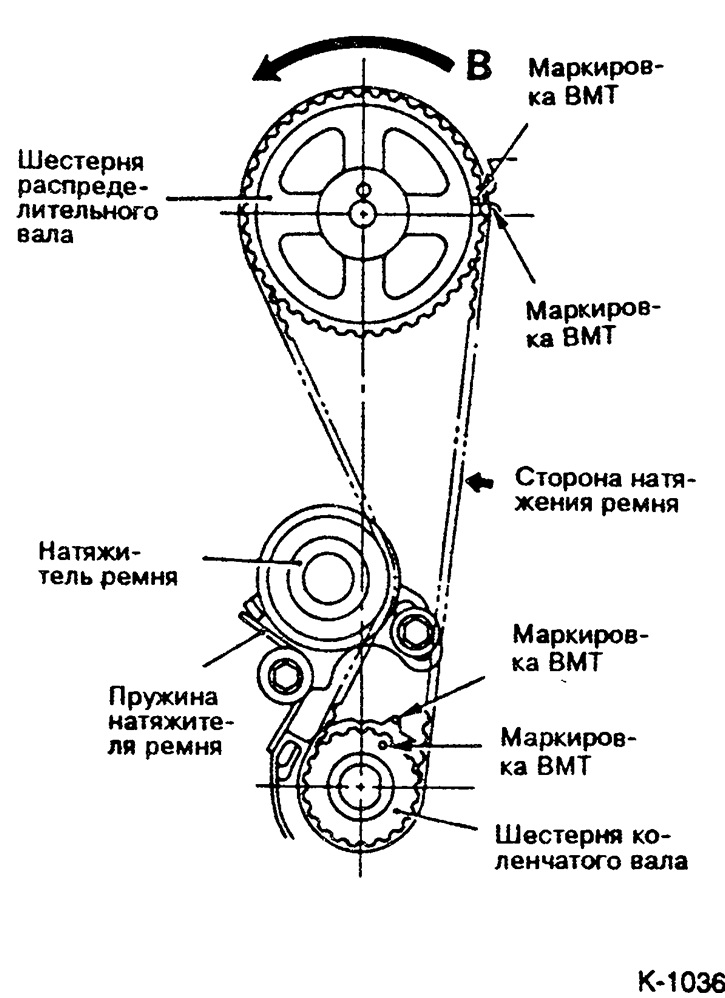
Check the TDC position of the camshaft and crankshaft, adjust if necessary.
Check whether the camshaft is in the TDC position of the 1st cylinder. In this case, the marking on the camshaft gear should match the mark on the cylinder head. If they do not match, carefully turn the camshaft without the toothed belt applied. In this case, the crankshaft should not be in the TDC position.
Apply the toothed belt. When doing this, take into account the marking of the direction of rotation made during removal. A used toothed belt must only be reinstalled in the previous direction of rotation. First apply the toothed belt to the crankshaft gear, hold the tension side of the toothed belt taut, then route the toothed belt to the camshaft gear through the tensioner.
Turn the camshaft gear slightly counterclockwise - direction of arrow B-, thereby tightening the belt on the tension side.
Loosen the tensioner clamp bolt.
Temporarily install the crankshaft belt pulley to prevent the timing belt from slipping off when the crankshaft rotates.
Tighten the timing belt.
Check the TDC position of the crankshaft and camshaft again. All TDC marks and markings with the timing belt tensioned must match, otherwise it is necessary to remove the timing belt and repeat the adjustment.
Install the lower timing belt cover. The longer bolts are installed at the bottom right.
Secure the crankshaft pulley with the central bolt with a tightening force of 100 Nm. To do this, engage 1st gear, press the brake pedal. Tighten 4 mounting bolts with a force of 15 Nm.
Tighten the water pump belt pulley with a torque of 10 Nm.
Install the V-belt, see p. 1.21.
Install the upper engine mount, see p. 1.4.
Check the ignition timing and adjust if necessary.
16-valve petrol engine (1.6, 1.8 l)
The 16-valve engine has a hydraulic belt tensioner that ensures a constant belt tension. Adjusting the toothed belt tension is only done after removing and installing the toothed belt. Since this work requires a certain amount of experience and special tools, it should be entrusted to a specialist.
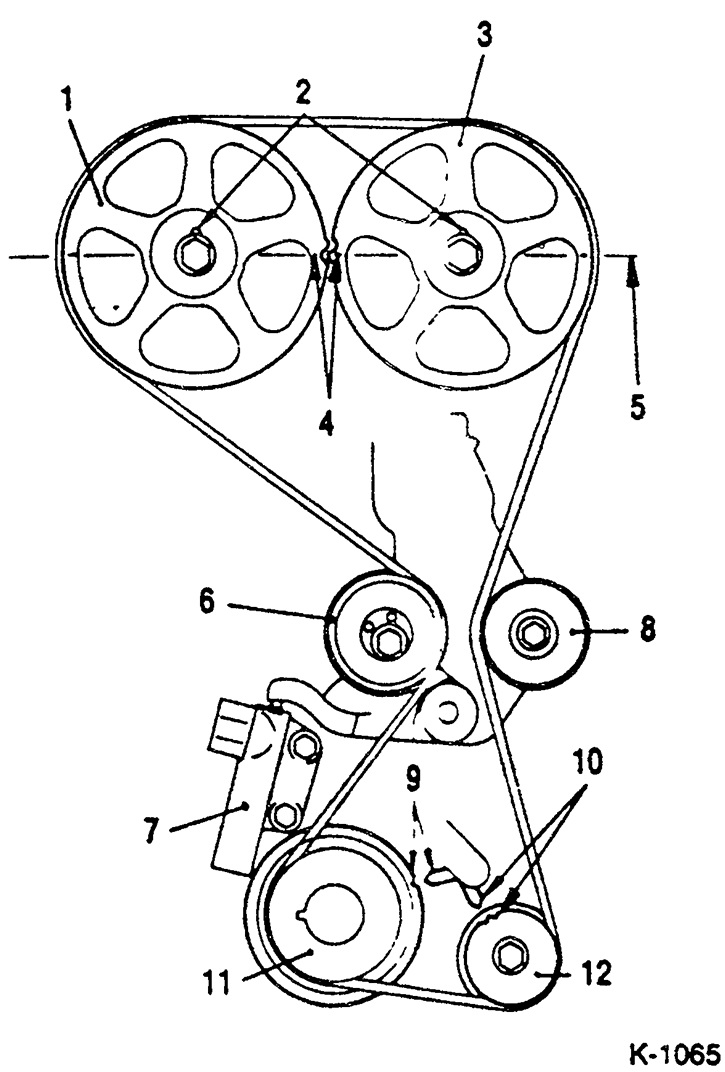
1 - Exhaust camshaft gear; 2 - Pin; 3 - Intake camshaft gear; 4 - Installation mark; 5 - Upper edge of the cylinder head; 6 - Timing belt tension roller; 7 - Timing belt tensioner; 8 - Timing belt guide roller; 9 - TDC marks; 10 - TDC marks; 11 - Crankshaft gear; 12 - Oil pump gear