English Русский
Български
Беларускі
Український
Српски
Hrvatski
Română
Polski
Slovenský
Magyar
Articles Bookmark Contacts Sitemap   
Company Audi Company Ford Company Hyundai Company Kia Company Mazda Company Mercedes-Benz Company Nissan
MitsubishiMan.ru


Home Colt Lancer Galant L200 Outlander Pajero Others
L200 4 (2005-2014, diesel)

Tightening the connecting rod cap nuts (Mitsubishi L200 4)

  • Home
  • L200
  • 4 (2005-2014, diesel)
  • Power unit
  • Diesel engine
  • Tightening the connecting rod cap nuts
0
1. Lubricate the threads of the connecting rod bolts and, after installing the caps, tighten the fastening nuts by hand (one by one, in several steps).

2. Tighten the nuts to a torque of 27±2 Nm.

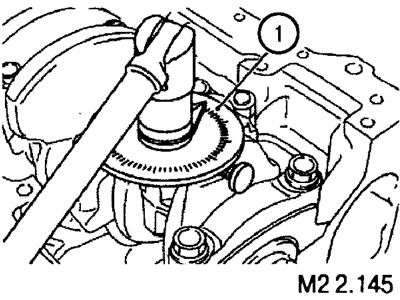
3. Using the angle tightening attachment (1), tighten the nuts to a 45° angle.


4. After tightening all the caps, completely loosen (unscrew) the nuts and tighten them again to a torque of 27±2 Nm.

The material is based on data from the website: MITSUBISHIMAN

5. After tightening to the specified torque, tighten the nuts to an angle of 90-94°.

Note: final tightening at an angle less or more than the specified values is not allowed. If for any reason the angle is less or more than the recommended values, it is necessary to completely loosen the nuts and repeat the tightening again.


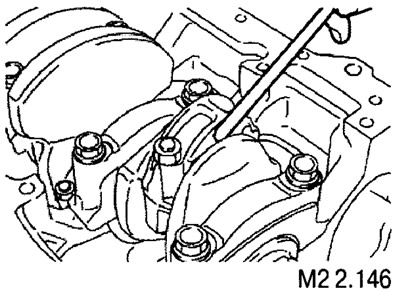
6. After tightening all the caps, make sure that the crankshaft turns without effort and that the lateral clearances between the connecting rod head and the crankshaft cheeks are within the permissible limits.

Nominal gap value: 0.100.25 mm;

Maximum permissible gap value: 0.40 mm.

This article is available at: russian, bulgarian, belarusian, ukrainian, serbian, croatian, romanian, polish, slovak, hungarian
This article was reviewed by: Nikita Romanov
Share with friends:
◀ Previous
L200 4: Diesel engine
Next ▶

Installing the piston and connecting rod assembly
Checking piston rings
Installing oil scraper and compression rings
Assembly of connecting rod, piston, pin, piston rings
Removal the piston with connecting rod assembly
Determining the amount of clearance in a bearing using a plastic gauge
Removal and installation of cylinder block elements
Replacing crankshaft seals
Similar materials for other Mitsubishi models

➤ Pistons and connecting rods — removal Mitsubishi Colt 4 and 5 (1991-2003)
➤ Disconnecting and connecting connectors in MITSUBISHI Mitsubishi Lancer 3 and 5 (1984-1992)
➤ Tightening forces of threaded connections Mitsubishi Galant 6 and 7 (1987-1998)
➤ Socket for connecting additional electrical appliances Mitsubishi Outlander 1 (2003-2008)
➤ Pistons and connecting rods — removal, inspection and… Mitsubishi Pajero 1 and 2 (1982-1999)
➤ Connecting the brake pipes to the pressure regulator Mitsubishi Carisma (1995-2004)
Link in different formats to this article
Comments and feedback from visitors
No comments yet


Add up two numbers 42 + 25


L200 4 (2005-2014, diesel) 
  • General information
  • User manual
  • Maintenance
  • Power unit
  • Diesel engine
  • Lubrication system
  • Fuel system
  • Control system
  • Transmission
  • Clutch
  • Mechanical gearbox
  • Transfer case
  • Front axle
  • Rear axle
  • Chassis and running gear
  • Car suspension
  • Steering
  • Brake system
  • Body and interior
  • Exterior (external elements)
  • Interior (internal elements)
  • Doors, locks and windows
  • Electrical equipment
  • Equipment and devices
  • Electrical circuits
MitsubishiMan.ru © 2018–2026 • Mobile version • Articles about Mitsubishi • Contacts • Sitemap: EN BG BY UA RS HR RO PL SK HU • Site search • Bookmark
Colt 2 and 3 (1983-1993) · Colt 4 and 5 (1991-2003) · Colt 5 (1995-2003) · Lancer 3 and 5 (1984-1992) · Lancer 9 (2000-2007) · Galant 5 (1983-1989) · Galant 6 and 7 (1987-1998) · L200 4 (2005-2014) · Outlander 1 (2003-2008) · Pajero 1 and 2 (1982-1999) · Pajero 4 (2006-2021) · Carisma (1995-2004) · Space Star (1998-2005) ·
This resource sets cookies 🍪 to avoid bothering you with repeated data entry.