
English Русский
Български
Беларускі
Український
Српски
Hrvatski
Română
Polski
Slovenský
Magyar
Articles Bookmark Contacts Sitemap   
Company Audi Company Ford Company Hyundai Company Kia Company Mazda Company Mercedes-Benz Company Nissan
MitsubishiMan.ru


Home Colt Lancer Galant L200 Outlander Pajero Others
Lancer 9 (2000-2007, petrol) Lancer 3 and 5 (1984-1992)

Checking the turn signal switch (Mitsubishi Lancer 3)

  • Home
  • Lancer
  • 3 (1984-1992)
  • Electrical equipment
  • Equipment and devices
  • Checking the turn signal switch
0
On vehicles produced before 8.88, the hazard warning lights and direction indicators are protected by different fuses.

If the blinking rhythm on one side is faster than on the other, then one of the lamps on the "fast" side is out of order or the wire is broken.
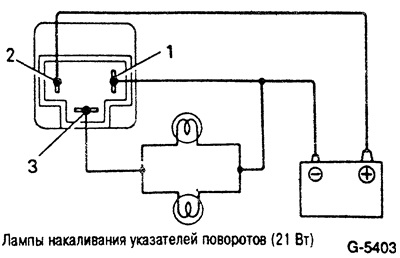


In all other cases, the cause is in the flasher relay. To check, remove the relay and connect relay contacts 1 and 2 (pins located next to each other) to the battery using auxiliary wires. Then connect two incandescent turn signal lamps (21 W) connected in parallel to contacts 1 and 3; the lamps should flash at a frequency of 60 to 120 times per minute. If you connect only one lamp, the frequency will increase to more than 140 times per minute. Otherwise, replace the flasher.

If you do not have a new relay, insert a thin wire between contacts 2 and 3 in the relay connector.

Caution: Do not damage the sensitive relay contacts. Before inserting, bend the ends of the wire so that there are no sharp edges. Insert the defective relay again. The relay legs are so long that the relay can be inserted with a jumper.


[The text of the article was obtained from the website: MITSUBISHIMAN]


Turn on the ignition. When you switch the turn signal switch, the turn signal lamps of the corresponding side are now constantly lit. By quickly switching the switch on and off, you can simulate the operation of the breaker. But at the first opportunity, you should replace the relay.

If the turn signals do not light up even with the jumper, the cause of the defect lies in the switch or in the wiring.
This article is available at: russian, bulgarian, belarusian, ukrainian, serbian, croatian, romanian, polish, slovak, hungarian
This article was reviewed by: Dmitry Vasiliev
Share with friends:
◀ Previous
Lancer 3 and 5: Equipment and devices
Next ▶

Checking the windshield wiper motor
Checking the relay
Checking switches
Search for electrical equipment failures
Checking the brake light
Checking the rear window defroster
Disconnecting and connecting connectors in MITSUBISHI
Replacing fuses
Lighting system — general information
Similar materials for other Mitsubishi models

➤ Checking the turn signal switch Mitsubishi Colt 4 and 5 (1991-2003)
➤ Checking and replacing the turn signal/hazard warning… Mitsubishi Galant 6 and 7 (1987-1998)
➤ Steering column turn signal switch Mitsubishi L200 4 (2005-2014, diesel)
➤ Turn signal switch Mitsubishi Outlander 1 (2003-2008)
➤ Switch block (headlights, turn signal, windshield wiper) Mitsubishi Pajero 1 and 2 (1982-1999)
➤ Lighting, headlight and turn signal switch Mitsubishi Carisma (1995-2004)
Link in different formats to this article
Comments and feedback from visitors
No comments yet


Add up two numbers 12 + 22


Lancer 9 (2000-2007, petrol) 
  • General information
  • User manual
  • Maintenance
  • Power unit
  • Repair of MPI engines
  • Repair of GDI engines
  • Engine overhaul
  • Cooling and lubrication system
  • MPI fuel injection system
  • GDI fuel injection system
  • Intake and exhaust system
  • Starting and charging system
  • Transmission
  • Automatic gearbox
  • Variator (CVT)
  • Drive shafts and gearbox
  • Chassis and running gear
  • Front suspension
  • Rear suspension
  • Steering
  • Brake system
  • Body and interior
  • Doors, locks and windows
  • Exterior (external elements)
  • Interior (internal elements)
  • Electrical equipment
  • Heater and air conditioner
  • Security system SRS
  • Equipment and devices
  • Wiring diagrams (saloon)
  • Wiring diagrams (wagon)
Lancer 3 and 5 (1984-1992) 
  • General information
  • Maintenance
  • Power unit
  • Engine repair
  • Lubrication system
  • Cooling system
  • Ignition system
  • Fuel system
  • Carburetor
  • Fuel injection
  • Diesel power system
  • Exhaust system
  • Transmission
  • Clutch
  • Car gearbox
  • Chassis and running gear
  • Front suspension
  • Rear suspension
  • Steering
  • Brake system
  • Wheels and tires
  • Body and interior
  • Exterior (external elements)
  • Interior (internal elements)
  • Heating system
  • Electrical equipment
  • Equipment and devices
  • Power devices
  • Electrical circuits
MitsubishiMan.ru © 2018–2026 • Mobile version • Articles about Mitsubishi • Contacts • Sitemap: EN BG BY UA RS HR RO PL SK HU • Site search • Bookmark
Colt 2 and 3 (1983-1993) · Colt 4 and 5 (1991-2003) · Colt 5 (1995-2003) · Lancer 3 and 5 (1984-1992) · Lancer 9 (2000-2007) · Galant 5 (1983-1989) · Galant 6 and 7 (1987-1998) · L200 4 (2005-2014) · Outlander 1 (2003-2008) · Pajero 1 and 2 (1982-1999) · Pajero 4 (2006-2021) · Carisma (1995-2004) · Space Star (1998-2005) ·
This resource sets cookies 🍪 to avoid bothering you with repeated data entry.