
English Русский
Български
Беларускі
Український
Српски
Hrvatski
Română
Polski
Slovenský
Magyar
Articles Bookmark Contacts Sitemap   
Company Audi Company Ford Company Hyundai Company Kia Company Mazda Company Mercedes-Benz Company Nissan
MitsubishiMan.ru


Home Colt Lancer Galant L200 Outlander Pajero Others
Lancer 9 (2000-2007, petrol) Lancer 3 and 5 (1984-1992)

Removal and installation speakers/radio (Mitsubishi Lancer 3)

  • Home
  • Lancer
  • 3 (1984-1992)
  • Electrical equipment
  • Equipment and devices
  • Removal and installation speakers/radio
0
Contents: Removal the front speaker ⤓ Removal the radio ⤓ Installation ⤓

Removal the front speaker


Remove the speaker cover from the switch panel, see item. 20.17/20.18.

Release the speaker mount and disconnect the wire.

Removal the radio


Attention: There are radio receivers with code numbers on sale. After each installation of the radio receiver, the code must be entered, otherwise the receiver cannot be put into operation; the code number serves as protection against theft of the receiver. If the receiver is coded, you must know the receiver code before disconnecting the wires from the battery or before removing the radio. If the receiver code is unknown, only the manufacturer of the radio can put the receiver into operation. The individual code number is usually given in the operating instructions. It must not be kept in the car.


Disconnect the ground cable from the battery.

Caution: This erases data in the electronic memory, such as the engine fault memory or the radio code. Disconnect the battery only when the ignition is switched off, otherwise the fuel injection control unit may be damaged. Before disconnecting the battery, read the instructions in the section "Removing and installing the battery".


Cars produced before 8.88: Remove the center console, see item 20.15.

Cars produced since 9.88: Remove the middle trim from the switch panel, see item 20.16.
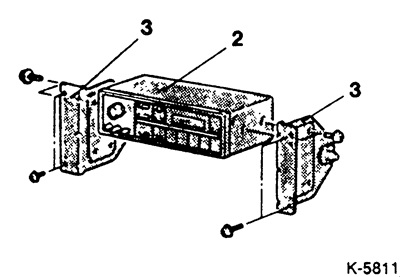


Release the radio receiver and mounting device. Pull the radio receiver out evenly, avoiding any distortions.


Disconnect the speaker and antenna connectors, and the power connector. If the receiver is not connected using standard connectors, mark the wires before disconnecting to avoid confusion during installation.

Installation


Make electrical connections to the rear of the radio.

Connect the ground cable to the battery.

Check the operation of the radio receiver. If the receiver is equipped with a security system, first enter the secret code.

The material was created based on the website MitsubishiMan.ru

Set the time on the clock.

Instructions for self-installation of the radio receiver.

Caution: If a standard connection cable is not used, make sure that there are no exposed wires. A short circuit may cause the wiring to burn out.


It is essential to ensure that tested radio interference filters are installed. Specially designed MITSUBISHI radio interference filters with installation instructions are available for sale.
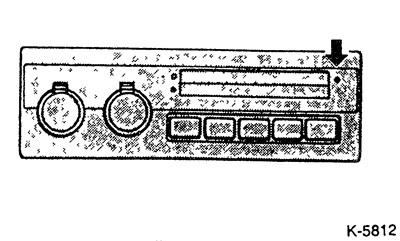


Note: Only for radios with touch tuning: When installing the radio yourself, match the receiver with the antenna. To do this, fully extend the antenna and turn on the full volume. Tune to a frequency of about 1400 kHz, where there is no transmitting station, i.e. only noise is heard. By turning the antenna tuning screw (on the front of the radio cover or on the body), achieve maximum noise volume.
This article is available at: russian, bulgarian, belarusian, ukrainian, serbian, croatian, romanian, polish, slovak, hungarian
This article was reviewed by: Dmitry Vasiliev
Share with friends:
◀ Previous
Lancer 3 and 5: Equipment and devices
Next ▶

Removal and installation the hazard warning light switch/rear fog light switch
Removal and installation the ignition switch / steering wheel lock
Removal and installation / disassembly of the turn signal / windshield wiper switch
Removal and installation the instrument panel / Replacing the bulbs
Devices — General information
Removal and installation a pin antenna
Replacing the wiper blade rubber
Removal and installation / adjustment of windshield washer nozzles
Removal and installation the windshield wiper motor
Windscreen washer
Similar materials for other Mitsubishi models

➤ Audio system — radio, tape recorder, CD player Mitsubishi Galant 6 and 7 (1987-1998)
➤ Audio system (radio and CD player) Mitsubishi L200 4 (2005-2014, diesel)
➤ Radio and CD player Mitsubishi Pajero 1 and 2 (1982-1999)
➤ Radio receiver, speakers, antenna Mitsubishi Space Star (1998-2005)
Link in different formats to this article
Comments and feedback from visitors
No comments yet


Add up two numbers 15 + 15


Lancer 9 (2000-2007, petrol) 
  • General information
  • User manual
  • Maintenance
  • Power unit
  • Repair of MPI engines
  • Repair of GDI engines
  • Engine overhaul
  • Cooling and lubrication system
  • MPI fuel injection system
  • GDI fuel injection system
  • Intake and exhaust system
  • Starting and charging system
  • Transmission
  • Automatic gearbox
  • Variator (CVT)
  • Drive shafts and gearbox
  • Chassis and running gear
  • Front suspension
  • Rear suspension
  • Steering
  • Brake system
  • Body and interior
  • Doors, locks and windows
  • Exterior (external elements)
  • Interior (internal elements)
  • Electrical equipment
  • Heater and air conditioner
  • Security system SRS
  • Equipment and devices
  • Wiring diagrams (saloon)
  • Wiring diagrams (wagon)
Lancer 3 and 5 (1984-1992) 
  • General information
  • Maintenance
  • Power unit
  • Engine repair
  • Lubrication system
  • Cooling system
  • Ignition system
  • Fuel system
  • Carburetor
  • Fuel injection
  • Diesel power system
  • Exhaust system
  • Transmission
  • Clutch
  • Car gearbox
  • Chassis and running gear
  • Front suspension
  • Rear suspension
  • Steering
  • Brake system
  • Wheels and tires
  • Body and interior
  • Exterior (external elements)
  • Interior (internal elements)
  • Heating system
  • Electrical equipment
  • Equipment and devices
  • Power devices
  • Electrical circuits
MitsubishiMan.ru © 2018–2026 • Mobile version • Articles about Mitsubishi • Contacts • Sitemap: EN BG BY UA RS HR RO PL SK HU • Site search • Bookmark
Colt 2 and 3 (1983-1993) · Colt 4 and 5 (1991-2003) · Colt 5 (1995-2003) · Lancer 3 and 5 (1984-1992) · Lancer 9 (2000-2007) · Galant 5 (1983-1989) · Galant 6 and 7 (1987-1998) · L200 4 (2005-2014) · Outlander 1 (2003-2008) · Pajero 1 and 2 (1982-1999) · Pajero 4 (2006-2021) · Carisma (1995-2004) · Space Star (1998-2005) ·
This resource sets cookies 🍪 to avoid bothering you with repeated data entry.