
English Русский
Български
Беларускі
Український
Српски
Hrvatski
Română
Polski
Slovenský
Magyar
Articles Bookmark Contacts Sitemap   
Company Audi Company Ford Company Hyundai Company Kia Company Mazda Company Mercedes-Benz Company Nissan
MitsubishiMan.ru


Home Colt Lancer Galant L200 Outlander Pajero Others
Lancer 9 (2000-2007, petrol) Lancer 3 and 5 (1984-1992)

Checking the control relay (Mitsubishi Lancer 3)

  • Home
  • Lancer
  • 3 (1984-1992)
  • Power unit
  • Fuel injection
  • Checking the control relay
0
Contents: 1.5L engine ⤓ Engines 1.6 / 1.8 l (16-valve) ⤓


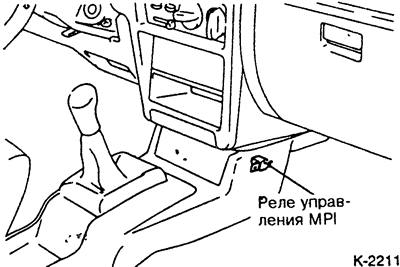
The MPI control relay is located at the rear of the center console. When the ignition is turned on, it supplies power to the control unit.

1.5L engine
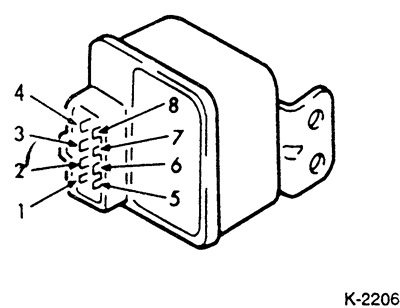


Remove the relay.

Connect an ohmmeter between the following contacts and measure the resistance:
  • contacts 3-5: about 95 Ohm
  • contacts 2-5: about 95 Ohm
  • contacts 6-7: about 35 Ohm
  • contacts 6-8: about 0 ohms (in one direction only).
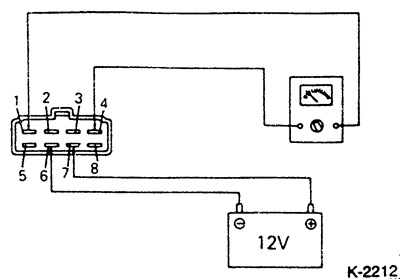


Measure the resistance between contacts 1 and 4. The required value is ∞. If the resistance is 0, replace the control relay.


Connect battery voltage directly to contacts 6 and 7 using jumpers, as shown in Fig. Measure the resistance between contacts 1 and 4. The required value is ∞. If the resistance is 0, replace the control relay.

Attention: when connecting the battery, ensure correct connection, otherwise the relay may be damaged.


Connect the positive battery terminal and contact 8 with a jumper. Measure the resistance between contacts 2 and 4. The required value* is 0 Ohms. Remove the jumper, the resistance should now be equal to ∞. Otherwise, replace the control relay

Engines 1.6 / 1.8 l (16-valve)
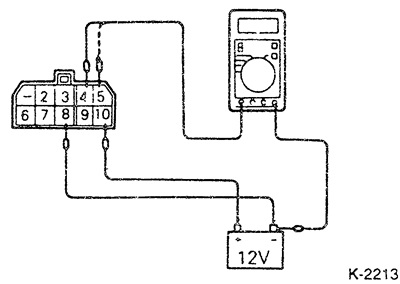


Remove the relay and, using two wires, apply voltage from the battery directly to contacts 4 and 5, as shown in the figure. Measure the voltage at contacts 4 and 5. The required value is 12V.

Attention: when connecting the battery, ensure correct connection, otherwise the relay may be damaged.


Connect the battery ground to contact 6, and the battery positive to contact 9. Measure the resistance between contacts 2 and 3. The required value is 0 V. If the resistance is ∞, replace the control relay.

Connect the battery ground to contact 7, and the battery positive to contact 3. Measure the voltage at contact 2. Required value: 12 V.
This article is available at: russian, bulgarian, belarusian, ukrainian, serbian, croatian, romanian, polish, slovak, hungarian
This article was reviewed by: Dmitry Vasiliev
Share with friends:
◀ Previous
Lancer 3 and 5: Fuel injection
Next ▶

Power Steering Pressure Switch Sensor — Check
Vehicle Speed Sensor — Check
Crankshaft Position Sensor — Check
TDC sensor — check
Mounting Motor Position Sensor — Check
Checking the fuel pump
Diagnostics of faults of the fuel injection device
Similar materials for other Mitsubishi models

➤ Checking the electrical continuity of the control relay and… Mitsubishi Colt 5 (1995-2003, petrol)
➤ Window lift control Mitsubishi Galant 6 and 7 (1987-1998)
➤ Checking the rear weight dependent brake force control… Mitsubishi L200 4 (2005-2014, diesel)
➤ Checking the electric fan relay Mitsubishi Outlander 1 (2003-2008)
➤ Checking the pre-heating control unit Mitsubishi Pajero 1 and 2 (1982-1999)
➤ Checking the 4G9 Engine Fan Control Relay Mitsubishi Space Star (1998-2005)
Link in different formats to this article
Comments and feedback from visitors
No comments yet


Add up two numbers 18 + 46


Lancer 9 (2000-2007, petrol) 
  • General information
  • User manual
  • Maintenance
  • Power unit
  • Repair of MPI engines
  • Repair of GDI engines
  • Engine overhaul
  • Cooling and lubrication system
  • MPI fuel injection system
  • GDI fuel injection system
  • Intake and exhaust system
  • Starting and charging system
  • Transmission
  • Automatic gearbox
  • Variator (CVT)
  • Drive shafts and gearbox
  • Chassis and running gear
  • Front suspension
  • Rear suspension
  • Steering
  • Brake system
  • Body and interior
  • Doors, locks and windows
  • Exterior (external elements)
  • Interior (internal elements)
  • Electrical equipment
  • Heater and air conditioner
  • Security system SRS
  • Equipment and devices
  • Wiring diagrams (saloon)
  • Wiring diagrams (wagon)
Lancer 3 and 5 (1984-1992) 
  • General information
  • Maintenance
  • Power unit
  • Engine repair
  • Lubrication system
  • Cooling system
  • Ignition system
  • Fuel system
  • Carburetor
  • Fuel injection
  • Diesel power system
  • Exhaust system
  • Transmission
  • Clutch
  • Car gearbox
  • Chassis and running gear
  • Front suspension
  • Rear suspension
  • Steering
  • Brake system
  • Wheels and tires
  • Body and interior
  • Exterior (external elements)
  • Interior (internal elements)
  • Heating system
  • Electrical equipment
  • Equipment and devices
  • Power devices
  • Electrical circuits
MitsubishiMan.ru © 2018–2026 • Mobile version • Articles about Mitsubishi • Contacts • Sitemap: EN BG BY UA RS HR RO PL SK HU • Site search • Bookmark
Colt 2 and 3 (1983-1993) · Colt 4 and 5 (1991-2003) · Colt 5 (1995-2003) · Lancer 3 and 5 (1984-1992) · Lancer 9 (2000-2007) · Galant 5 (1983-1989) · Galant 6 and 7 (1987-1998) · L200 4 (2005-2014) · Outlander 1 (2003-2008) · Pajero 1 and 2 (1982-1999) · Pajero 4 (2006-2021) · Carisma (1995-2004) · Space Star (1998-2005) ·
This resource sets cookies 🍪 to avoid bothering you with repeated data entry.