



Registration of the key-transmitter
Note: The data on registered transmitter keys is stored in non-volatile memory (EEPROM) in the ETACS electronic control unit. When registering a transmitter, all data on previously registered transmitter keys is erased, so each time you register, it is important that all transmitters are present at the same time. This procedure for registering a transmitter key is performed in the following cases:
- - Replacement of the key transmitter or the electronic control unit of the ETACS system.
- - The need to register a second transmitter key.
- - Incorrect functioning of the system due to a failure in registering the transmitter key.
1. Check that the central lock operates correctly when the ignition key is turned in the door lock cylinder.
2. Insert the key into the ignition switch. (Leave the key in the "LOCK" position.)
3. Connect the tester to the diagnostic connector or connect terminal "1" of the diagnostic connector to ground.
Note: After connecting pin "1" of the diagnostic connector to ground, the system will enter the registration readiness mode.
Caution: Always turn off the ignition before connecting or disconnecting the tester or ground.
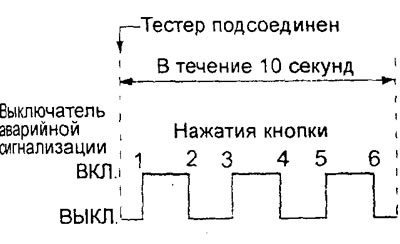
4. Within 10 seconds of connecting the tester, press the hazard warning switch 6 times (the switch position will change between "ON" and "OFF").
Note: After the above steps, the central door lock will be activated first, then the central door lock will be unlocked, then the system will enter the transmitter registration mode.
5. Press the "LOCK" or "UNLOCK" button of the key transmitter once, then press the button again 2 times in a row within 10 seconds after the first press. This will register the transmitter in the system.
6. After completing the registration of the transmitter, the central door locking will be automatically activated once, then the central door locking will be activated once.
7. If several transmitters are used or it is necessary to register a new transmitter, it is necessary to repeat the registration procedure according to items "5" - "6" within one minute after completing the registration of the first transmitter.
Note: The registration procedure is the same for all transmitters.
8. The registration mode will be completed under the following conditions.
[The text of the article was taken from the website www.MitsubishiMan.ru]
a) One minute has passed since the registration mode was turned on.
b) The tester is disconnected (the connection to ground is broken).
c) The key is removed from the ignition switch.
9. After registration is complete, remove the key from the ignition, then close all doors.
10. Check the functionality of the central locking remote control system.
Setting up service functions for confirming system operation
Caution: The service function settings will be stored in the ETACS ECU memory even after the battery is disconnected.
1. Activation of the service functions setup mode.
a) Make sure the hazard warning switch is in the "OFF" position.
b) Connect the tester to the diagnostic connector or connect terminal "1" of the diagnostic connector to ground.
c) Insert the key into the ignition switch.
d) Make sure that the driver's door is closed (driver's door switch in the "OFF" position),
d) If the above conditions are met, the windshield washer switch should be turned to the "ON" position for 10 seconds or more.
Note: When the above conditions are met, a buzzer will sound to confirm that the service function setting mode has been activated.
2. To deactivate the service function setup mode, do one of the following:
- a) Disconnect the tester or disconnect terminal "1" of the diagnostic connector from the ground.
- b) Remove the key from the ignition, c) Open the driver's door.
- d) Triggering of another warning signal (buzzer).
- d) Do not make any changes to the settings within 3 minutes after activating the service function setting mode, or wait 3 minutes after making any changes.
3. Activation and deactivation of confirmation functions using the key fob transmitter.
a) The confirmation function consists of turning on the direction indicators and/or the horn after locking/unlocking the doors using the transmitter key fob.
b) After changing the parameters of the confirmation function, the buzzer will sound (once when activated, twice when deactivated).
c) To change the confirmation function when locking the doors, press and hold the "LOCK" button for 2 seconds.
d) To change the confirmation function when unlocking the door locks, press and hold the "UNLOCK" button for 2 seconds.
4. Initialization (setting initial parameters) when activating all confirmation functions in the ETACS system after forced deactivation.
a) When the windshield washer switch is in the "ON" position for more than 20 seconds, the buzzer sounds twice and the following functions are enabled, then the confirmation functions are initialized (initial parameters are set).
- Photocell sensitivity.
- Automatic headlight switching function.
- Function of adjusting the wiper according to the vehicle speed.
- Automatic folding side rearview mirror function, b) When the warning buzzer sounds for 10 seconds (indicating that the service function setting mode is activated), the washer switch must be in the "OFF" position for 20 seconds in order for initialization (setting the initial parameters) of all ETACS functions to occur.
c) When the service function setting mode is deactivated and the washer switch is in the "ON" position for more than 20 seconds, the system will enter the service function setting mode for 10 seconds, but initialization (setting the initial parameters) of all functions will not occur.