



Contents: Removal ⤓ Installation ⤓
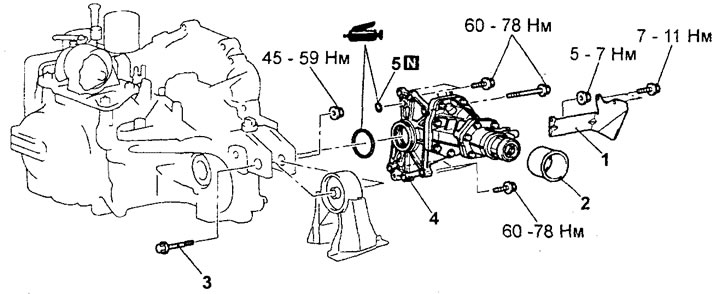
Removal the transfer case assembly.1 - guide, 2 - dust cover protection, 3 - rear support bolt, 4 - transfer case assembly, 5 - sealing rings.
Note: the nut securing the variator to the cross beam should first be tightened only preliminarily, and the final tightening to the specified torque should be performed after the variator has been completely lowered onto the supports.
Removal
— Before you begin removing parts, perform the following operations:
- a) Remove the protective cover of the power unit.
- b) Drain the working fluid from the variator (see chapter "Maintenance and general check and adjustment procedures").
- c) Drain the transmission oil from the transfer case (see chapter "Maintenance and general check and adjustment procedures").
- d) Remove the exhaust system components (see chapter "Intake and exhaust systems").
- d) Remove the propeller shaft (see chapter "Cardan shaft").
- e) Remove the beam (see chapter "Powertrain mounts").
Installation
— Installation of parts is carried out in the reverse order of removal.
— After completing the installation of the parts, perform the following operations:
- a) Install the beam (see chapter "Powertrain mounts").
- b) Install the driveshaft (see chapter "Cardan shaft").
- c) Install the exhaust system components (see chapter "Intake and exhaust systems").
- d) Fill the transfer case with transmission oil (see chapter "Maintenance and general check and adjustment procedures").
- d) Fill the working fluid into the variator (see chapter "Maintenance and general check and adjustment procedures").
- e) Install the lower protective cover of the power unit.