
English Русский
Български
Беларускі
Український
Српски
Hrvatski
Română
Polski
Slovenský
Magyar
Articles Bookmark Contacts Sitemap   
Company Audi Company Ford Company Hyundai Company Kia Company Mazda Company Mercedes-Benz Company Nissan
MitsubishiMan.ru


Home Colt Lancer Galant L200 Outlander Pajero Others
Pajero 4 (2006-2021) Pajero 1 and 2 (1982-1999)

Headlights — replacement of lamps and adjustment (Mitsubishi Pajero 1)

  • Home
  • Pajero
  • 1 (1982-1999)
  • General information
  • Driving and operation
  • Headlights — replacement of lamps and adjustment
0
Contents: Headlight adjustment ⤓ Front headlight ⤓ Rear headlight ⤓
When replacing the left headlight bulb, remove the engine coolant expansion tank.

Disconnect the connection connector and remove the cap by turning it counterclockwise. Remove the socket and take the light bulb out of the socket.

Warning: Never touch the glass of a halogen bulb with bare fingers or fingers in dirty gloves. If the glass surface is dirty, clean it with alcohol, wipe it thoroughly and put it back in place.


Headlight adjustment
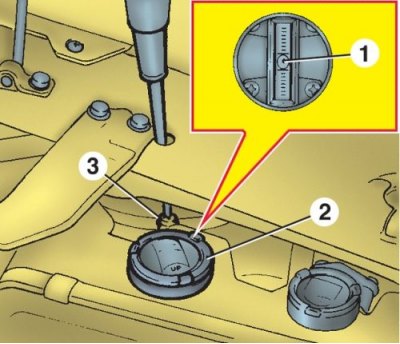


1. Air bubble
2. Tilt sensor
3. Vertical adjustment screw


The headlights must be adjusted under the following conditions:
  • the car must be parked on a level surface;
  • check headlights for rust or defects;
  • the driver must be sitting in his seat, the car's fuel tank must be full;
  • rock the car up and down several times.

Headlamp vertical adjustment


Check that the air bubble is exactly in the middle of the scale. If the bubble is not centered, turn the vertical adjustment screw until the bubble is centered.

Adjusting the headlights in the horizontal plane
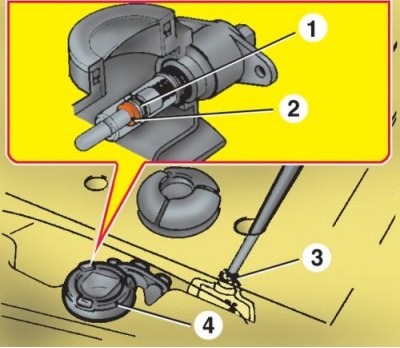


1. Central pine
2. Red mark
3. Horizontal adjustment screw
4. Horizontal deviation indicator


Check that the red mark is aligned with the center line. If the mark does not align with the center line, turn the windage adjustment screw and adjust the red mark so that it aligns with the center line.

Front headlight
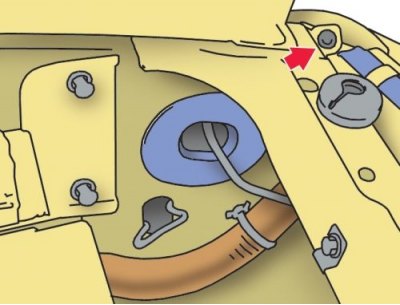


When replacing the left headlight bulb, remove the engine coolant expansion tank. Loosen the mounting screw. Remove the spring that secures the headlight to the engine compartment.
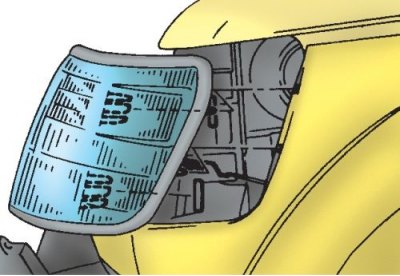


Remove the headlight from the front of the car.

When replacing the front turn signal bulb, turn the socket with the bulb counterclockwise, pull out the socket and remove the bulb.

When replacing a side turn signal bulb, remove the bulb from its socket.

When installing the headlight, insert the pin on the headlight into the hole on the body.


Rear headlight


Reversing light
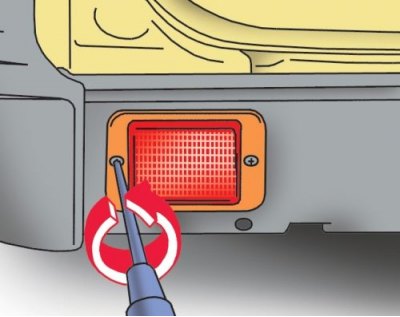


Rear headlight
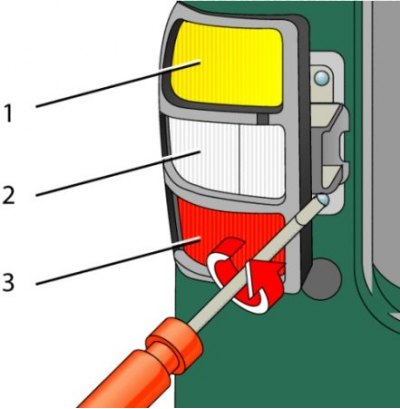


1. Rear direction indicator
2. Brake light/tail light
3. Rear side direction indicator


Remove the screws securing the headlight.

Slide the headlight assembly to the side and remove it from the vehicle. Remove the bulb holder together with the bulbs.

Remove the bulb from the socket by pressing on the bulb and turning it counterclockwise.
This article is available at: russian, bulgarian, belarusian, ukrainian, serbian, croatian, romanian, polish, slovak, hungarian
This article was reviewed by: Arseny Pavlov
Share with friends:
◀ Previous
Pajero 1 and 2: Driving and operation
Next ▶

Power of the lamps used
Replacing lamps
Jacking up a car
Location of spare tire, jack and tools in the car
Cruise control system
Rear number plate lights
Trunk light
Map reading lamps
Upper lighting fixture
Upper brake light
Similar materials for other Mitsubishi models

➤ Headlights — adjustment Mitsubishi Colt 2 and 3 (1983-1993)
➤ Timing Belt Tension Adjustment — Diesel Engine Mitsubishi Lancer 3 and 5 (1984-1992)
➤ Headlights — adjustment Mitsubishi Galant 5 (1983-1989, petrol)
➤ Combined switch for low and high beam headlights Mitsubishi L200 4 (2005-2014, diesel)
➤ Indicator and control lamps Mitsubishi Outlander 1 (2003-2008)
➤ Front seat adjustment Mitsubishi Carisma (1995-2004)
Link in different formats to this article
Comments and feedback from visitors
No comments yet


Add up two numbers 11 + 31


Pajero 4 (2006-2021) 
  • General information
  • User manual
  • Troubleshooting
  • Maintenance
  • Technical specifications
  • Power unit
  • Engine repair
  • Cooling system
  • Lubrication system
  • Fuel system
  • Engine management system
  • Intake and exhaust system
  • Engine electrical equipment
  • Transmission
  • Clutch
  • Manual gearbox
  • Automatic gearbox
  • Drive shafts
  • Chassis and running gear
  • Front suspension
  • Rear suspension
  • Brake system
  • Steering
  • Body and interior
  • Exterior (external elements)
  • Interior (internal elements)
  • Doors, locks and windows
  • Body dimensions
  • Electrical equipment
  • Safety system (SRS)
  • Air conditioner
  • Equipment and devices
  • Electrical diagrams
Pajero 1 and 2 (1982-1999) 
  • General information
  • User manual
  • Seats and seat belts
  • Instruments and controls
  • Driving and operation
  • Maintenance
  • Power unit
  • Gasoline engines
  • Diesel engines
  • Ignition system
  • Engine electrical equipment
  • Cooling and lubrication system
  • Power and exhaust system
  • Fuel system (gasoline)
  • Fuel system (diesel)
  • Transmission
  • Clutch
  • Mechanical gearbox
  • Automatic gearbox
  • Drive shafts and axles
  • Chassis and running gear
  • Front suspension
  • Rear suspension
  • Steering
  • Brake system
  • Body and interior
  • Exterior (external elements)
  • Interior (internal elements)
  • Doors, locks and windows
  • Electrical equipment
  • Equipment and devices
  • Heater and air conditioner
  • Cruise control
  • Headlights and lighting
  • Electrical circuits
MitsubishiMan.ru © 2018–2026 • Mobile version • Articles about Mitsubishi • Contacts • Sitemap: EN BG BY UA RS HR RO PL SK HU • Site search • Bookmark
Colt 2 and 3 (1983-1993) · Colt 4 and 5 (1991-2003) · Colt 5 (1995-2003) · Lancer 3 and 5 (1984-1992) · Lancer 9 (2000-2007) · Galant 5 (1983-1989) · Galant 6 and 7 (1987-1998) · L200 4 (2005-2014) · Outlander 1 (2003-2008) · Pajero 1 and 2 (1982-1999) · Pajero 4 (2006-2021) · Carisma (1995-2004) · Space Star (1998-2005) ·
This resource sets cookies 🍪 to avoid bothering you with repeated data entry.