



Note: It is important that the headlights are adjusted correctly. Incorrectly adjusted headlights can blind oncoming drivers, cause a serious accident, or reduce visibility. The headlight adjustment should be checked every twelve months, and also when changing bulbs or performing work on the front end of the vehicle. The following adjustment procedure is temporary; the real adjustment should be performed by a workshop.
1. There are two adjustment screws on the headlights, one adjusts the up and down movement, and the other adjusts the right and left movement.
2. There are several methods for adjusting headlights. The simplest method requires a clean wall 7.6 m from the front of the car, parked on a horizontal surface.
3. Stick the tape vertically on the wall in accordance with the axis of symmetry of the car to the center lines of both headlights.
4. Draw a horizontal line in accordance with the axis of symmetry of all headlights.
Note: It is easier to apply the tape if the car is parked just a few centimeters from the wall.
5. The adjustment is carried out by placing the car on a horizontal surface, filling the gas tank halfway. The car should not have any extra load.
6. Start adjusting with the low beam, positioning the zone of greatest intensity so that it is approximately 5 cm below the horizontal line and 5 cm to the right of the vertical line of the headlights. On vehicles equipped with non-detachable headlights, adjustment is performed by turning the upper adjustment screw: clockwise - the beam rises, counterclockwise - the beam falls (see illustration). The side adjustment screw is used in a similar way to move it right and left. On models with headlights with replaceable bulbs, the adjustment screws may be located in different places (see illustrations). On Corclia/Tradis models, the adjustment screws are located in the upper right and lower left corners of the headlight assembly. On Galant models, the vertical adjustment screw is mounted vertically in the upper right corner, and the horizontal adjustment screw is located horizontally in the upper left corner.
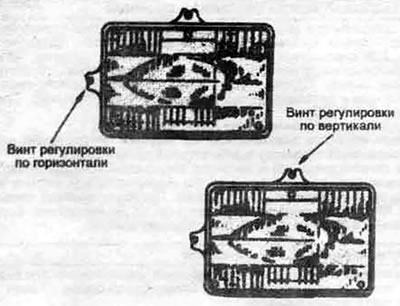
10.6a. Typical location of adjustment screws of a non-separable headlight bulb
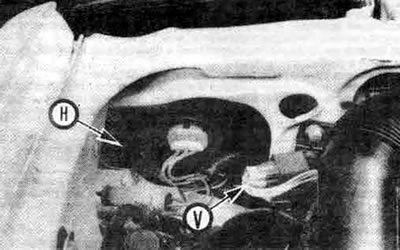
10.6b. On 1989 models and early Precte models with replaceable lamps, the upper adjustment screw (H) moves the beam horizontally, and the lower screw (V) moves the beam vertically
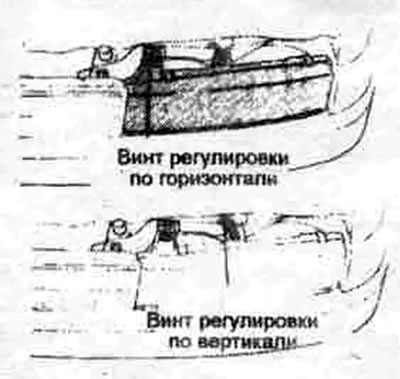
10.6s Typical adjustment screw locations for Mirage models with replaceable bulbs
7. When adjusting the high beam, the area of greatest intensity should be centered vertically with the center exactly below the horizontal line.
Note: You may not be able to precisely adjust the high and low beams. When choosing a compromise option, keep in mind that the low beam headlights are used more often. which has the greatest impact on driver safety.
8. Have your headlights adjusted by your dealer.