



Non-detachable headlight bulb
2. On some models it may be necessary to remove the radiator grille.
3. Loosen the screws and remove the headlight bezel. Loosen the headlight holder screws, being careful not to touch the adjusting screws (see illustration).
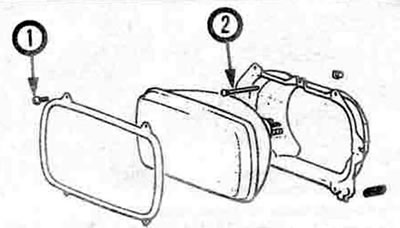
9.3. To remove the non-detachable headlamp, unscrew the mounting screws (1) of the vertical adjustment bezel, loosen or tighten the adjusting screw (2) (the horizontal adjustment screw is located on the side of the headlamp)
4. Remove the holder and pull out the headlight to disconnect the connector.
5. Remove the headlight.
6. To install the headlight, connect the connector, install the headlight in place, install the holder and screws. Tighten the screws firmly.
7. Install the radiator grille if removed.
Headlight with replaceable bulbs
Warning: The headlight bulbs of this model are filled with pressurized halogen gas and may burst if the surface is scratched or if hit
Use safety glasses and handle the lamp carefully, touching only its base. Do not touch the glass surface of the lamp with your hands, as the remaining grease may cause the lamp to overheat and fail prematurely. If you do touch the surface, wipe the lamp with alcohol.
8. Open the hood. Disconnect the electric by pressing the locking tab.
The original was published on the website: www.MitsubishiMan.ru
9. From the rear of the headlight assembly, grasp the bulb holder and turn it counterclockwise.
10. To remove the lamp, press it down and turn it counterclockwise.
11. Install the new bulb into the headlight assembly.
12. Install the holder and turn it clockwise and lock it.
13. Connect the electrical connector.