



Contents: Removal the instrument panel ⤓ Installing the dashboard ⤓ Disassembling the instrument panel ⤓ Assembling the instrument panel ⤓
Removal the instrument panel
Caution: On vehicles equipped with the Supplemental Restraint System (SRS), before removing the instrument panel, see Chapter 20 - Precautions and Airbag Module.
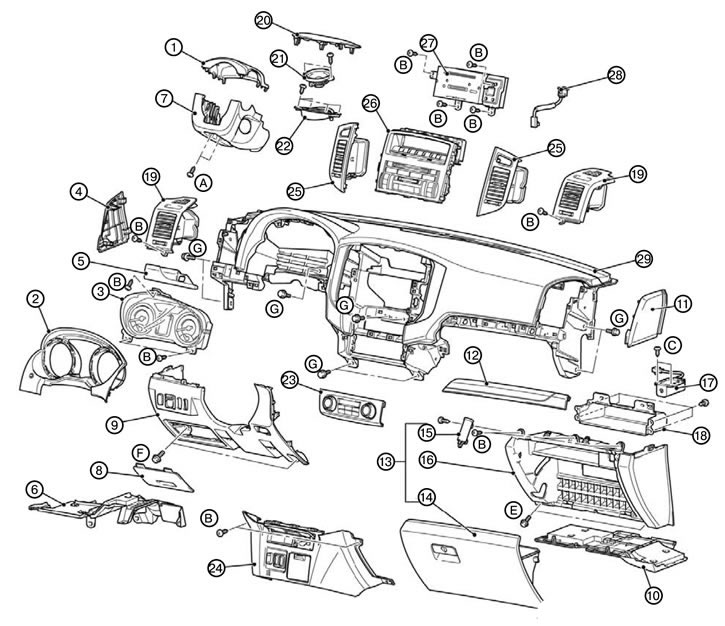
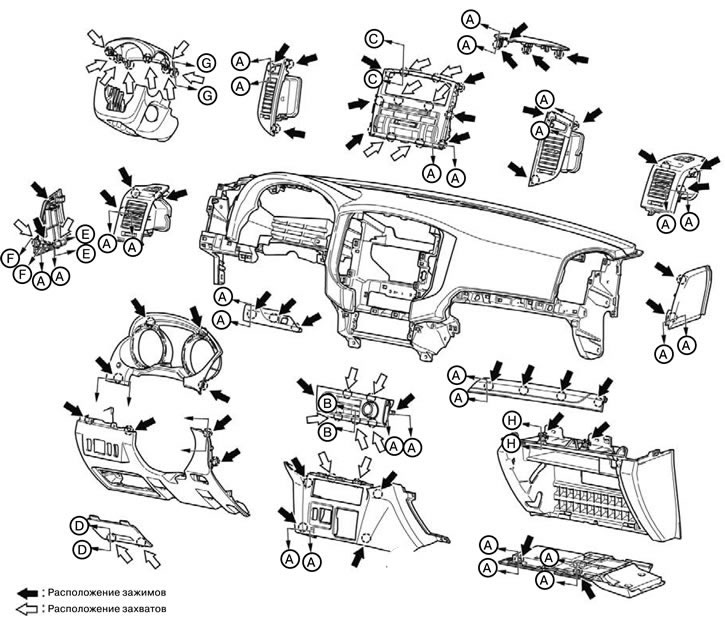
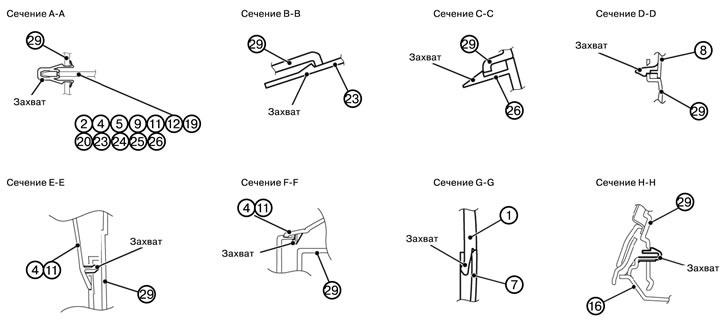
1. Remove the upper steering column cover (1).
2. Remove the instrument cluster frame (2).
3. Remove the instrument cluster (3).
4. Remove the front left door waterproof trim.
5. Remove the left side cover (4).
6. Remove the driver's side panel (5).
7. Remove the lower cover on the driver's side (6).
8. Remove the lower steering column cover (7).
9. Remove the service cover (8).
10. Remove the hood release handle.
11. Remove the lower instrument panel cover assembly (9).
12. Remove the lower cover on the passenger side (10).
13. Remove the waterproof trim from the front right door.
14. Remove the right side cover (11).
15. Remove the passenger side panel (12).
16. Remove the glove box assembly (13).
17. Remove the glove compartment cover (14).
18. Remove the glove box damper (15).
19. Remove the glove box housing (16).
20. Remove the passenger airbag activation sensor (17).
21. Remove the glove compartment lock (18).
22. Remove the front pillar trim.
23. Remove the side air outlet deflector (19).
24. Remove the front speaker grille (20).
25. Remove the front speaker (21).
26. Remove the front speaker bracket (22).
27. Remove the central lower panel assembly (23).
28. Remove the front panel assembly (24).
29. Remove the central air outlet deflector (25).
30. Remove the central upper panel assembly (26).
31. Remove the CD player (27).
32. Remove the photo sensor (28).
33. Remove the instrument panel (29).
Installing the dashboard
1. Install the instrument panel (29).
2. Install the photo sensor (28).
3. Install the CD player (27).
4. Install the center top panel assembly (26).
5. Install the central air outlet deflector (25).
6. Install the front panel assembly (24).
7. Install the center lower panel assembly (23).
8. Install the front speaker bracket (22).
9. Install the front speaker (21).
10. Install the front speaker grille (20).
11. Install the side air outlet deflector (19).
12. Install the front pillar trim.
13. Install the glove compartment lock (18).
14. Install the passenger airbag activation sensor (17).
15. Install the glove box housing (16).
16. Install the glove box damper (15).
17. Install the glove compartment cover (14).
18. Install the glove box assembly (13).
19. Install the passenger side panel (12).
20. Install the right side cover (11).
21. Install the front right door waterproof trim.
22. Install the lower cover on the passenger side (10).
23. Install the lower instrument panel cover assembly (9).
24. Install the hood release handle.
25. Install the service cover (8).
26. Install the lower steering column cover (7).
27. Install the lower cover on the driver's side (6).
28. Install the driver's side panel (5).
29. Install the left side cover (4).
30. Install the front left door waterproof trim.
31. Install the instrument cluster (3).
32. Install the instrument cluster frame (2).
33. Install the upper steering column cover (1).
Disassembling the instrument panel
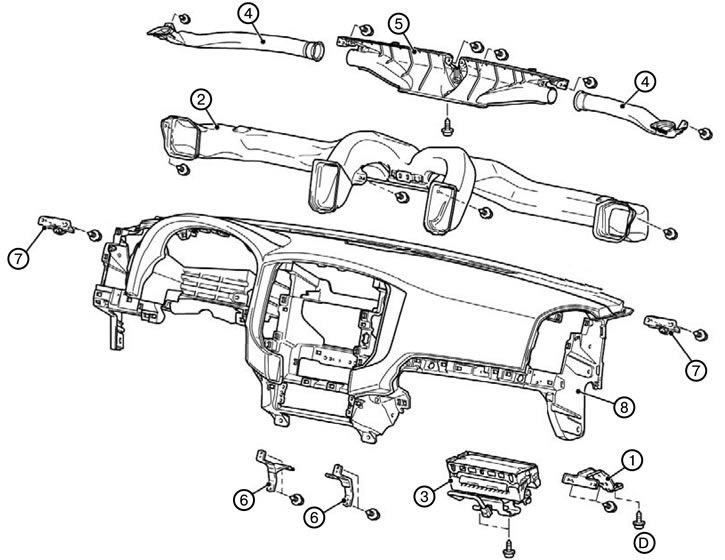
1. Remove the bracket from the passenger side (1).
2. Remove the air distribution duct (2).
3. Remove the front passenger airbag module (3).
4. Remove the heater side air duct (4).
5. Remove the heater nozzle (5).
6. Remove the reinforcement (6).
7. Remove the instrument panel bracket (7).
8. Remove the instrument panel (8).
Assembling the instrument panel
1. Install the instrument panel (8).
2. Install the instrument panel bracket (7).
(The material is based on data from the website: «MitsubishiMan.ru»)
3. Install the reinforcement (6).
4. Install the heater nozzle (5).
5. Install the heater side air duct (4).
6. Install the front passenger airbag module (3).
7. Install the air distribution duct (2).
8. Install the bracket on the passenger side (1).