



Removal the interior trim
Short wheelbase
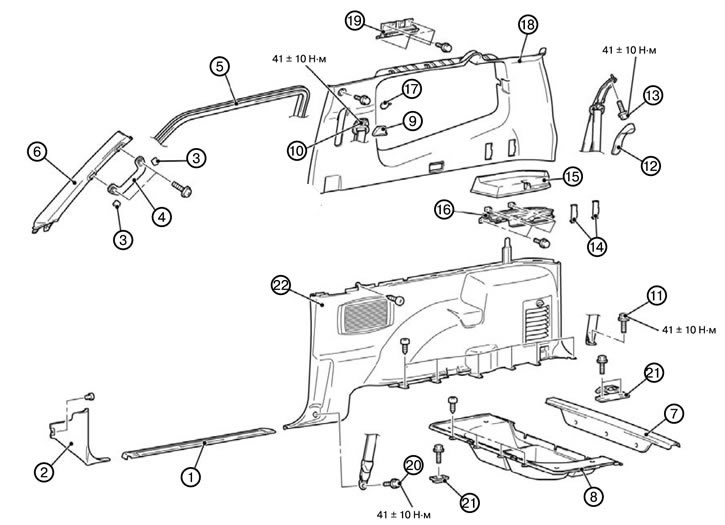
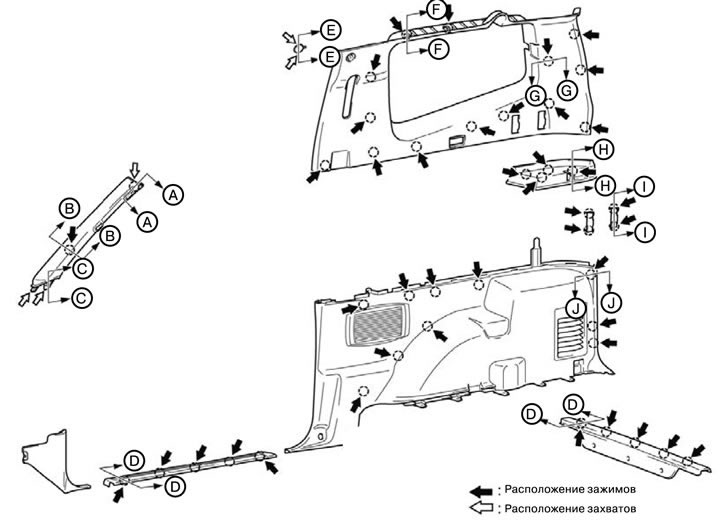
1. Remove the front safety plate (1).
2. Remove the side hood trim (2).
3. Remove the front pillar handle cover (3).
4. Remove the front pillar handle (4).
5. Remove the front door waterproof trim (5).
6. Remove the front pillar trim (6).
7. Remove the luggage compartment door safety plate (7).
8. Remove the luggage compartment floor covering (8).
9. Remove the seat belt guide cover (9).
10. Remove the front seat belt connection (10).
11. Remove the rear seat belt connection (11).
12. Remove the seat belt guide cover (12).
13. Remove the rear seat belt connection (13).
The original article is on the website (MitsubishiMan)
14. Remove the rear shelf side trim cover (14).
15. Remove the side trim of the rear shelf (15).
16. Remove the reinforcement of the side trim of the rear shelf (16).
17. Remove the luggage compartment door waterproof seal.
18. Remove the cover (17).
19. Remove the upper square trim (18).
20. Remove the ceiling trim.
21. Remove the upper square trim bracket (19).
22. Remove the front seat belt connection (20).
23. Remove the luggage hooks (21).
24. Remove the second row of seats as a whole.
25. Remove the lower square trim (22).
Long wheelbase
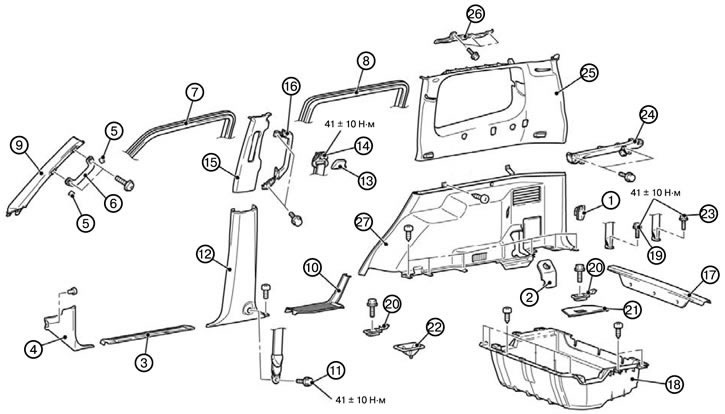
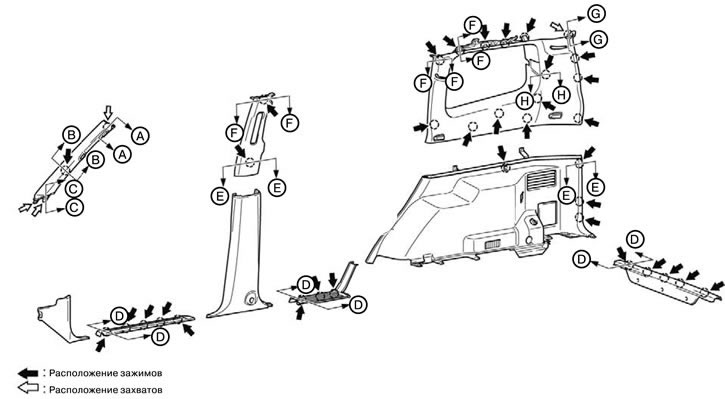
1. Remove the air conditioner adapter (1).
2. Remove the square trim cover (2).
3. Remove the third row of seats.
4. Remove the side hood trim (4).
5. Remove the front pillar handle cover (5).
6. Remove the front pillar handle (6).
7. Remove the front door waterproof trim (7).
8. Remove the rear door waterproof trim (8).
9. Remove the front pillar trim (9).
10. Remove the rear safety plate (10).
11. Remove the front seat belt connection (11).
12. Remove the lower trim of the central pillar (12).
13. Remove the seat belt guide cover (13).
14. Remove the front seat belt connection (14).
15. Remove the upper center pillar trim (15).
16. Remove the center pillar handle (16).
17. Remove the luggage compartment door safety plate (17).
18. Remove the luggage compartment floor trim (18).
19. Remove the second row seat belt connection (19).
20. Remove the luggage hook (20).
21. Remove the luggage compartment floor side plate (21).
22. Remove the striker cover (22).
23. Remove the third row seat belt connection (23).
24. Remove the rear shelf assembly mount (24).
25. Remove the waterproof trim from the luggage compartment door.
26. Remove the upper square trim (25).
27. Remove the upper square trim bracket (26).
28. Remove the lower square trim bracket (27).
Installation of interior cladding
Short wheelbase
Note: When installing, tighten the bolts to the tightening torques shown in the figure.
1. Install the lower square trim (22).
2. Install the second row of seats as a whole.
3. Install luggage hooks (21).
4. Install the front seat belt connection (20).
5. Install the upper square trim bracket (19).
6. Install the ceiling trim.
7. Install the top square trim (18).
8. Install the cover (17).
9. Install the tailgate waterproof gasket.
10. Install the rear shelf side trim reinforcement (16).
11. Install the rear shelf side trim (15).
12. Install the rear shelf side trim cover (14).
13. Install the rear seat belt connection (13).
14. Install the seat belt guide cover (12).
15. Install the rear seat belt connection (11).
16. Install the front seat belt connection (10).
17. Install the seat belt guide cover (9).
18. Install the luggage compartment floor covering (8).
19. Install the luggage compartment door safety plate (7).
20. Install the front pillar trim (6).
21. Install the front door waterproof trim (5).
22. Install the front pillar handle (4).
23. Install the front pillar handle cover (3).
24. Install the hood side trim (2).
25. Install the front safety plate (1).
Long wheelbase
Note: When installing, tighten the bolts to the tightening torques shown in the figure.
1. Install the lower square trim bracket (27).
2. Install the upper square trim bracket (26).
3. Install the top square trim (25).
4. Install the waterproof trim on the tailgate.
5. Install the rear shelf assembly mount (24).
6. Install the third row seat belt connection (23).
7. Install the striker cover (22).
8. Install the luggage compartment floor side plate (21).
9. Install the luggage hook (20).
10. Install the second row seat belt connection (19).
11. Install the luggage compartment floor trim (18).
12. Install the luggage compartment door safety plate (17).
13. Install the center pillar handle (16).
14. Install the upper center pillar trim (15).
15. Install the front seat belt connection (14).
16. Install the seat belt guide cover (13).
17. Install the lower center pillar trim (12).
18. Install the front seat belt connection (11).
19. Install the rear safety plate (10).
20. Install the front pillar trim (9).
21. Install the rear door waterproof trim (8).
22. Install the front door waterproof trim (7).
23. Install the front pillar handle (6).
24. Install the front pillar handle cover (5).
25. Install the hood side trim (4).
26. Install the third row of seats.
27. Install the square trim cover (2).
28. Install the air conditioner adapter (1).