
English Русский
Български
Беларускі
Український
Српски
Hrvatski
Română
Polski
Slovenský
Magyar
Articles Bookmark Contacts Sitemap   
Company Audi Company Ford Company Hyundai Company Kia Company Mazda Company Mercedes-Benz Company Nissan
MitsubishiMan.ru


Home Colt Lancer Galant L200 Outlander Pajero Others
Pajero 4 (2006-2021) Pajero 1 and 2 (1982-1999)

Ceiling lining (Mitsubishi Pajero 4)

  • Home
  • Pajero
  • 4 (2006-2021)
  • Body and interior
  • Interior (internal elements)
  • Ceiling lining
0
Contents: Removal the ceiling trim ⤓ Installation of ceiling lining ⤓ Dismantling the ceiling lining ⤓ Assembling the ceiling lining ⤓

Removal the ceiling trim


Caution: On vehicles equipped with the Supplemental Restraint System (SRS), before removing the headliner, see Chapter 20 - Precautions and Airbag Module.
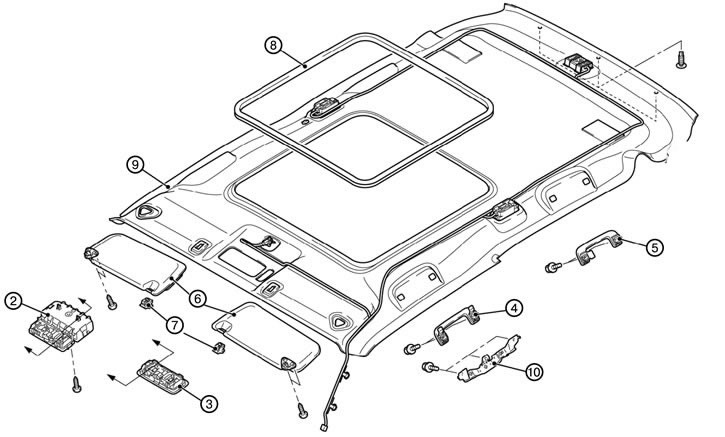


Short wheelbase
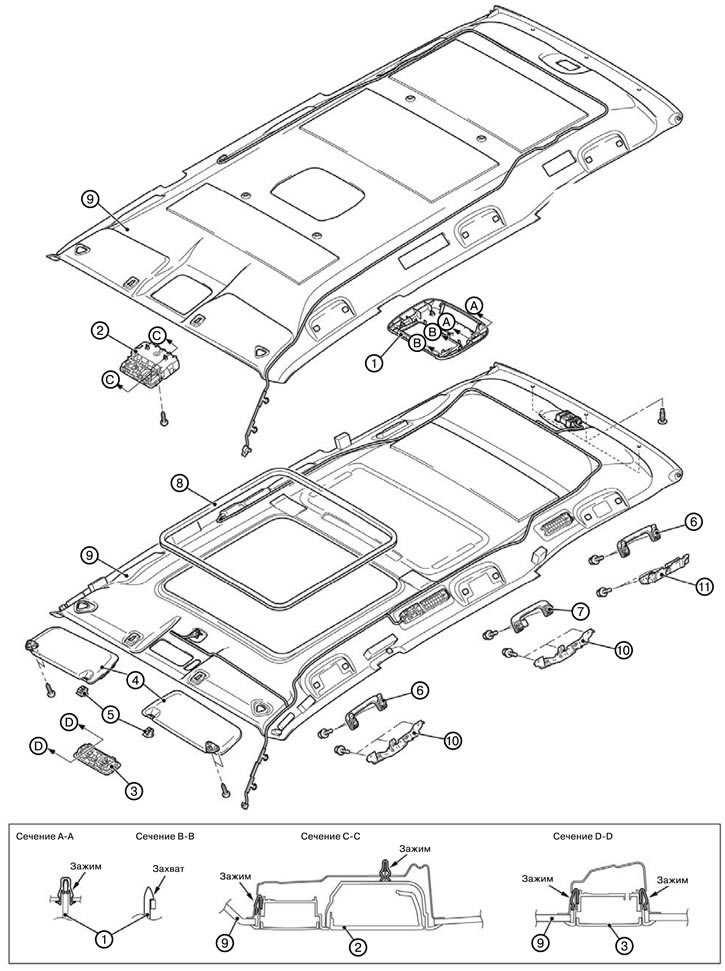


Long wheelbase


1. Remove the upper square trim, upper center pillar trim and front pillar trim.

2. Remove the rear view camera monitor frame (model with rear view camera) (1).

3. Remove the front ceiling lamp assembly (model with roof hatch) (2).

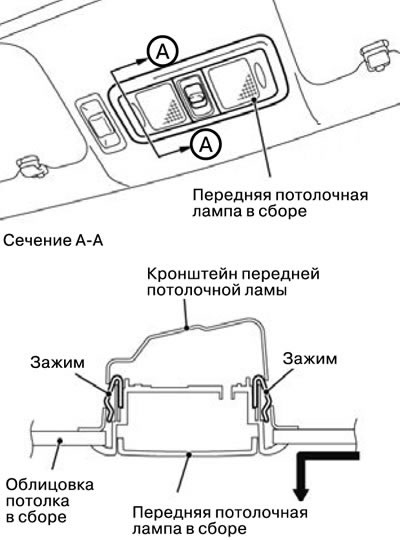
4. Remove the front ceiling lamp assembly (model without sunroof) (3).

1) Move the front ceiling lamp assembly forward to remove it from the mounting bracket. Then remove the front ceiling lamp assembly.


5. Remove the sun visor (4).

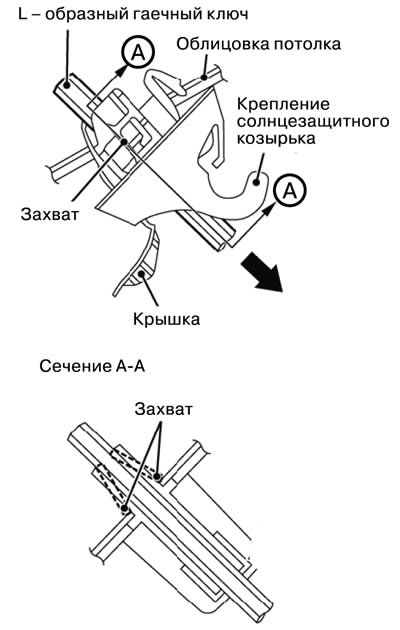
6. Remove the sun visor holder (5).

1) Remove the sun visor holder cover, insert the L-shaped wrench (6mm) to detach the side hooks of the sun visor.

2) Pull the sun visor in the direction shown in the figure and remove the sun visor holder.


7. Remove the auxiliary handle (6).

8. Remove the middle auxiliary handle (7).

9. Remove the sunroof inner waterproof trim (model with roof hatch) (8).

10. Remove the ceiling trim assembly (9).

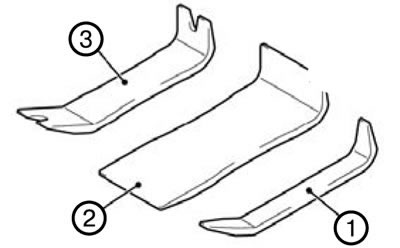
Note: To remove the headliner, use special puller A (JS000001), puller B (JS000003) and puller C (JS000002).


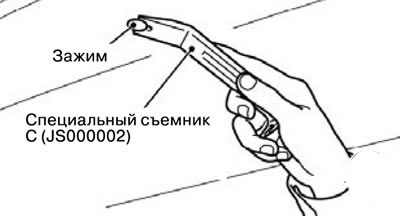
1) Remove the ceiling trim clips using the special puller C (JS000002) as shown in the figure.


11. Remove the auxiliary handle bracket (10).

12. Remove the rear auxiliary handle bracket (11).

Installation of ceiling lining


1. Install the rear auxiliary handle bracket (11).

2. Install the auxiliary handle bracket (10).

3. Install the ceiling trim assembly (9).

4. Install the sunroof inner waterproof trim (model with roof hatch) (8).

5. Install the middle auxiliary handle (7).

6. Install the auxiliary handle (6).

7. Install the sun visor holder (5).

8. Install the sun visor (4).

9. Install the front ceiling lamp assembly (model without sunroof) (3).

10. Install the front ceiling lamp assembly (model with roof hatch) (2).

11. Install the rear view camera monitor frame (model with rear view camera) (1).

12. Install the upper square trim, upper B-pillar trim and A-pillar trim.

Dismantling the ceiling lining
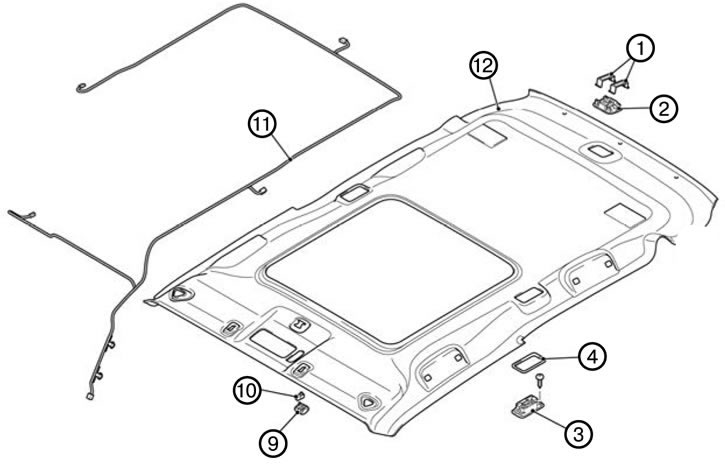


Short wheelbase
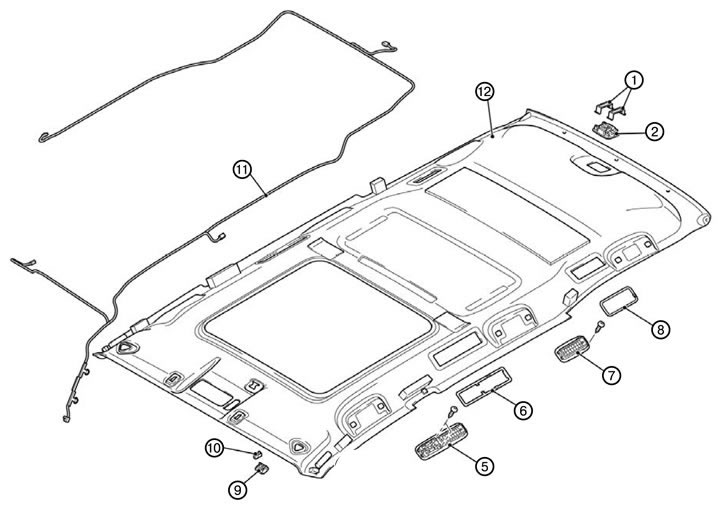


Long wheelbase


1. Remove the clamp (1).

2. Remove the luggage compartment light (2).

3. Remove the rear reading lamp (model without dual air conditioner) (3).

4. Remove the rear reading lamp bracket (model without dual air conditioner) (4).

5. Remove the rear reading lamp (model with dual air conditioner) (5).

6. Remove the rear reading lamp bracket (model with dual air conditioner) (6).

7. Remove the air outlet deflector (7).

8. Remove the air outlet deflector bracket (8).

9. Remove the lamp cover (9).

10. Remove the lamp corner (10).

11. Remove the ceiling wiring (11).

12. Remove the ceiling trim (12).

Assembling the ceiling lining


1. Install the ceiling trim (12).

2. Install the ceiling wiring (11).

3. Install the lamp corner (10).

4. Install the lamp cover (9).

5. Install the air outlet deflector bracket (8).

6. Install the air outlet deflector (7).

7. Install the rear reading lamp bracket (model with dual air conditioner) (6).

8. Install rear reading light (model with dual air conditioner) (5).

9. Install the rear reading lamp bracket (model without dual air conditioner) (4).

10. Install rear reading lamp (model without dual air conditioner) (3).


11. Install the luggage compartment light (2).

12. Install the clamp (1).
This article is available at: russian, bulgarian, belarusian, ukrainian, serbian, croatian, romanian, polish, slovak, hungarian
This article was reviewed by: Miroslav Rakov
Share with friends:
◀ Previous
Pajero 4: Interior (internal elements)
Next ▶

Luggage compartment door trim
Door trim
Interior lining
Floor console
Dashboard
Interior rear view mirror
Front seats
Second row of seats
Third row of seats
Seat belts
Similar materials for other Mitsubishi models

➤ Removal and installation ceiling trim Mitsubishi Lancer 3 and 5 (1984-1992)
➤ Typical wiring diagram for switching on the ceiling light… Mitsubishi Galant 5 (1983-1989, petrol)
➤ Ceiling panel elements diagram Mitsubishi L200 4 (2005-2014, diesel)
Link in different formats to this article
Comments and feedback from visitors
No comments yet


Add up two numbers 33 + 16


Pajero 4 (2006-2021) 
  • General information
  • User manual
  • Troubleshooting
  • Maintenance
  • Technical specifications
  • Power unit
  • Engine repair
  • Cooling system
  • Lubrication system
  • Fuel system
  • Engine management system
  • Intake and exhaust system
  • Engine electrical equipment
  • Transmission
  • Clutch
  • Manual gearbox
  • Automatic gearbox
  • Drive shafts
  • Chassis and running gear
  • Front suspension
  • Rear suspension
  • Brake system
  • Steering
  • Body and interior
  • Exterior (external elements)
  • Interior (internal elements)
  • Doors, locks and windows
  • Body dimensions
  • Electrical equipment
  • Safety system (SRS)
  • Air conditioner
  • Equipment and devices
  • Electrical diagrams
Pajero 1 and 2 (1982-1999) 
  • General information
  • User manual
  • Seats and seat belts
  • Instruments and controls
  • Driving and operation
  • Maintenance
  • Power unit
  • Gasoline engines
  • Diesel engines
  • Ignition system
  • Engine electrical equipment
  • Cooling and lubrication system
  • Power and exhaust system
  • Fuel system (gasoline)
  • Fuel system (diesel)
  • Transmission
  • Clutch
  • Mechanical gearbox
  • Automatic gearbox
  • Drive shafts and axles
  • Chassis and running gear
  • Front suspension
  • Rear suspension
  • Steering
  • Brake system
  • Body and interior
  • Exterior (external elements)
  • Interior (internal elements)
  • Doors, locks and windows
  • Electrical equipment
  • Equipment and devices
  • Heater and air conditioner
  • Cruise control
  • Headlights and lighting
  • Electrical circuits
MitsubishiMan.ru © 2018–2026 • Mobile version • Articles about Mitsubishi • Contacts • Sitemap: EN BG BY UA RS HR RO PL SK HU • Site search • Bookmark
Colt 2 and 3 (1983-1993) · Colt 4 and 5 (1991-2003) · Colt 5 (1995-2003) · Lancer 3 and 5 (1984-1992) · Lancer 9 (2000-2007) · Galant 5 (1983-1989) · Galant 6 and 7 (1987-1998) · L200 4 (2005-2014) · Outlander 1 (2003-2008) · Pajero 1 and 2 (1982-1999) · Pajero 4 (2006-2021) · Carisma (1995-2004) · Space Star (1998-2005) ·
This resource sets cookies 🍪 to avoid bothering you with repeated data entry.