
Front suspension strut installation details on Mirage models
1 - Brake hose retainer; 2 - Wheel sensor (models with ABS); 3 - Bolt of fastening of the bottom support (2 pcs); 4 - Self-locking nut; 5 - Rack assembly; N - Replace
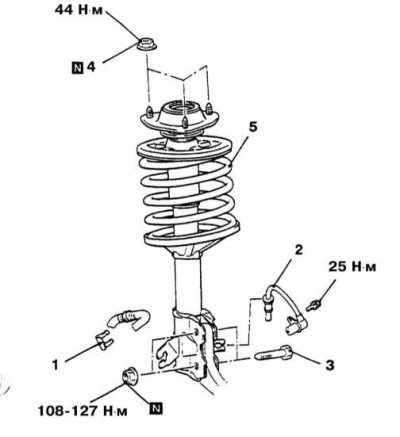
Diamante and Galant models up to 1993 and since 1999 issue
Removing
1. Disconnect the negative cable from the battery.
Attention! If the stereo system installed in the car is equipped with a security code, before disconnecting the battery, make sure that you have the correct combination to activate the audio system!
2. Jack up the car and put it on stands. Remove the relevant wheel.
3. Remove the brake line support bracket from the rack - do not pry the mounting collar with any tools!
4. On models equipped with ABS, release the wheel sensor retainer on the strut assembly.
5. Support the lower suspension arm with a jack and give the bolts of the rack-mount assembly to the steering knuckle. Tie the steering knuckle to the suspension elements in such a way that the brake hose is not under tension.
6. On models with active suspension (Active-ECS) Loosen the nut securing the air line to the top of the rack. Disconnect the line and remove the sealing ring, then unscrew the fasteners and remove the Active-ECS actuator from the rack - do not forget to disconnect the electrical wiring.
7. Mark position of the top support of a rack concerning a body, then release fixing nuts and remove rack-mount assembly from the car.
Installation
1. Install the rack assembly in its regular place (follow the correct alignment of the landing marks applied during dismantling), screw on the top fixing nuts and tighten them to the required torque (45 Nm).
2. Align the strut and connect it to the steering knuckle assembly by tightening the mounting bolts to the required torque (90÷105 Nm).
3. On models with active suspension, restore the original air line connection (don't forget to replace the o-ring) and reinstall the Active-ECS actuator - do not forget to connect the electrical wiring.
4. Reinstall the support bracket with the brake hose. On models with ABS, install the wheel sensor.
5. Install the wheel and lower the vehicle to the ground.
6. Finally, adjust the front wheel alignment.
Mirage Models
Removing
1. Rack assembly details on Mirage models are shown in the illustration.
2. Disconnect the negative cable from the battery.
Attention! If the stereo system installed in the car is equipped with a security code, before disconnecting the battery, make sure that you have the correct combination to activate the audio system!
3. Jack up the car and put it on stands. Remove the relevant wheel.
4. On models equipped with ABS, release the wheel sensor retainer on the strut assembly.
5. Support the lower suspension arm with a jack and give the bolts of the rack-mount assembly to the steering knuckle.
6. Mark position of the top support of a rack concerning a body, then turn out fixing bolts and remove rack-mount assembly from the car.
Installation
1. Install the rack assembly in its regular place (follow the correct alignment of the landing marks applied during dismantling), screw on the top fixing nuts and tighten them to the required torque (40 Nm).
2. Align the strut and connect it to the steering knuckle assembly by tightening the mounting bolts to the required torque (110÷130 Nm).
3. Reinstall the support bracket with the brake hose. On models with ABS, install the wheel sensor.
4. Install the wheel and lower the vehicle to the ground.
5. Finally, adjust the front wheel alignment.
Models Galant 1994÷1998 y.
Removing
1. Disconnect the negative cable from the battery.
Attention! If the stereo system installed in the car is equipped with a security code, before disconnecting the battery, make sure that you have the correct combination to activate the audio system!
2. Jack up the car and put it on stands. Remove the relevant wheel.
3. Disconnect the anti-roll bar from the damper fork.
4. Turn out the bottom through and top coupling bolts and remove assembly of a damper fork.

5. Give nuts of fastening of the top support and remove assembly of the shock-absorber with a screw spring from the car.
Installation
1. Establish the top support of the shock-absorber, - trace correctness of an arrangement of three fixing bolts.
2. Install the rubber bushing of the upper support, apply the washer, screw on the lock nut and tighten it to the required torque (24 Nm).
3. Install the shock absorber and tighten the upper nuts of its fastening with the required force (44 Nm).
4. Align the damper fork, install the lower through bolt of its fastening and tighten its nut with a force of 88 Nm. Tighten the upper pinch bolt to 103 Nm.
5. Connect the anti-roll bar to the damper fork and tighten the nut of its fastening with the required force (39 Nm).
6. Install the wheel and lower the vehicle to the ground.
7. Finally, adjust the front wheel alignment.