



Contents: Mirage Models ⤓ Galant models up to 1993, FWD ⤓ Galant models up to 1993, AWD ⤓ Galant models since 1994. ⤓ Diamante Models ⤓
Mirage Models
Removal
1. Disconnect the negative cable from the battery.
Warning! If the car stereo system is equipped with a security code, make sure you have the correct combination to activate the audio system before disconnecting the battery!
2. Jack up the car and place it on supports.
3. Disassemble the anti-roll bars: loosen the lock nuts, remove the cups, rubbers and bushings. Unscrew the strut mounting bolts.
4. Remove the exhaust pipe.
5. Hang the power unit on the winch from above. Unscrew the four bolts securing the central beam.
6. Remove both rack and pinion steering gear assembly supports.
7. Disconnect the lower suspension arm from the center beam.
8. Support the beam with a jack, unscrew the mounting bolts and lower the assembly, providing the necessary free space to remove the anti-roll bar.
9. Loosen the fasteners and remove the anti-roll bar from under the vehicle.
Installation
Note: Please note the identification markings on the left and right mounting clamps.
1. Installation is carried out in reverse order.
2. Tighten the stabilizer bar mounting clamp bolts to 22 N·m.
3. When assembling the stabilizer struts, ensure that the bolt protrusion is 22 mm.
4. Lower the vehicle to the ground and connect the negative cable to the battery.
Galant models up to 1993, FWD
Removal
1. Disconnect the negative cable from the battery.
Warning! If the car stereo system is equipped with a security code, make sure you have the correct combination to activate the audio system before disconnecting the battery!
2. Jack up the car and place it on supports.
3. Disconnect the exhaust pipe from the exhaust manifold (remove the sealing gasket). Tie the pipe so that it does not interfere with the removal of the anti-roll bar.
Attention! Try not to allow the flexible coupling of the inlet section of the exhaust tract to bend at an angle of more than a few degrees!
4. Remove the rear center beam mounting bolts.
5. Remove the anti-roll bar mounting bolts.
Note: On ball-type struts, when releasing the self-locking nut, the ball stud should be held from turning with a hex key.
6. Unscrew the bolts of the anti-roll bar mounting clamps.
7. Pull both ends of the bar back along the vehicle, then release the right end from under the lower control arm. Next, release the left end of the bar from under the opposite control arm. Pull the bar to the right to remove it from under the vehicle.
8. Assess the degree of wear of all rubber bushings, replace defective components.
9. Check the condition of the stabilizer bar. Replace if necessary.
Installation
1. Place the anti-roll bar into its original position.
2. Install the rod clamps (note the identification markings). Align the components, then tighten the fasteners securely.
3. When tightening the fasteners of the ball-type struts, use two wrenches. Make sure that the amount of the bolt protruding above the nut is 16÷18 mm.
4. Connect the intake pipe to the exhaust manifold (remember to replace the sealing gasket). Tighten the self-locking joint nuts to the required torque (40 N·m).
5. Connect the negative cable to the battery.
Galant models up to 1993, AWD
Removal
1. Disconnect the negative cable from the battery.
(The material was borrowed from the website www.MitsubishiMan.ru)
Warning! If the car stereo system is equipped with a security code, make sure you have the correct combination to activate the audio system before disconnecting the battery!
2. Disconnect the exhaust pipe from the exhaust manifold (remove the sealing gasket).
3. Remove the center knuckle and transfer case assembly.
4. Remove the anti-roll bar strut - when loosening the nuts, the ball studs of the joints should be held from turning with a second key.
5. Unscrew the mounting bolt and remove the anti-roll bar mounting clamp with the rubber bushing.
6. Disconnect the stabilizer from the right lower suspension arm.
7. Remove the left section of the stabilizer bar through the space between the drive shaft and the lower arm. The right section is removed from under the corresponding lower arm.
Installation
1. Install the stabilizer bar in its regular place.
2. Temporarily tighten the mounting clamp fasteners. Align the ends of the rubber bushing with the installation marks applied to the rod, then tighten the fasteners finally.
3. Screw in and tighten the mounting clamp bolt.
4. Install the stabilizer struts and tighten their mounting nuts - the ball studs are blocked from turning using a second wrench. The bolt should protrude above the surface of the nut by 16÷18 mm).
5. Install the transfer case assembly and mounting bracket.
6. Install the left lower beam and tighten its mounting bolts to the required torque (80 Nm: rear and 100 Nm: front).
Galant models since 1994.
Removal
1. Disconnect the negative cable from the battery.
Warning! If the car stereo system is equipped with a security code, make sure you have the correct combination to activate the audio system before disconnecting the battery!
2. Jack up the car and place it on supports.
3. Loosen the self-locking nuts and remove the anti-roll bar struts.
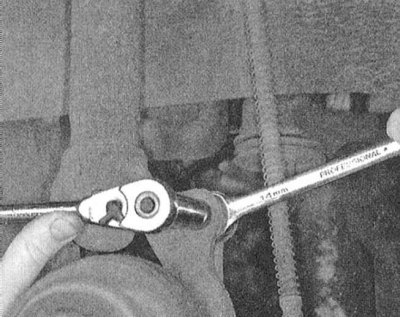 | 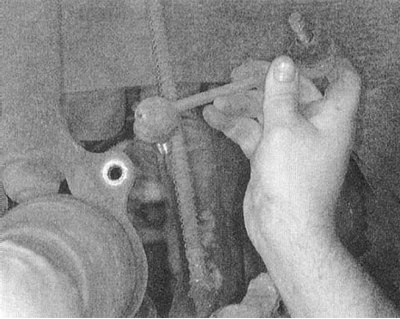 |
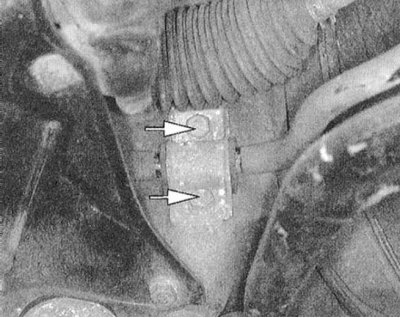 |
4. Remove the stabilizer bar mounting clamps with rubber bushings.
5. Remove the stabilizer.
6. Assess the degree of wear of components and replace failed units.
Installation
1. Place the stabilizer bar in its regular place.
2. Loosely install the mounting clamps.
3. Align the rod so that both of its mounting marks are approximately 10 mm from the inside of the clamps.
4. Tighten the clamp mounting bolts to the required torque (39 Nm).
5. Connect the stabilizer links to the rod and damper forks. Tighten the lock nuts to the required torque (39 N·m).
6. Lower the vehicle to the ground and connect the negative cable to the battery.
Diamante Models
Removal
1. Disconnect the negative cable from the battery.
Warning! If the car stereo system is equipped with a security code, make sure you have the correct combination to activate the audio system before disconnecting the battery!
2. Jack up the car and place it on supports.
3. Remove the exhaust pipe and crankcase guard.
4. Remove the left and right lower beams.
5. Remove the anti-roll bar.
6. Loosen the mounting clamps and remove the stabilizer bar.
Installation
1. Place the stabilizer bar in its regular place and secure it with mounting clamps. Do not confuse the left clamp with the right one - carefully study the identification marking.
Note: All rubber components of the fastening units should be lubricated before installation.
2. Install the anti-roll bar.
3. Install the bottom beams.
4. Install the exhaust pipe and crankcase protection elements.
5. Connect the negative cable to the battery.