English Русский
Български
Беларускі
Український
Српски
Hrvatski
Română
Polski
Slovenský
Magyar
Articles Bookmark Contacts Sitemap   
Company Audi Company Ford Company Hyundai Company Kia Company Mazda Company Mercedes-Benz Company Nissan
MitsubishiMan.ru


Home Colt Lancer Galant L200 Outlander Pajero Others
Galant 6 and 7 (1987-1998) Galant 5 (1983-1989, petrol)

Removal and installation the upper front suspension arms (Galant 1994-1998) (Mitsubishi Galant 6)

  • Home
  • Galant
  • 6 (1987-1998)
  • Chassis and running gear
  • Car suspension
  • Removal and installation the upper front suspension arms (Galant 1994-1998)
0
Contents: Removal ⤓ Installation ⤓


Upper Control Arm Assembly Design (Galant 1994-1998 Models)
1 - Ball joint for fastening the upper arm to the steering knuckle; 2 - Self-locking nuts for fastening the upper support of the lever; 3 - Assembling the upper arm; 4 - Upper suspension arm axial bearings; 5 - Ball joint protective cover


Removal


1. The design of the upper control arm assembly (Galant models 1994÷1998) is shown in the illustration.

2. Jack up the car and place it on stands. Remove the corresponding front wheel.

3. Release the upper ball joint from the steering knuckle assembly.
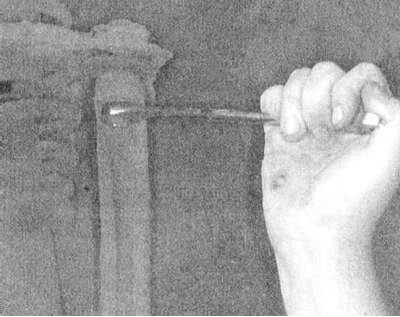


4. Loosen the nuts securing the axle supports of the upper arm to the body element.
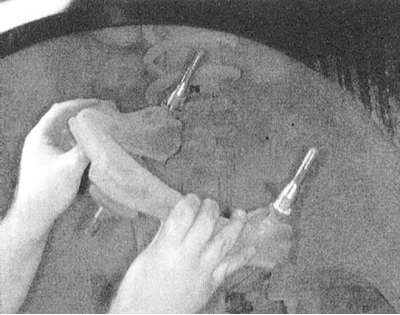


5. Remove the upper arm assembly.

6. Unscrew the through bolts securing the axle supports of the lever assembly.

Installation
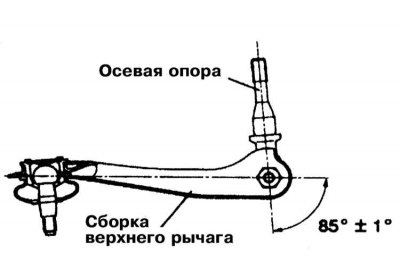


1. Install the axle bearings on the upper control arm assembly and adjust their installation angles. The required value is 84°÷86°.

2. Tighten the nuts of the through bolts securing the axle supports to the required torque (57 N·m).
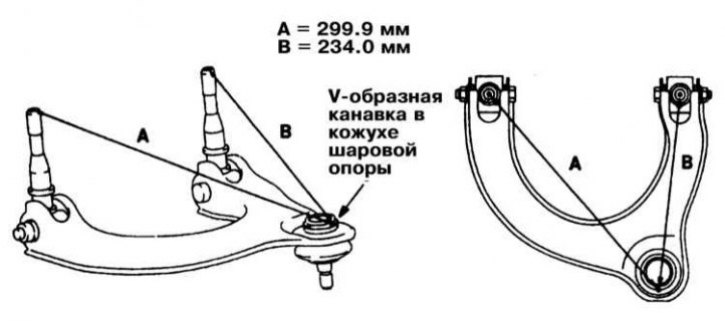


3. Check the correct installation of the axle supports by measuring the installation distances A and B. The required values are 299.9 mm for A and 234.0 for B.


4. Secure the upper control arm assembly to the vehicle body by tightening the new self-locking axle bearings to the required torque (86 Nm).

5. Place the upper ball joint into the steering knuckle assembly and secure it with a new self-locking nut, tightening the latter to 28 N·m.

6. Install the front wheel and lower the vehicle to the ground.

7. Finally, adjust the front wheel alignment angles.
This article is available at: russian, bulgarian, belarusian, ukrainian, serbian, croatian, romanian, polish, slovak, hungarian
This article was reviewed by: Dmitry Vasiliev
Share with friends:
◀ Previous
Galant 6 and 7: Car suspension
Next ▶

Checking the condition of the upper ball joints of the front suspension (Galant 1994-1998)
Restorative repair of front suspension strut assemblies
Removal and installation of struts and coil springs of the front suspension
Suspension and steering specifications
Suspension and steering — design description
Checking the condition of the lower ball joints of the front suspension
Removal and installation the lower arms of the front suspension
Removal and installation the front anti-roll bar
Removal and installation of steering knuckles and hub assemblies with wheel bearings (front suspension)
Removal and installation rear struts
Similar materials for other Mitsubishi models

➤ General description of the front suspension Mitsubishi Colt 4 and 5 (1991-2003)
➤ Front suspension — device Mitsubishi Lancer 3 and 5 (1984-1992)
➤ Upper control arm front suspension Mitsubishi L200 4 (2005-2014, diesel)
➤ Front Suspension Specifications and Testing Mitsubishi Outlander 1 (2003-2008)
➤ Electrical equipment of the 3.5L engine (1994-1998) Mitsubishi Pajero 1 and 2 (1982-1999)
➤ Adjusting, upper and lower rear suspension arms Mitsubishi Carisma (1995-2004)
Link in different formats to this article
Comments and feedback from visitors
No comments yet


Add up two numbers 43 + 48


Galant 6 and 7 (1987-1998) 
  • General information
  • Introduction to guide
  • User manual
  • Driving and operation
  • Maintenance
  • Power unit
  • Dismantling the engine
  • Engine overhaul
  • Cooling and heating
  • Power and exhaust systems
  • Engine electrical equipment
  • Engine management systems
  • Transmission
  • Mechanical gearbox
  • Automatic gearbox
  • Clutch
  • Drive shafts and transfer case
  • Chassis and running gear
  • Brake system
  • Car suspension
  • Steering
  • Body and interior
  • Exterior (external elements)
  • Interior (internal elements)
  • Doors, locks and windows
  • Electrical equipment
  • Equipment and devices
  • Wiring diagrams Galant
  • Wiring diagrams Mirage
  • Wiring diagrams Diamante
Galant 5 (1983-1989, petrol) 
  • General information
  • Troubleshooting
  • Maintenance
  • Power unit
  • Engine repair
  • Engine overhaul
  • Cooling and heating
  • Fuel and exhaust system
  • Engine electrical equipment
  • Reducing exhaust toxicity
  • Transmission
  • Manual gearbox
  • Automatic gearbox
  • Clutch and drive shafts
  • Chassis and running gear
  • Brake system
  • Car suspension
  • Steering
  • Body and interior
  • Exterior (external elements)
  • Interior (internal elements)
  • Doors, locks and windows
  • Electrical equipment
  • Equipment and devices
  • Electrical diagrams
MitsubishiMan.ru © 2018–2026 • Mobile version • Articles about Mitsubishi • Contacts • Sitemap: EN BG BY UA RS HR RO PL SK HU • Site search • Bookmark
Colt 2 and 3 (1983-1993) · Colt 4 and 5 (1991-2003) · Colt 5 (1995-2003) · Lancer 3 and 5 (1984-1992) · Lancer 9 (2000-2007) · Galant 5 (1983-1989) · Galant 6 and 7 (1987-1998) · L200 4 (2005-2014) · Outlander 1 (2003-2008) · Pajero 1 and 2 (1982-1999) · Pajero 4 (2006-2021) · Carisma (1995-2004) · Space Star (1998-2005) ·
This resource sets cookies 🍪 to avoid bothering you with repeated data entry.