



The anti-lock braking system (ABS) prevents the wheels from locking during sudden braking. Thanks to this, even with full braking, the car remains controllable.
ABS starts working when the ignition is on, starting from a speed of 6 km/h. First, the control unit tests the functionality of the entire system, and then begins the process of regulating all braking processes in the locking range.
Based on signals from the speed sensors, one on each wheel, the electronic control unit calculates the average speed, approximately corresponding to the speed of the vehicle. By comparing the rotation speed of each individual wheel with the average calculated speed, the electronic unit determines the slip state of the individual wheel and thus determines which wheel is in the pre-lock state.
As soon as a wheel tends to lock, i.e. the brake fluid pressure in the caliper of that wheel is too high in relation to the force of the wheel's adhesion to the road, the brake hydraulic system, according to signals from the electronic unit, keeps the pressure in the caliper of that wheel constant. That is, the pressure remains constant when the brake pedal is pressed harder. When the tendency to lock remains, the pressure decreases due to the fluid leaking out through the outlet valve opening, but as soon as the wheel increases its rotation speed again, the pressure again becomes constant.
When a certain wheel speed is reached, the hydraulic system increases the pressure, but not higher than the total braking pressure.
This process is repeated under hard braking for each wheel until the foot is removed from the brake pedal or shortly before the car comes to a complete stop (at approximately 2-3 km/h). The driver feels the operation of the ABS system by the pulsation of the brake pedal.
The emergency shutdown system ensures that the ABS system is switched off in the event of a failure (for example, a broken wire) or low voltage (below 9.5 V). In this case, the ABS indicator light on the dashboard lights up while driving. The normal braking system functions normally. That is, the car behaves as if it does not have an ABS system.
When the ABS indicator light comes on while driving, it indicates that the ABS system is disabled.
Stop briefly, turn off and restart the engine.
Check the battery voltage. If it is below 9.5 V, charge the battery.
Caution: If the ABS warning light comes on at the start of the journey and then goes out, this indicates that the battery voltage was low, but then increased during the journey due to recharging from the generator.
Check the fastening and reliability of the battery terminal contacts.
Raise the vehicle, remove the front wheels, check the integrity of the wheel speed sensor wiring.
Checking the ABS system using a test lamp
Check the tightness of the brake system and the connections of the brake pipes and hoses.
Turn on the ignition. The ABS indicator light should come on.
Start the engine. After starting, the control lamp should flash 2 times for a short time (about 0.5 sec).
Let the engine idle for about 2 minutes. During this time, the ABS warning light should not come on.
Make a short test drive (approximately 1 minute). The speed should be above 30 km/h. During this time, the ABS warning light should not light up.
If there are any problems with the ABS system, contact a service station.
Disabling the ABS system
Remove the ABS fuse. The fuse is located in the fuse box on the left (in the direction of travel) behind the battery.
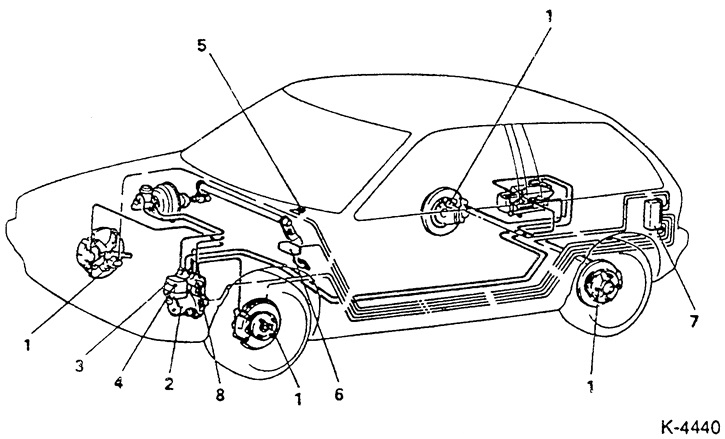
1 - Wheel rotation sensor
Transmits a wheel rotation signal to the electronic control unit
2 - Hydraulic block
Regulates brake fluid pressure for each individual wheel
3 - Motor relay
It is controlled by an electronic control unit and turns on the pump motor in the hydraulic unit
4 - Valve relay
Supplies voltage to the solenoid valve in the hydraulic unit
5 - ABS warning light
It is located on the dashboard and lights up when the ABS system fails
6 - Diagnostic connector
Used to read fault codes
7 - Control unit
It is located behind the left trim of the luggage compartment and controls the hydraulic unit based on signals from sensors
8 - Level selection valve (Select-Low)
It is located in the hydraulic block and prevents one rear wheel from locking on one side
The original material is here MITSUBISHIMAN.ru