
English Русский
Български
Беларускі
Український
Српски
Hrvatski
Română
Polski
Slovenský
Magyar
Articles Bookmark Contacts Sitemap   
Company Audi Company Ford Company Hyundai Company Kia Company Mazda Company Mercedes-Benz Company Nissan
MitsubishiMan.ru


Home Colt Lancer Galant L200 Outlander Pajero Others
Lancer 9 (2000-2007, petrol) Lancer 3 and 5 (1984-1992)

Adjusting the handbrake (Mitsubishi Lancer 3)

  • Home
  • Lancer
  • 3 (1984-1992)
  • Chassis and running gear
  • Brake system
  • Adjusting the handbrake
0
Contents: Adjustment (cars produced from 1.84…⤓ Adjustment (cars produced from 6.89…⤓
The handbrake adjusts automatically according to the wear of the brake pads. Therefore, adjustment is only required after replacing the handbrake lever or cable, or when the handbrake does not work despite sufficient pad thickness.

Raise the car from behind, see item 29.

Check the correct routing and secure fit of the cable in the holders and guides.

Release the handbrake lever.
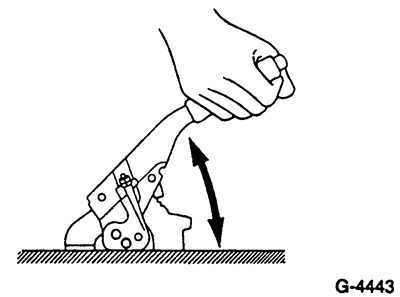


Slowly pull the handbrake lever upward and count the number of clicks. With a force of 200 N (corresponding to 20 kg on a spring scale), the handbrake lever travel should be between 4 and 7 clicks.

If there is a deviation from the required value, perform the correct adjustment of the brake shoe clearance as described below.

Adjustment (cars produced from 1.84 to 5.89)


Remove the console trim near the handbrake lever, see item 20.15.

Loosen the lock nut and unscrew the adjusting washer to the end of the handbrake cable.

Pull the handbrake lever several times with a force of approximately 200 N (20 kg) until the lever stroke becomes constant.


Note: If the handbrake lever stroke length remains unchanged, the automatic brake shoe setting mechanism functions normally and the clearance between the brake shoe and brake drums is normal.
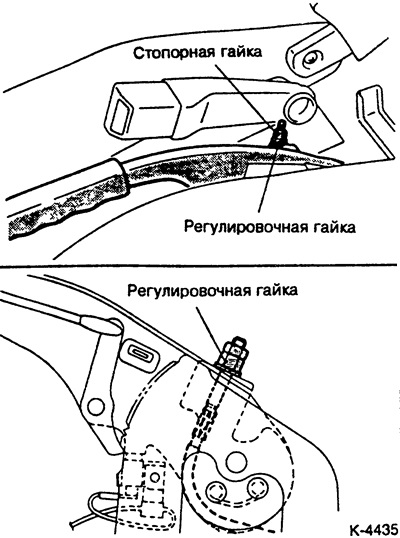


Adjust the correct stroke of the handbrake lever by turning the adjusting nut.

Caution: There should be no gap between the handbrake lever and the adjusting nut.


Caution: If the number of handbrake lever clicks is less than required, the handbrake cable is overtightened. This will prevent the automatic brake shoe setting mechanism from working properly. Therefore, it is important to achieve the required number of clicks.
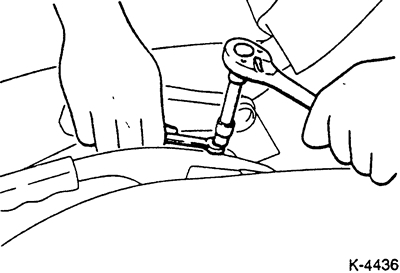


After adjustment, tighten the lock nut while holding the adjusting nut with a wrench.

Release the handbrake and turn the rear wheels. The brake pads should not rub, otherwise repeat the adjustment.


Lower the car.

Install the console cover.

Adjustment (cars produced from 6.89 to 3.92)


The original material is here: MITSUBISHIMAN.ru

Remove the console trim near the handbrake lever, see item 20.16.

Loosen the lock nut and unscrew the adjusting nut to the end of the handbrake cable.

Start the engine and let it run at idle speed, press the brake pedal hard 5-6 times. At the same time, the automatic brake pad installation mechanism sets the pads in the correct position.
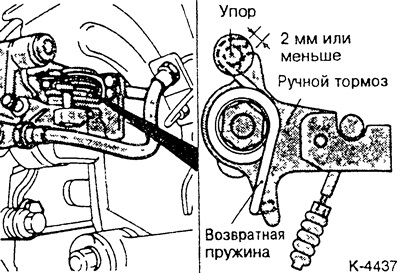


Check the clearance between the handbrake lever and the stop. The required value is 2 mm or less. If it deviates from the required value, the handbrake cable is jammed or does not fit correctly in the guides, or the automatic brake shoe setting mechanism is difficult to operate.

Adjust the required travel of the handbrake lever using the adjusting washer.

Caution: There should be no gap between the handbrake lever and the adjusting nut.


Caution: If the number of handbrake lever clicks is lower than required, the handbrake cable is too tight. This will prevent the automatic brake shoe setting mechanism from working properly. Therefore, it is important to achieve the required number of clicks.


After adjustment, tighten the lock nut while holding the adjusting nut with a wrench.

Release the handbrake and turn the rear wheels. The brake pads should not rub, otherwise repeat the adjustment.

Lower the car.

Install the console cover.
This article is available at: russian, bulgarian, belarusian, ukrainian, serbian, croatian, romanian, polish, slovak, hungarian
This article was reviewed by: Dmitry Vasiliev
Share with friends:
◀ Previous
Lancer 3 and 5: Brake system
Next ▶

Handbrake — device
Adjusting the brake light switch / brake pedal height
Replacing brake pipes/brake hoses
Bleeding the brake system
Brake fluid
ABS device
Technical data of the brake system
Diagnostics of brake system faults
Similar materials for other Mitsubishi models

➤ Checking the handbrake Mitsubishi Colt 4 and 5 (1991-2003)
➤ Adjusting headrests Mitsubishi Galant 6 and 7 (1987-1998)
➤ Adjusting the steering column angle Mitsubishi L200 4 (2005-2014, diesel)
➤ Checking and adjusting the brake pedal Mitsubishi Outlander 1 (2003-2008)
➤ Adjusting the front seat position Mitsubishi Pajero 1 and 2 (1982-1999)
➤ Checking and adjusting the tension of the generator drive… Mitsubishi Carisma (1995-2004)
Link in different formats to this article
Comments and feedback from visitors
No comments yet


Add up two numbers 22 + 24


Lancer 9 (2000-2007, petrol) 
  • General information
  • User manual
  • Maintenance
  • Power unit
  • Repair of MPI engines
  • Repair of GDI engines
  • Engine overhaul
  • Cooling and lubrication system
  • MPI fuel injection system
  • GDI fuel injection system
  • Intake and exhaust system
  • Starting and charging system
  • Transmission
  • Automatic gearbox
  • Variator (CVT)
  • Drive shafts and gearbox
  • Chassis and running gear
  • Front suspension
  • Rear suspension
  • Steering
  • Brake system
  • Body and interior
  • Doors, locks and windows
  • Exterior (external elements)
  • Interior (internal elements)
  • Electrical equipment
  • Heater and air conditioner
  • Security system SRS
  • Equipment and devices
  • Wiring diagrams (saloon)
  • Wiring diagrams (wagon)
Lancer 3 and 5 (1984-1992) 
  • General information
  • Maintenance
  • Power unit
  • Engine repair
  • Lubrication system
  • Cooling system
  • Ignition system
  • Fuel system
  • Carburetor
  • Fuel injection
  • Diesel power system
  • Exhaust system
  • Transmission
  • Clutch
  • Car gearbox
  • Chassis and running gear
  • Front suspension
  • Rear suspension
  • Steering
  • Brake system
  • Wheels and tires
  • Body and interior
  • Exterior (external elements)
  • Interior (internal elements)
  • Heating system
  • Electrical equipment
  • Equipment and devices
  • Power devices
  • Electrical circuits
MitsubishiMan.ru © 2018–2026 • Mobile version • Articles about Mitsubishi • Contacts • Sitemap: EN BG BY UA RS HR RO PL SK HU • Site search • Bookmark
Colt 2 and 3 (1983-1993) · Colt 4 and 5 (1991-2003) · Colt 5 (1995-2003) · Lancer 3 and 5 (1984-1992) · Lancer 9 (2000-2007) · Galant 5 (1983-1989) · Galant 6 and 7 (1987-1998) · L200 4 (2005-2014) · Outlander 1 (2003-2008) · Pajero 1 and 2 (1982-1999) · Pajero 4 (2006-2021) · Carisma (1995-2004) · Space Star (1998-2005) ·
This resource sets cookies 🍪 to avoid bothering you with repeated data entry.