
English Русский
Български
Беларускі
Український
Српски
Hrvatski
Română
Polski
Slovenský
Magyar
Articles Bookmark Contacts Sitemap   
Company Audi Company Ford Company Hyundai Company Kia Company Mazda Company Mercedes-Benz Company Nissan
MitsubishiMan.ru


Home Colt Lancer Galant L200 Outlander Pajero Others
Lancer 9 (2000-2007, petrol) Lancer 3 and 5 (1984-1992)

Checking glow plugs (Mitsubishi Lancer 3)

  • Home
  • Lancer
  • 3 (1984-1992)
  • Power unit
  • Diesel power system
  • Checking glow plugs
0
Contents: Checking the power supply ⤓ Checking glow plugs ⤓ Glow plugs with burnt heating rods ⤓
Glow plugs are checked when there are difficulties starting the engine.

Test condition: the battery must be fully charged, the battery voltage must be at least 12 V. The engine is cold (ambient temperature) or the engine temperature must not be higher than 55°C. At higher temperatures, disconnect the coolant temperature sensor connector.

Checking the power supply


This check can be performed without removing the glow plugs.
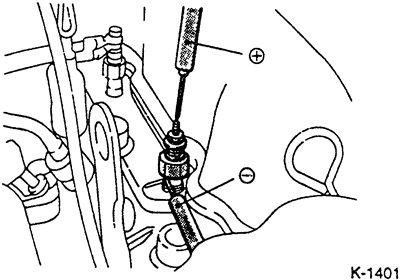


Connect the voltmeter to the current bus of the glow plug keys and the spark plug body.

Turn on ignition. Warm up the engine (preheat). The voltmeter should show battery voltage (9 V or higher) for about 3 seconds. The time depends on the glow plug temperature and battery voltage.

Start the engine and let it idle. During the start and for about 180 seconds after that, the voltmeter should indicate battery voltage (9 V or higher).

If there is a power failure, have the pre-heater control unit checked at a specialist workshop.

Checking glow plugs


Check the current busbar for corrosion, otherwise clean or replace.


Check the glow plug for any external visible damage.

Remove the connection wire and the current bus.

Measure the resistance between the glow plug contact and the glow plug body with an ohmmeter. The required value is about 0 Ohm. If the resistance is 00, replace the glow plug.

Check all glow plugs in the same way.

Note: Normal spark plug resistance is very low and difficult to measure with conventional ohmmeters. Required value: 0.235 Ohm. Clean the spark plug from oil before measuring.


Connect the wire and the current bus.

If it was disconnected, connect the coolant temperature sensor connector.

Note: If no defect is found, although the engine continues to start poorly, perform an external inspection of the glow plugs during warming up. To do this, remove the injectors and observe the glow plugs through the holes.


Glow plugs with burnt heating rods


Burnt glow plug rods are often caused by faulty injectors. Such damage should not be attributed to an internal or external defect in the glow plug.
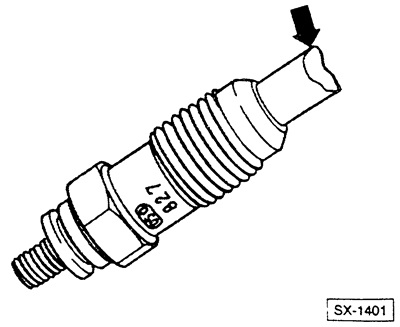


If such glow plugs are found -arrow-, it is not enough to replace them. In this case, it is also necessary to check the injection nozzles for injection pressure and tightness (workshop work).
This article is available at: russian, bulgarian, belarusian, ukrainian, serbian, croatian, romanian, polish, slovak, hungarian
This article was reviewed by: Dmitry Vasiliev
Share with friends:
◀ Previous
Lancer 3 and 5: Diesel power system
Next ▶

Preheating device
How a diesel engine works
Removal and installation glow plugs
Fuel supply
Checking and replacing the fuel shut-off valve
Checking / adjusting the idle speed
Injection system — device
Similar materials for other Mitsubishi models

➤ Glow Plugs — Checking Mitsubishi Colt 4 and 5 (1991-2003)
➤ Checking the condition and replacing spark plugs Mitsubishi Galant 6 and 7 (1987-1998)
➤ Glow plugs Mitsubishi L200 4 (2005-2014, diesel)
➤ Removal, Checking and Installing the Oil Pan (2WD Models) Mitsubishi Outlander 1 (2003-2008)
➤ Drive Belts — Checking and Adjusting Tension Mitsubishi Pajero 1 and 2 (1982-1999)
➤ Checking and cleaning spark plugs Mitsubishi Carisma (1995-2004)
Link in different formats to this article
Comments and feedback from visitors
No comments yet


Add up two numbers 30 + 30


Lancer 9 (2000-2007, petrol) 
  • General information
  • User manual
  • Maintenance
  • Power unit
  • Repair of MPI engines
  • Repair of GDI engines
  • Engine overhaul
  • Cooling and lubrication system
  • MPI fuel injection system
  • GDI fuel injection system
  • Intake and exhaust system
  • Starting and charging system
  • Transmission
  • Automatic gearbox
  • Variator (CVT)
  • Drive shafts and gearbox
  • Chassis and running gear
  • Front suspension
  • Rear suspension
  • Steering
  • Brake system
  • Body and interior
  • Doors, locks and windows
  • Exterior (external elements)
  • Interior (internal elements)
  • Electrical equipment
  • Heater and air conditioner
  • Security system SRS
  • Equipment and devices
  • Wiring diagrams (saloon)
  • Wiring diagrams (wagon)
Lancer 3 and 5 (1984-1992) 
  • General information
  • Maintenance
  • Power unit
  • Engine repair
  • Lubrication system
  • Cooling system
  • Ignition system
  • Fuel system
  • Carburetor
  • Fuel injection
  • Diesel power system
  • Exhaust system
  • Transmission
  • Clutch
  • Car gearbox
  • Chassis and running gear
  • Front suspension
  • Rear suspension
  • Steering
  • Brake system
  • Wheels and tires
  • Body and interior
  • Exterior (external elements)
  • Interior (internal elements)
  • Heating system
  • Electrical equipment
  • Equipment and devices
  • Power devices
  • Electrical circuits
MitsubishiMan.ru © 2018–2026 • Mobile version • Articles about Mitsubishi • Contacts • Sitemap: EN BG BY UA RS HR RO PL SK HU • Site search • Bookmark
Colt 2 and 3 (1983-1993) · Colt 4 and 5 (1991-2003) · Colt 5 (1995-2003) · Lancer 3 and 5 (1984-1992) · Lancer 9 (2000-2007) · Galant 5 (1983-1989) · Galant 6 and 7 (1987-1998) · L200 4 (2005-2014) · Outlander 1 (2003-2008) · Pajero 1 and 2 (1982-1999) · Pajero 4 (2006-2021) · Carisma (1995-2004) · Space Star (1998-2005) ·
This resource sets cookies 🍪 to avoid bothering you with repeated data entry.